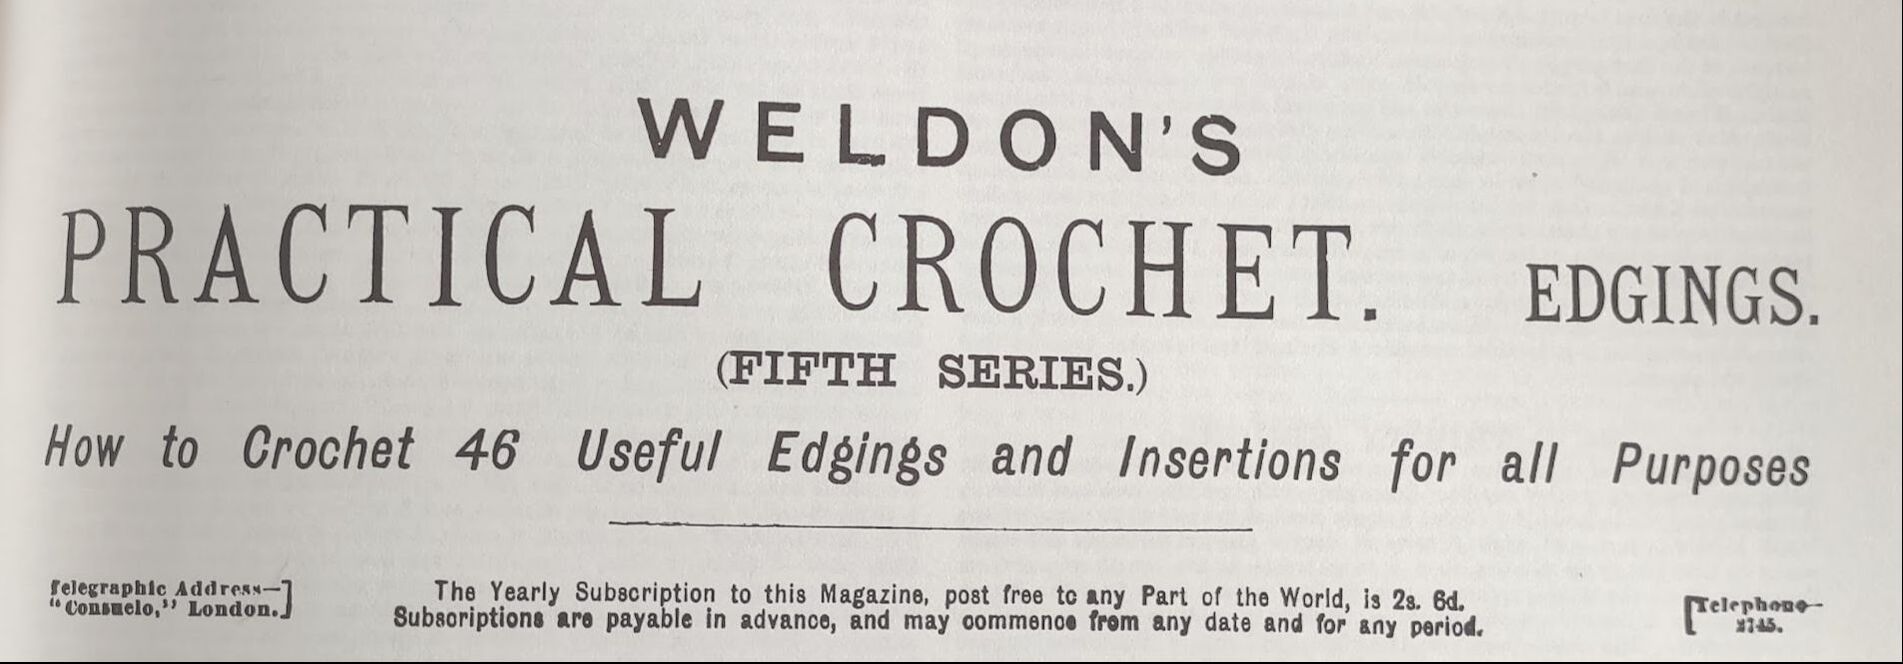
 This week's series is full of useful edgings and insertions. They have numbered them so it's easy to see that there are 46 of them. They range from highly detailed to much more simple edgings. This week I'm sharing a sampling of them. The series starts out with this one called a Mussel-Shell Border. Like many of them it starts by saying "begin with a foundation of chain the length required". This looks like you would need a multiple of something and they don't mention what that might be. This particular edging is 12 rows. 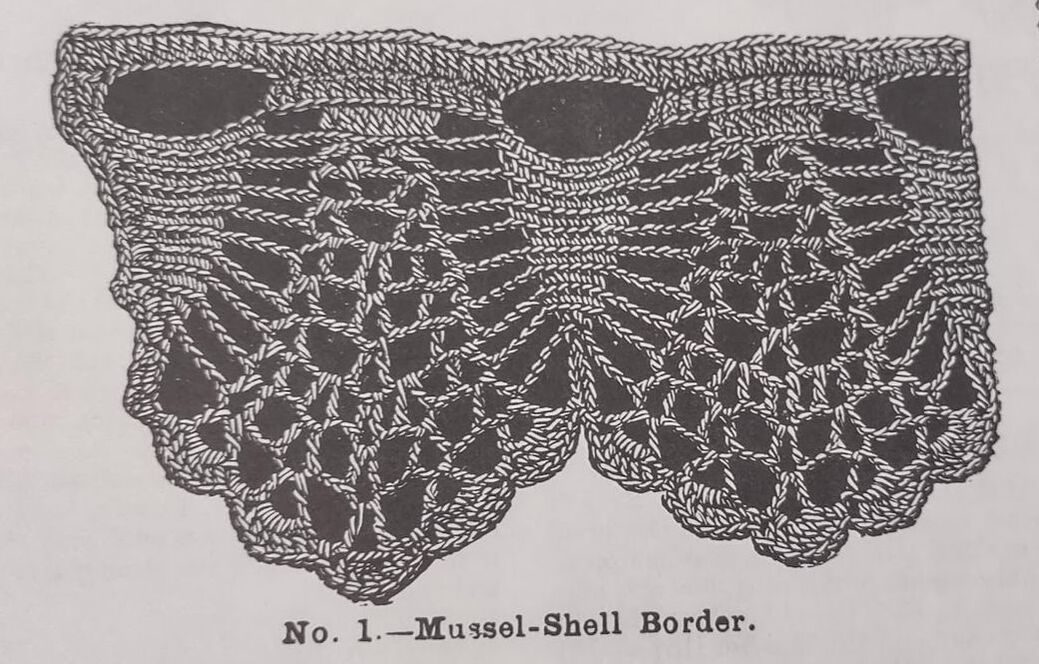 Some of the edgings have you start with 'mignardese braid'. This seems to refer to a braided edging that you can buy. Both No 4 and No 5 below start with some kind of fancy braid and then work into it to. This seems like an excellent way to avoid making a foundation row if that's something you don't enjoy. No. 6, Spider-Web Edging, is described as a "strong, pretty edging for underlinen". 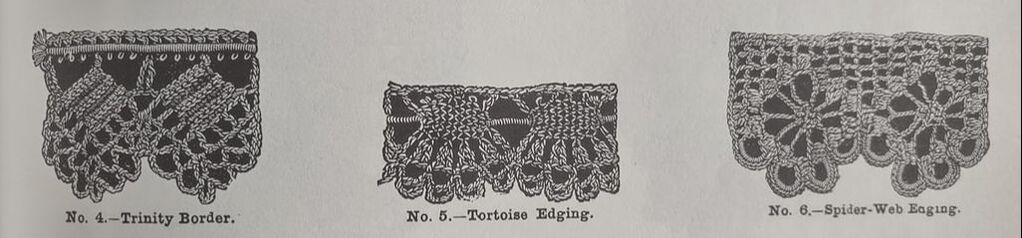 The Jubilee border below is done sideways or "the short way". They add the last bit of edging at the end. The Waterfall Border looks pretty but it seems a little more complicated.  The middle of the series has two pages of illustrations of the different edgings. Here's one page of them. This one includes a fancy fringe for a quilt or a toilet cover (bottom right). 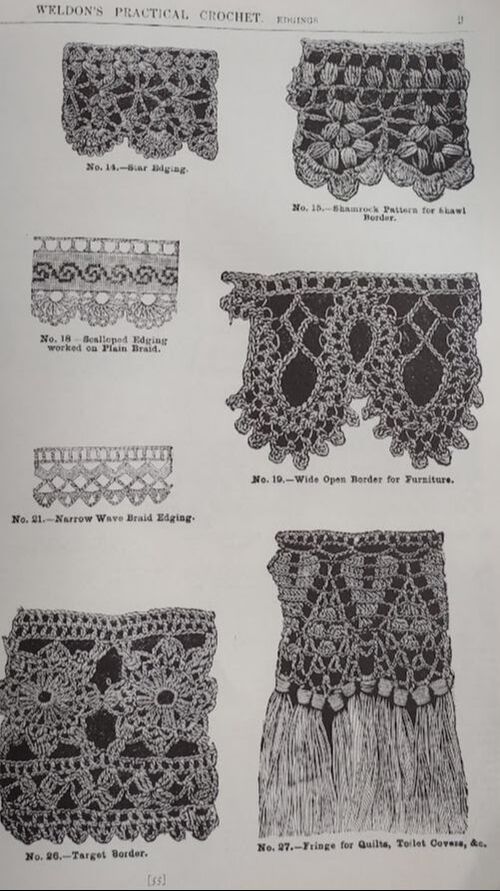 These seem a little simpler and most are done with a braid to start.  I wasn't sure I wanted to try one of the edgings because I didn't have anything to use it for at the moment but I did end up picking one and doing a small sample of it for next week. It is called Polo Edging and I'll have that next week!
0 Comments
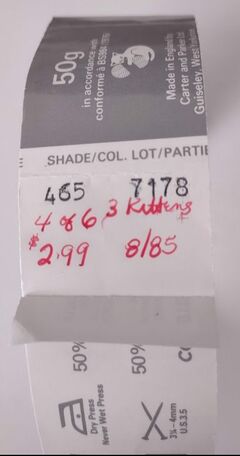
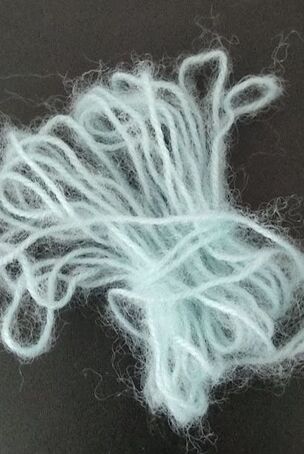
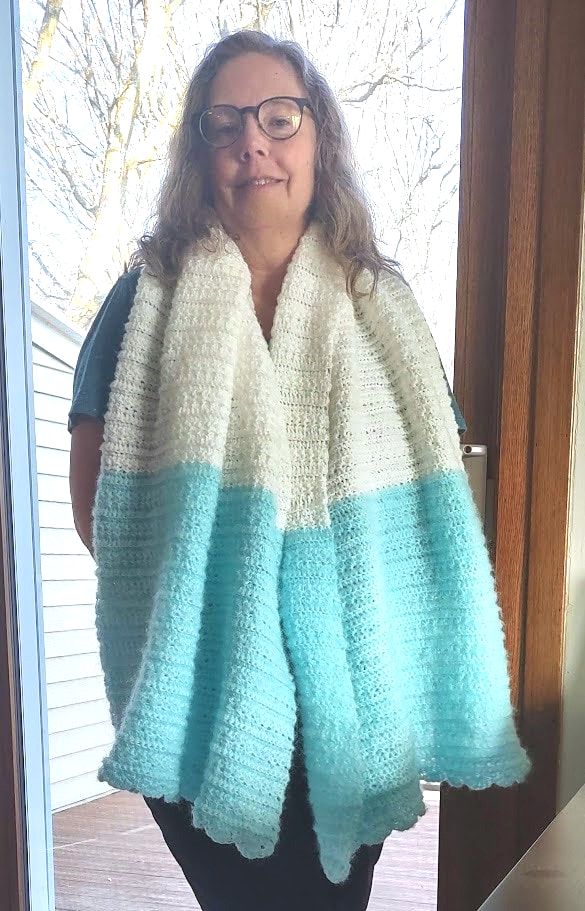
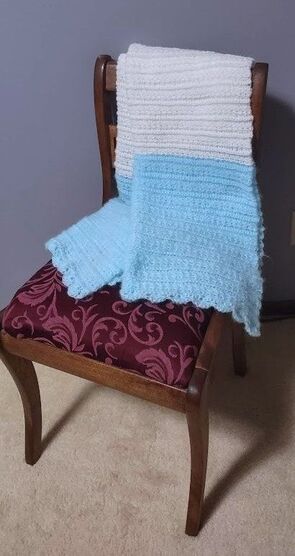
This week I pulled some stitch patterns from the fourth and second series. I attempted to follow the directions for the Lewis Point stitch pattern from the fourth series and the Beehive stitch pattern and the Rice stitch pattern from the second series. Let's see how that went. For all of these I used a 4.5mm hook and worsted weight yarn from my scrap bag. I'm pretty sure it was all Red Heart Super Saver. 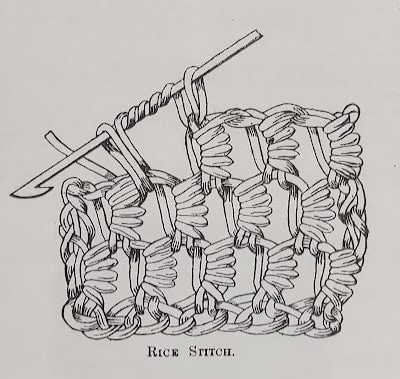 The Rice Stitch pattern seemed like it would be a quick and easy stitch pattern to work up and it actually was. It's not that easy to get the hook through all of the loops on it but it makes an interesting pattern. Start with a chain for whatever length you need. Wrap the yarn around the hook five times and insert into the fourth chain from the hook, yarn over and draw the yarn through all of the loops on the hook, chain one, skip the next chain in the foundation and repeat the stitch. Rows after that are started with a chain three and the rice stitch is worked under the chain stitch of the previous row. This looks similar to a Bullion Stitch.  The next one I tried was the Beehive pattern. Here's the illustration. 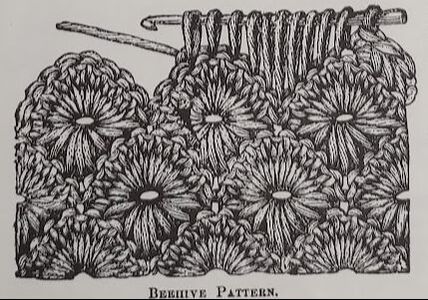 My version is pretty close. The back of mine looked more like their illustration so that's what I'm showing in the photo. This one is a little longer to write out so I'm not going to do that today but if you're interested in having that pattern written out, let me know and I'll work on that for a future post. 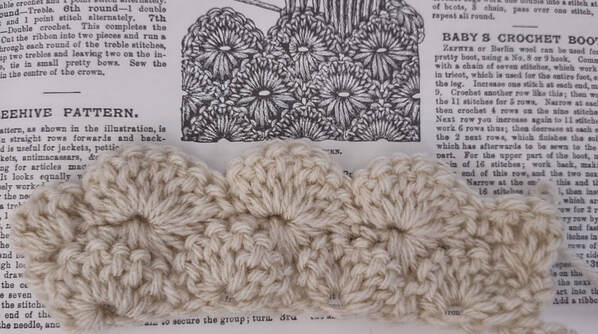 And last we have the Lewis Point pattern. 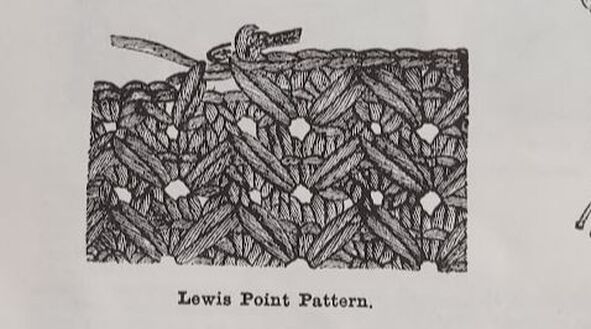 This one didn't go so well. I had trouble getting things to line up with their directions and I only had one stitch at the end when they said I should have two. I did it in two different colors so you can see where the points are a little easier. The whole thing leans even though I have 12 stitches per row. (I chained 13 and started my first single crochet in the second stitch from the hook). I have no idea what I did wrong. I tried different numbers of stitches between the points. After trying this a number of times this was the best I could come up with. 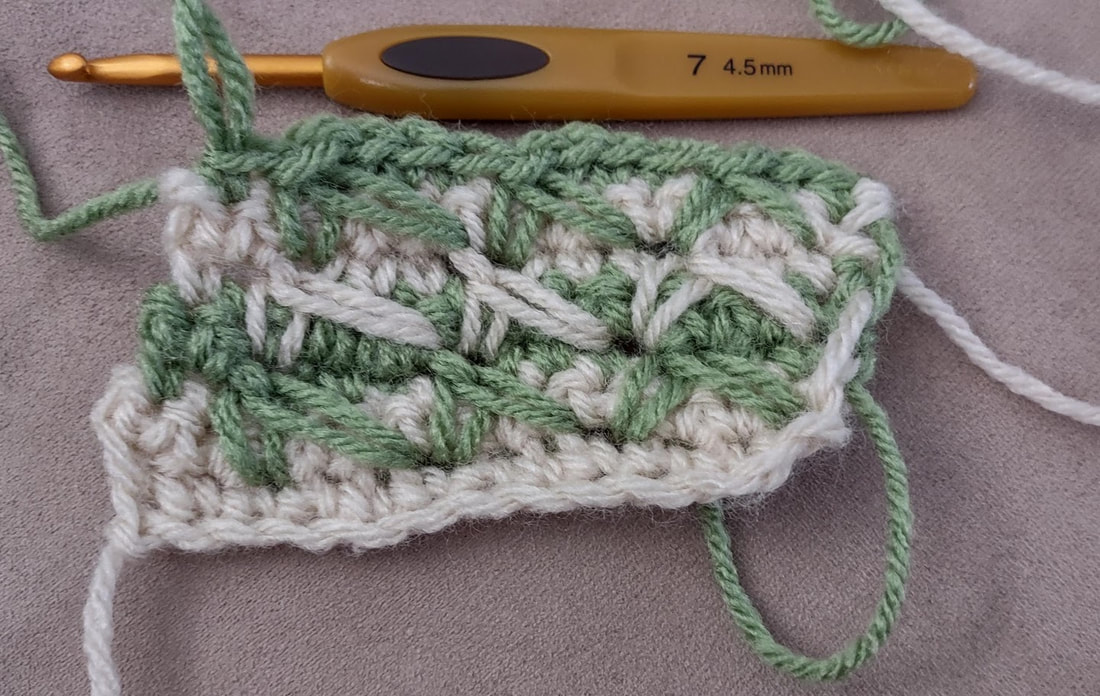 There's no rating this time since it's three stitch patterns and not a finished item. I did enjoy the first two stitch patterns but the third one was frustrating. It seems like it could be an interesting pattern if I could get it to work. Here's a photo of the Lewis Point directions if you want to try it. Don't forget this is UK terms and let me know how it goes. 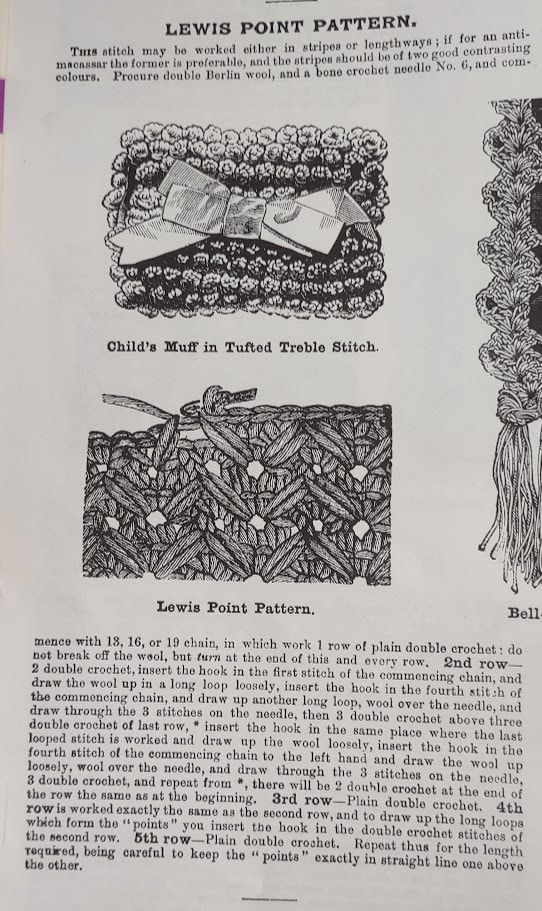  28 Articles and 38 Illustrations! They must be making up for the previous lack of illustrations. This variation surprised me so I counted the number of articles including stitch patterns and the number of illustrations and I came up with very different numbers. I got 36 patterns and three of those are stitch patterns. There are only 30 illustrations. This is the first time I've checked their count of patterns but maybe they think only 28 of the patterns are "Useful Articles". That leaves eight that aren't useful. Maybe they aren't counting the stitch patterns? Maybe it's backwards and should be 38 articles and 30 illustrations. That would be closer. I guess we'll just say even Weldon's made mistakes. The first pattern in this series takes up almost two pages. It's an Outdoor Pelisse for a Young Child that is 24 inches in length. They say, "Every stitch of the working is here given, so that not the slightest difficulty can be experienced." I'm not going to test that. It is worked in tricot, aka Tunisian and the trimming is "looped knitting in imitation of astrachan." According to Wikipedia, astrachan or the alternative astrakhan is "closely-curled black or gray fleece of very young karakul lambs from Astrakhan" (a place in Russia). 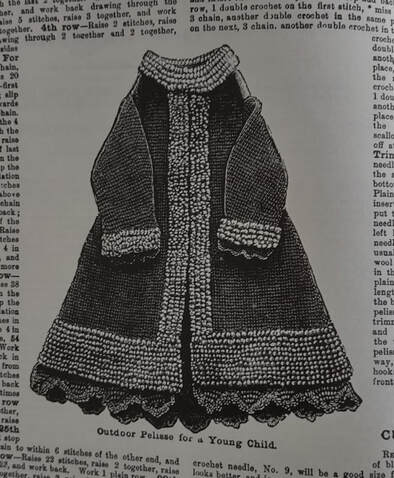 Here are few more of their useful articles. The Hand-bag is made from macrame twine. The boots are made in white and scarlet fingering yarn and the blanket is done in "fancy tricot" with contrasting colors. They suggest fawn and blue. 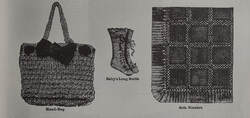 There were two things that weren't quite projects but I thought were interesting. One was a watch guard made with purse silk and black beads. The other was a sleeve holder. 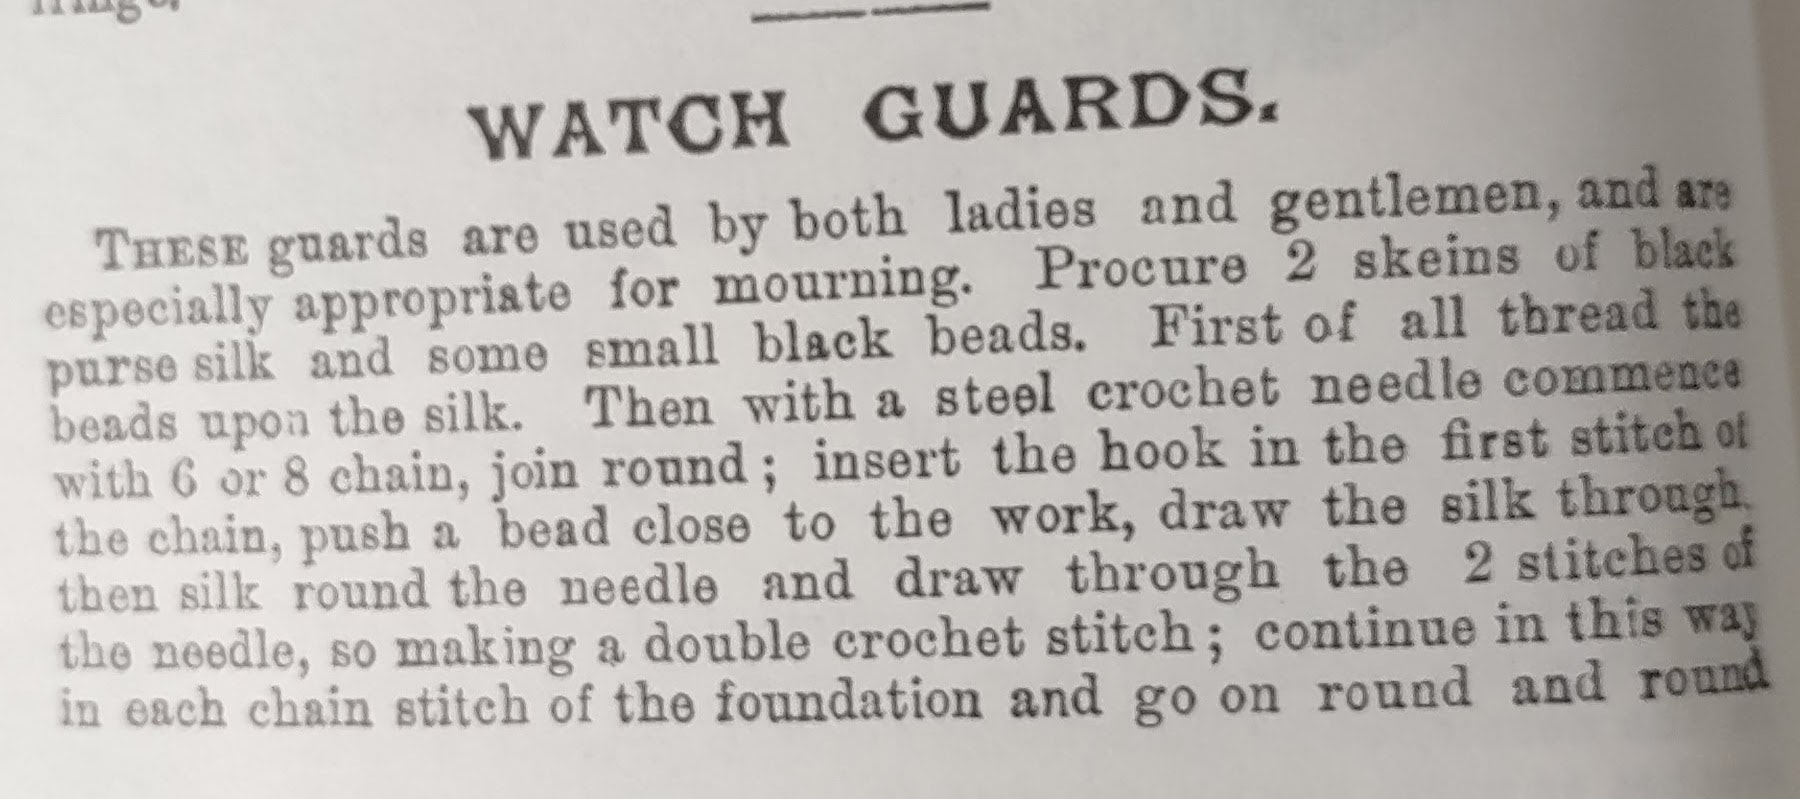 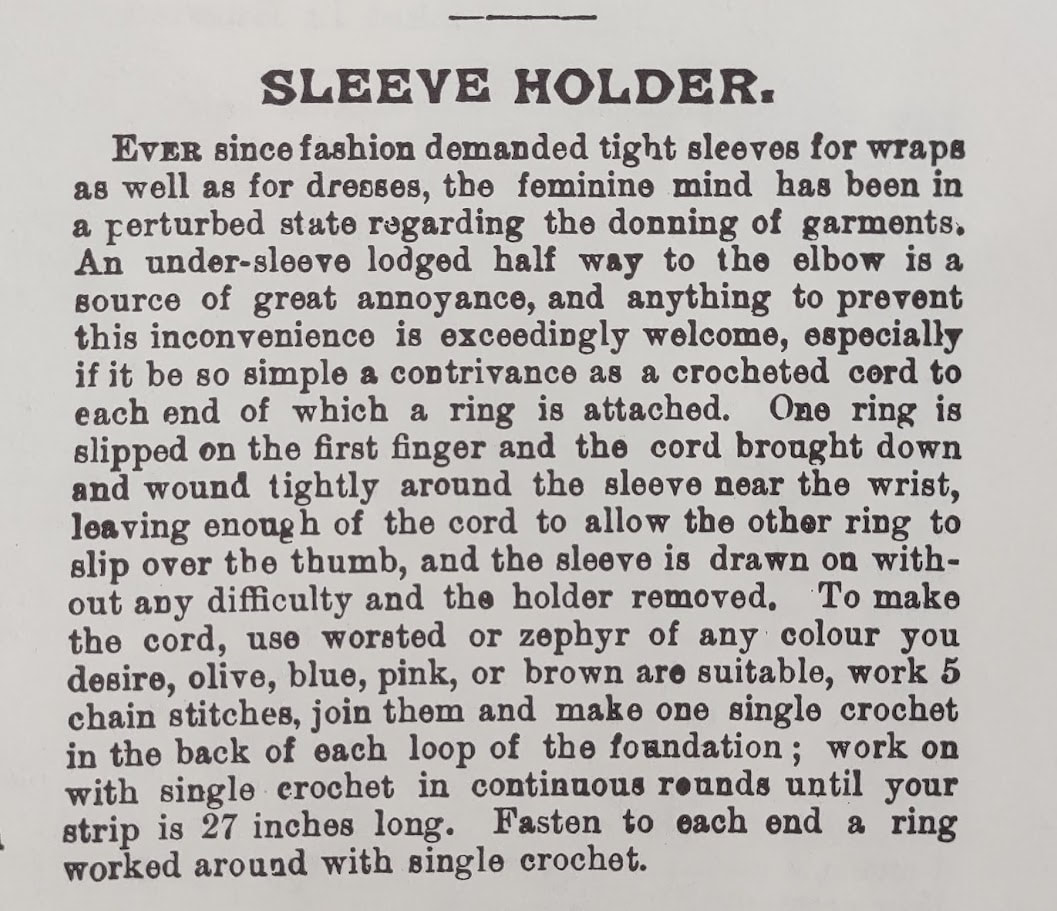 The obvious thing for me to try is a hat right? There is this Venetian Cap in this edition: 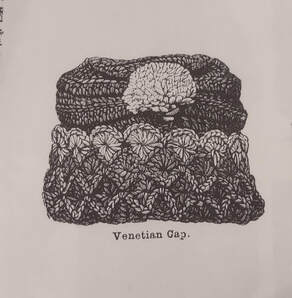 I decided not to make it but if you want to see one completed, Just Vintage Crochet on YouTube made one. I had a hard time picking something out of this series. Everything was either time consuming, done with fingering weight or was something like an insertion that didn't seem practical. After paging through this series multiple times I decided that I'm doing a stitch pattern from this series and two more from a previous series. The one from this series is called Lewis Point. The others are the Rice Stitch and the Beehive Stitch from the second series. Next week we'll see if mine looks as nice as their illustration! 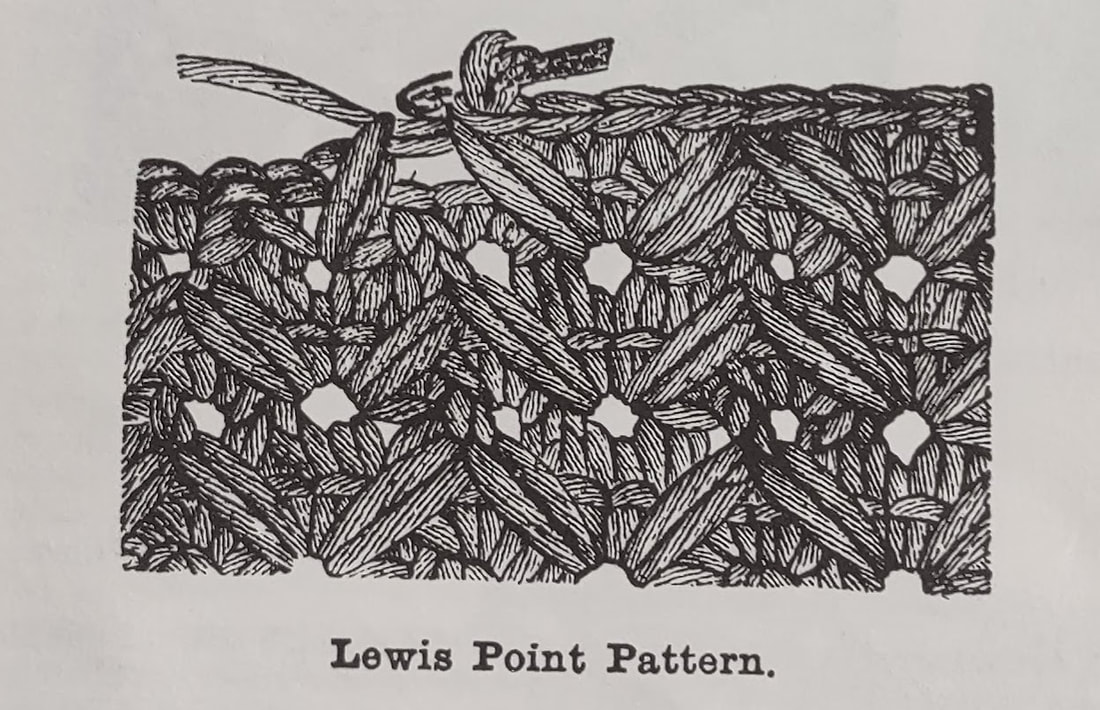 For the Third Series project I chose the Cloud. The Cloud is described as a "light and elegant wrap" and there is no illustration of the finished item. They ask you to procure 8 oz of white 3-thread Lady Betty Wool and a No 9 bone needle. The glossary in the front says that a modern substitute for that is worsted or mohair yarn and the recommended aluminum needle is an H-J or 5-6mm hook. On the Bell Gauge a 9 is equivalent to an F and that seems pretty small for worsted weight yarn so I went with an I. I had four 50 gram skeins of Unger Fluffy, a worsted weight yarn with a definite halo but not quite mohair-like, so I used that to start the wrap. 200grams is about 7 ounces so I thought it would be close enough. The directions are fairly simple for the main part of the wrap. It is all done in back loop and it's three rows of single crochet and one row of what we would call a star or daisy stitch. It's worked from one side to the end and then you join to the starting chain and work the other side.  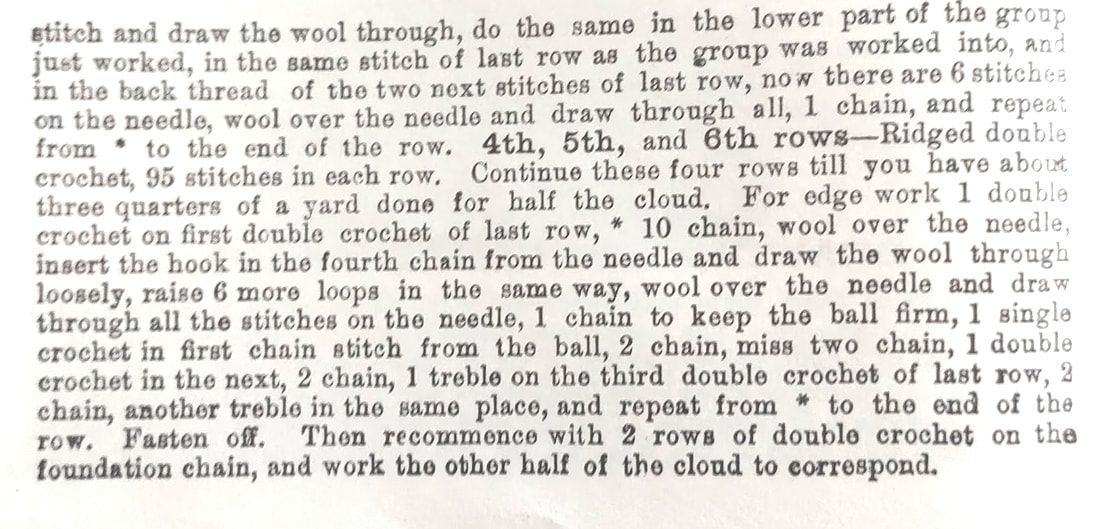 After I finished the first two skeins of Unger Fluffy I had only 15 inches completed and the pattern asked for 27 inches so I knew I wasn't going to have enough yarn. I worked the other side and then waited for the Textile Center Garage Sale hoping I'd find some to finish it. The garage sale had Unger Fluffy but only in brown and i didn't think that was a good option for a cloud. Instead, I picked up 5 skeins of Dolce by Wendy in a light turquoise color donated by someone who wrote the date they bought it, the location, the amount purchased and the cost on the band. I ended up picking up several groups of this particular person's yarn donation and used one of them for a baby layette.
I now had an additional 8.8 ounces to finish the wrap so I did two skeins on each side thinking it wouldn't take more than one for the edging. Dolce is a very fuzzy yarn and difficult to pull out so I tried to figure out the edging with different yarn first. I had a lot of trouble figuring out where some of the stitches were supposed to go. I was fine for this part (stitches changed to US terms) "work one single crochet on the first single crochet of the last row, *10 chain, wool over the needle, insert the hook in the fourth chain from the needle and draw the wool through loosely, raise 6 more loops in the same way, wool over the needle and draw through all the stitches on the needle, 1 chain to keep the ball firm." After that I just couldn't quite figure out what to do. At this point you've used all of the chain stitches you made but you need to slip stitch in the first chain stitch from the ball, make 2 chains, miss two chains, 1 single crochet in the next, 2 chain, 1 double on the third single crochet from the last row. I tried turning and doing the slip stitch and single crochet in the same 10 chains but that didn't work well. I tried shortening the "ball" and doing the slip stitch, chain 2, single crochet in the last chain left. I thought that would work so I tried it and it used almost a skein to finish the row which meant that I wouldn't have enough to do the second side. This is where an illustration would have been helpful. I ended up pulling this version out which took some time since those extra fuzzy fibers like to stick to each other. 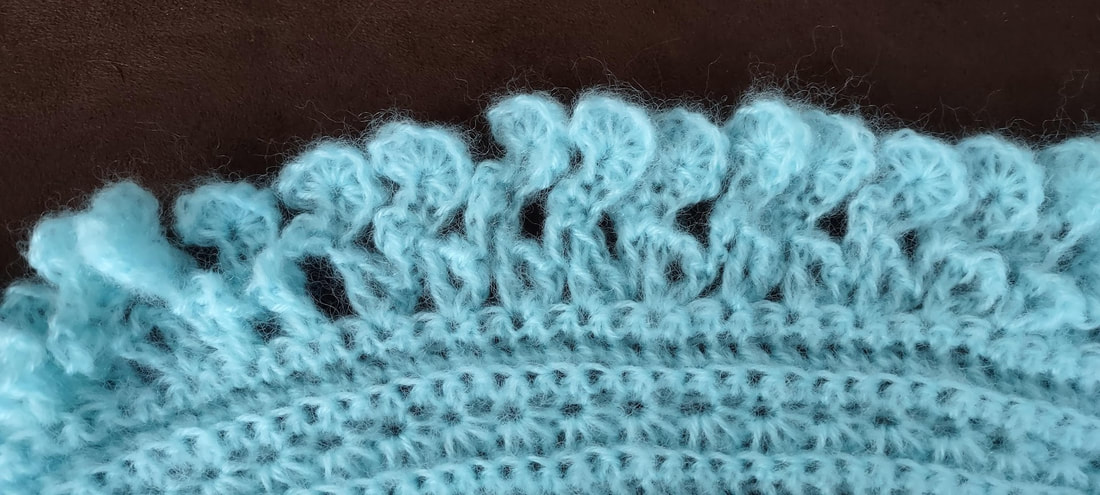 After looking at some of the other edgings in the book I decided I would just use a simple shell stitch for edging. I had 4 grams of yarn left when I was done with the new edging. The finished wrap was supposed to be 54 inches and mine is 66 inches by 20 inches. I could have stopped when I got to the right size but I thought I'd finish the two skeins of Dolce on each side to use it up. I'm not sure I would call this light and airy but I also used almost twice the yarn they asked for. It was 15.7 ounces at the end vs the 8 ounces they said I would need. Here is the finished wrap:
The color in the first photo is more accurate. It's more turquoise than sky blue. While the border was a little frustrating this wasn't difficult to make. It did take a lot longer than most of my projects and I was happy to be done with the fluffy yarn.
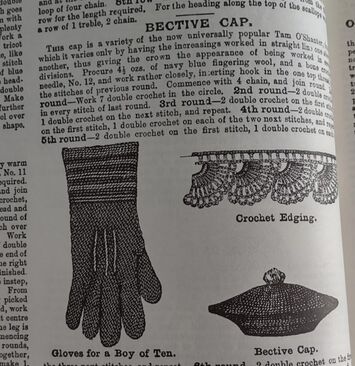
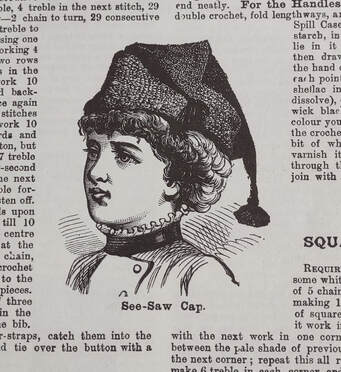
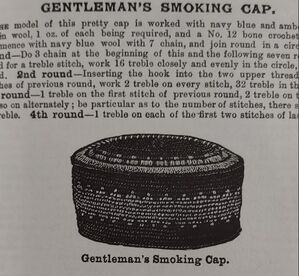
Was the pattern easy to understand? Yes, except for the border. I thought their description of how to do the special stitch aka star stitch in this was pretty good. 0.75 Does it look like the illustration? No photo so it gets a 0.5 Would someone wear or use this? Yes. 1.0 Did I enjoy making it? Yes, until I had to pull out the Dolce on the border. I think if I'd chosen easier yarn to work with I would have enjoyed it more. I'm not going to mark it down for that since the yarn was my choice and I knew what I was getting into. 1.0 Total Score = 3.25 out of 4.0  This time we have 47 items and only 38 illustrations. Some of the patterns without photos include more common things they would make like baby boots, a shawl and some mats. Others seem a little more complicated but there is probably a general shape that they're familiar with like the Petticoat for a Child of Two and a Child's Petticoat with Bodice. Here are some of the patterns that I think are fun. There are several hats in this series including a Pretty Hat for a Baby Boy, a Bonnet for a Baby and the ones show below; the Bective Cap, the See-Saw Cap, the Gentleman's Smoking Cap and the Boy's College Cap. I considered making the Smoking Cap but I thought it might turn out to be more of a basket than a useful hat.
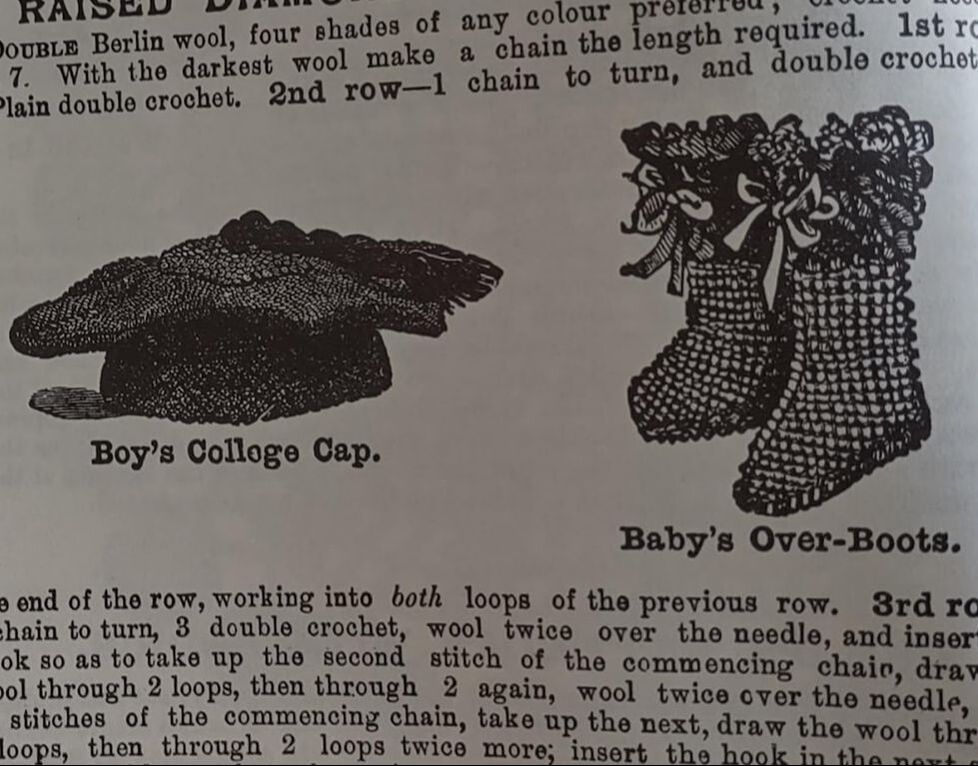
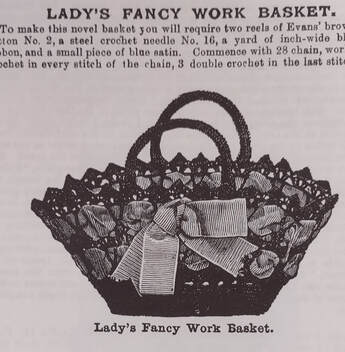
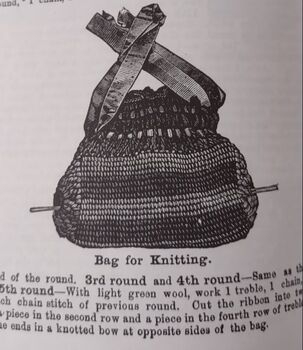
Speaking of baskets there are a few baskets/bags in this series. The Spill Case is described as a "pretty novelty to work for bazaars or presents." There's a Fancy Work Basket done in thread with large ribbons. But, my favorite is the Bag for Knitting. It says it's perfect for knitters because it will hold any size needle. It has openings on the side to accommodate the needles and, I assume, so you can easily pull out your needles for personal defense. I'm assuming that they suggest using cherry colored wool because it will hide the blood stains more easily. 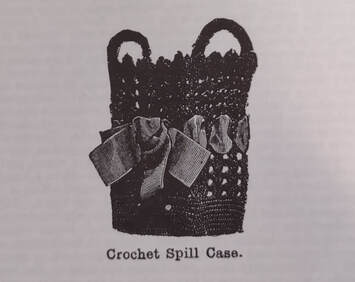
This Tippet Worked in Point Muscovite was an interesting combination of a shoulder cape with a muff attached by ribbons. 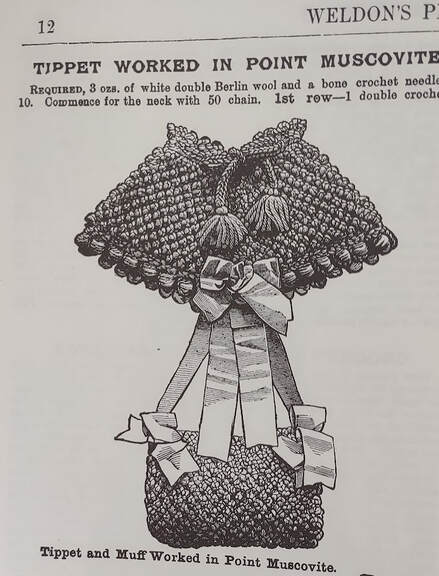 For next week's project, I'm going to attempt one of the patterns with no photo again. It's called "Cloud" and is described as a light and elegant wrap. This is one of the bigger things I'll make from the Weldon's Series. The finished size is about 1 1/2 yards plus an edging. We'll see if it's really is light and elegant!
|
Proudly powered by Weebly