CRAFT ACROSS TIME
  • Home
  • About
  • Contact
  • Blog
  • Home
  • About
  • Contact
  • Blog

Crochet Square for a Quilt - Weldon's Second Series

2/24/2024

0 Comments

 
I chose to make the "Crochet Square for Quilt With Four Diamonds of Raised Treble Stitches". Weldon's describes it as a "handsome square" and it's worked with something called Strutt's knitting cotton No. 6 and a steel crochet needle No. 15.  
Picture
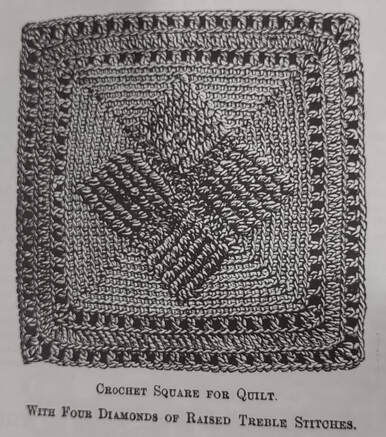
I couldn't find any source that could tell me what the equivalent crochet thread would be. I could find photos of Strutt's No. 4 and No. 8 but it was hard to gauge the size of the thread in the photos. The beginning of this book lists several Victorian cottons and substitutes but not Strutt's.  The hook size didn't help much because what I think of as a size 15 steel hook is very small and would be used for a size 100 thread (a very fine thread) and from what I could tell between the two Strutt's sizes I could find the No. 8 wouldn't fall into that range. And then I noticed that the headline on the series said, "The sizes of Crochet Hooks mentioned in the descriptions are regulated by Walker's Bell Gauge." I found the photo below on the website for the Victoria and Albert Museum, London. It isn't a Walker's Bell Gauge but it is a bell gauge. In "Everyone His Own Knitting Needles" by Colleen Formby there is a comparison chart on page 8 that says the slot labeled 15 is usually 1.75mm on most bell gauges. 

Picture
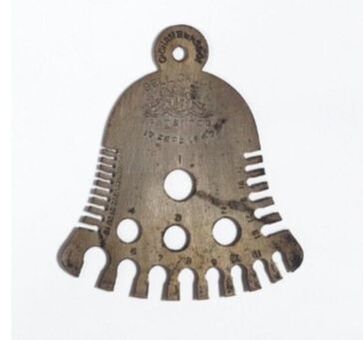
photo from the Victoria and Albert Museum, London
So now working backwards from the hook size, crochet thread size 10 seems like a pretty good choice. I went with a 1.65mm hook (aka size 7 steel hook) since that's what I usually use for size 10 thread. ​
Picture
The instructions for this were actually pretty good. I tried starting with 4 chains and working the single crochets into them but ripped it out and went with the magic circle to start. Starting in the 2nd round we are working in into the back loop only for the rest of the square. They say to work into the "one top thread" of the stitches and it seemed like that meant back loop only but having the photo in this case was very helpful. They don't really say to keep doing that but the photo clearly shows the front loops that aren't worked into. Here are my notes that I followed after re-writing it in lines/rounds and switching to US terms.
Quilt Square with Four Diamonds of Raised Treble Stitches
Join all rounds, crochet into the back loops. Start with 4 chains, joined to make a circle
  1. 2 sc in each chain, 8 sc in all and join at the end of this and every round
  2. Working into the one top thread, 3 sc on the first stitch, 1 sc in the next, repeat three times
  3. 3 sc on the center stitch of the three sc of the last round (which will be a corner stitch), 3 consecutive sc along the side of the square, * 3 sc on the next corner stitch, 3 sc along the next side of the square and repeat from * twice; 24 sc in all
  4. 3 sc on the corner stitch, 2 consecutive sc, 1 dc on the front of the work in the center stitch along the side of the second round, 2 consecutive sc and repeat three times
  5. 3 sc on the corner stitch, 2 consecutive sc, 1 dc into the third round, 1 sc, 1 dc into the third round, 2 consecutive sc and repeat
  6. 3 sc on the corner stitch, 2 consecutive sc, 1 dc into the fourth round, 1 sc, 1 dc over the dc in the fourth round, 1 sc, 1 dc into the fourth round, 2 consecutive sc and repeat
  7. 3 sc on the corner stitch, 2 consecutive sc, 1 dc into the fifth round, 1 sc, 1 dc over the dc in the fifth round, 1 sc, 1 dc into the fifth round, 2 consecutive sc and repeat
  8. Repeat as round 7 increasing the diamond of raised double stitches
  9. Repeat as round 7 increasing the diamond of raised double stitches
  10. 3 sc on the corner stitch, 4 consecutive sc, 1 dc into the eighth round, then 1 sc and 1 dc alternately four times, 4 consecutive sc and repeat, contract the raised diamond in the manner until in the 14th found it is reduced to a point of 1 dc.
  11. See 10 (6 consecutive)
  12. See 10 (8 consecutive)
  13. See 10 (10 consecutive)
  14. See 10 (12 consecutive)
  15. 3 sc in the corner stich, 27 sc along the side of the square and repeat
  16. 1 sl stitch to shape the corner, which tighten in to rend the junction invisible, 4 chain, 1 dc in the corner stitch, * 1 chain, miss one sc, 1 dc on the next stitch and repeat from * until you have 14 dc along the side, then 1 chain, and work 3 dc in the corner stitch with a chain between each dc and repeat from the first asterisk
  17. 1 dc on every stitch along the sides of the square and for the corners work 3 dc on the corner stitch and 2 dc on the stitch on each side of the corner stitch
  18. Same as the sixteenth round only there will be 18 dc to come in along each side

​Here's what I ended up with. Size 10 thread with a 1.65mm hook gives you a square that's about 5 inches. I'm planning on making a few more quilt squares as they come up in future series. Hopefully I'll be able to put them together into something interesting.
Picture
Time for the score:
Is the pattern easy to understand? Yes. Aside from not knowing what they thought I should use as thread and a hook, the directions themselves were pretty good. 1.0
If there was a gauge... No gauge give 0.5
Does it look like the illustration? Yes! 1.0
Would someone wear (or use) this? Yes. 1.0
Did I enjoy making it? I did! 1.0

Total is 4.5. Not a bad score for this little square!
0 Comments


Leave a Reply.

      Sign up here to get an email when I post something new!

    Subscribe to Newsletter

    Author

    I'm from Minnesota and have been crocheting since 2003.  I inherited a box full of Workbasket Magazines from my mother-in-law and became obsessed with the vintage patterns.  

    Archives

    March 2025
    February 2025
    January 2025
    December 2024
    November 2024
    October 2024
    September 2024
    August 2024
    July 2024
    June 2024
    May 2024
    April 2024
    March 2024
    February 2024
    January 2024
    December 2023
    November 2023
    October 2023
    September 2023
    August 2023
    July 2023
    June 2023
    April 2023
    March 2023
    February 2023
    January 2023
    December 2022
    November 2022
    October 2022
    September 2022
    August 2022
    July 2022
    June 2022
    May 2022
    April 2022
    March 2022
    February 2022
    January 2022
    September 2020
    August 2020
    July 2020
    June 2020
    May 2020
    April 2020
    March 2020
    February 2020
    January 2020
    December 2019
    November 2019
    October 2019
    September 2019
    August 2019
    July 2019
    June 2019
    May 2019
    April 2019
    March 2019
    February 2019
    January 2019
    December 2018
    November 2018
    October 2018
    September 2018
    August 2018
    July 2018
    June 2018
    May 2018
    April 2018


    Ravelry: aronningen
Proudly powered by Weebly