|
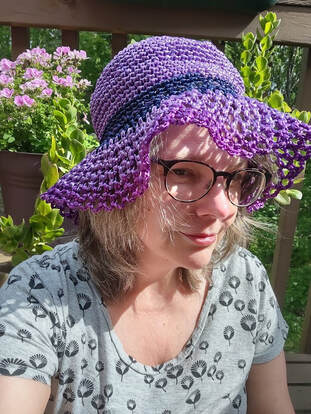
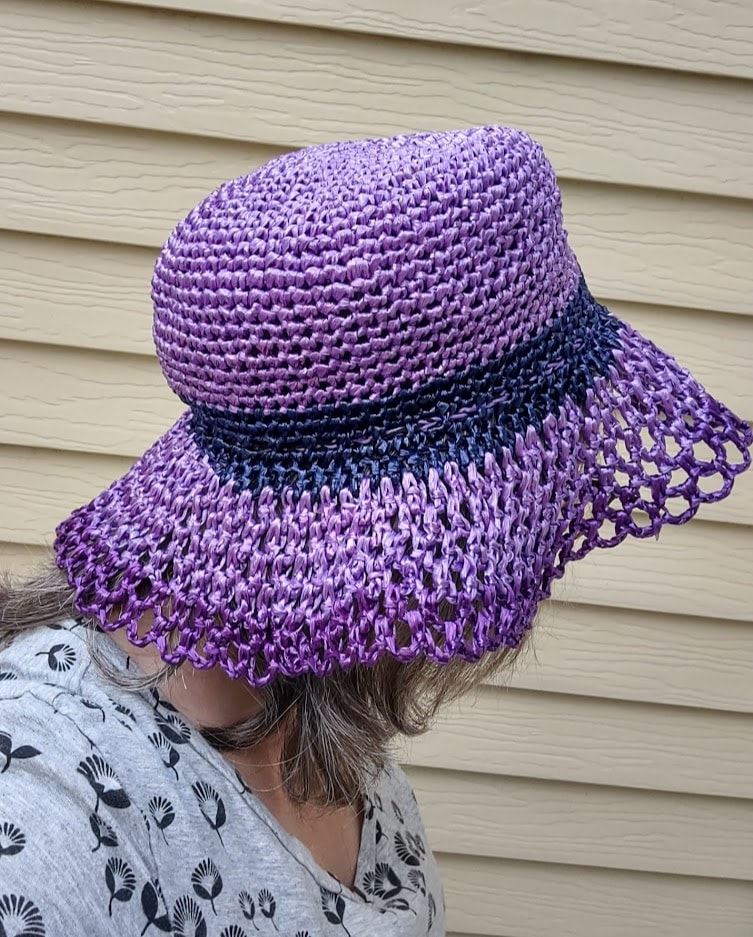
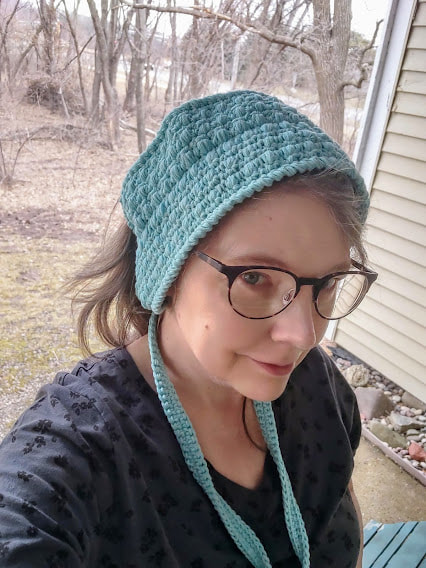
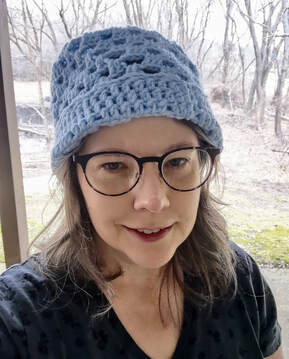
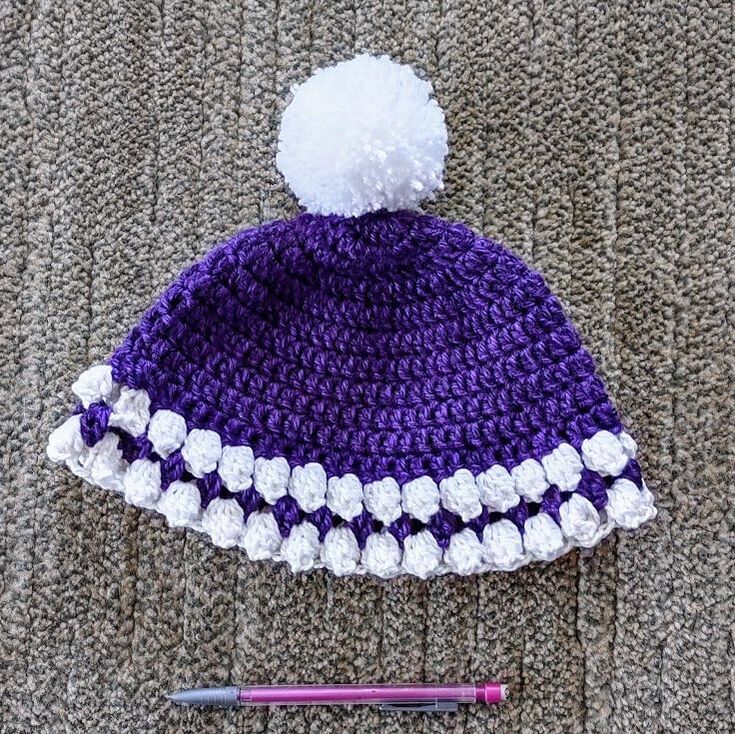
This week's hat is from a flyer I bought at Vintage Knits; "Bucilla's easy-to-crochet Bonnets and Bags". When I got it I realized all of the patterns except one use a specific type of fiber to make them. It was something I'd never heard of called StrawTex. StrawTex is 100% viscose rayon, a fiber made from wood pulp. I managed to find some StrawTex and HiStraw (I'll use that for next week's hat) on eBay at about $1 per skein and it included the perfect color to make the purple sun hat on the bottom right of the cover. While some of the other hats would have used less Strawtex, I wasn't sure that some of those beanie type hats would be more than just decorative. 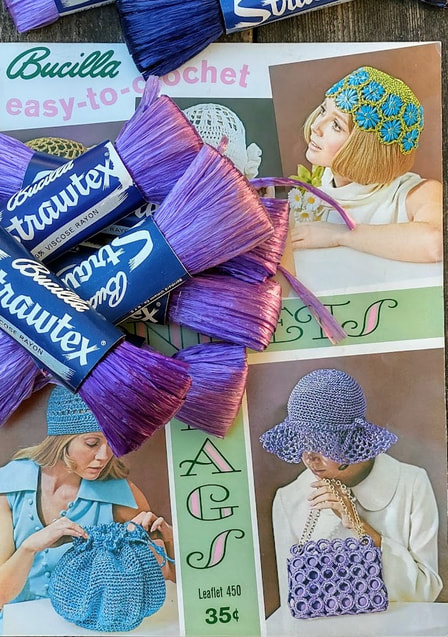 The pattern asked for eight skeins of StrawTex and each skein is only 24 yards. I had six of the lighter purple and added a darker purple and navy skein to get up to eight. It said to use an H hook or the hook to get the specified gauge. I used a G hook. This starts out by using a plastic ring at the top and while I was skeptical at first it was much easier to do that than try other methods with this type of fiber. The rest of the pattern was very simple and I was surprised that this fiber wasn't that hard to work with. I've used polypropylene fiber from Spinnerin before and that was sticky and hard to work with but this wasn't that sticky. My hands did get tired faster than if it was yarn though. I used the navy where the cord trim would go and used the darker purple on the very last rows to give it an ombre effect. I did not have enough StrawTex to do the cord trim so I did that in cotton instead. It's hard to see in the photos because it's much smaller than their version but it works to make the hat a little tighter. The finished hat had a very ruffly brim that I didn't love and since this was a natural fiber I thought it might block. The fiber label said it was washable in lukewarm water so it shouldn't damage it at least. I wet just the brim and the StrawTex got very soft and I was able to pin it in the brim width I wanted. This is not a hat you should wear in the rain though. You would have a soggy mess on your hands...or head. I'm giving this a 5 out of 5 stars. The pattern was simple and I used a fiber that was new to me. Next week I'll have another hat using the same type of fiber from a different leaflet.
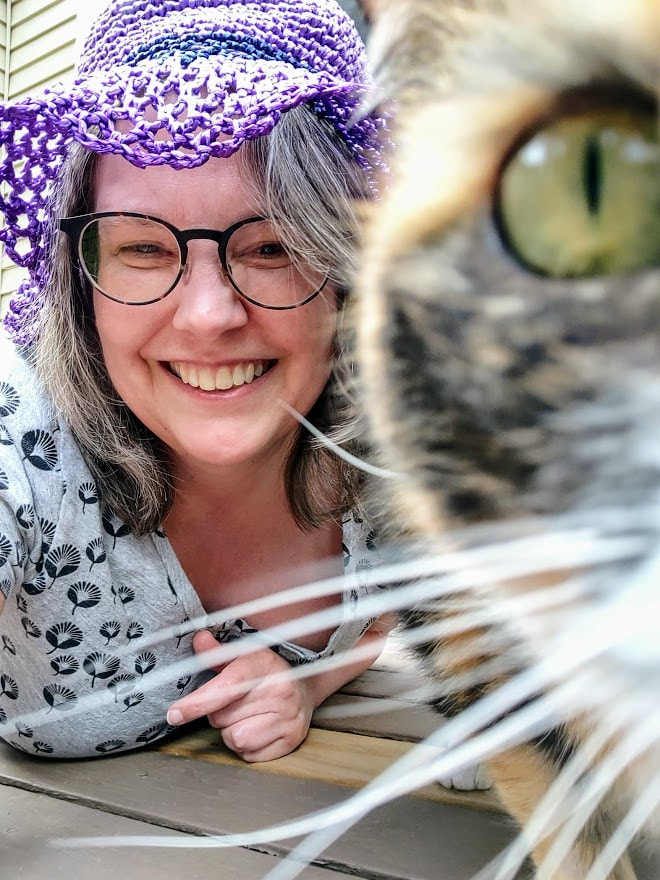
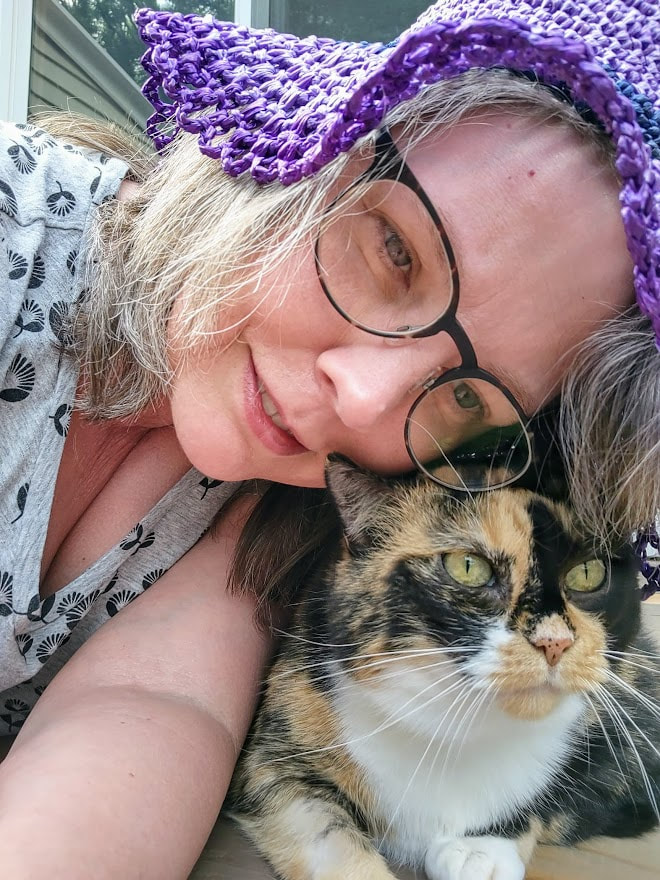
I tried to take a photo with Tayla for the hat. This is how that went:
While I enjoy making vintage patterns I definitely don't want our country to go back to the 60s or 70s. I've been donating to Just the Pill for a few years and I believe in their mission to provide reproductive health care to to people who live in rural areas and to areas that are on the borders of the states it operates in. They use mobile clinics to reach these areas and provide the services. If you would like to learn more about them go to justthepill.com.
0 Comments
This week's hat was such a failure that I rewound the yarn after the second attempt and gave up. The hat is a vintage pattern for a Yellow Picture Hat and Bag and can be found here along with many other vintage patterns. This pattern asks for rug yarn and size F hook. Rug yarn can be anything from worsted weight to super bulky. Since this used an F hook I thought it would be on the lighter side but after trying with two different weights and even a different hook I realized it must be something on the heavy side and I didn't have yarn that work. Plus I have a lot of really fun patterns waiting so I didn't want to try a third time. My photo shows the heavier worsted weight yarn using a G hook.
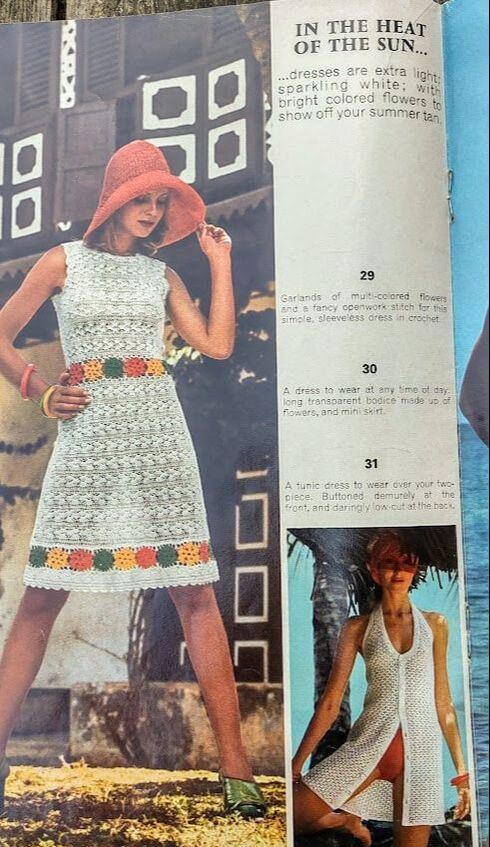
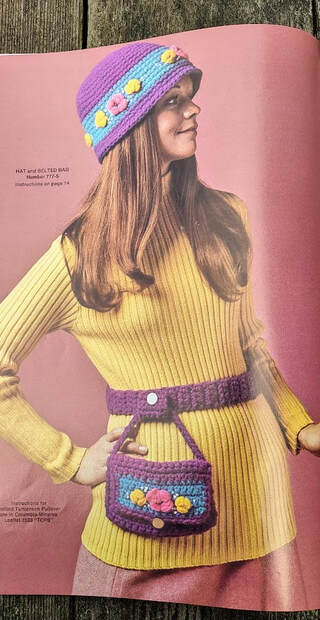
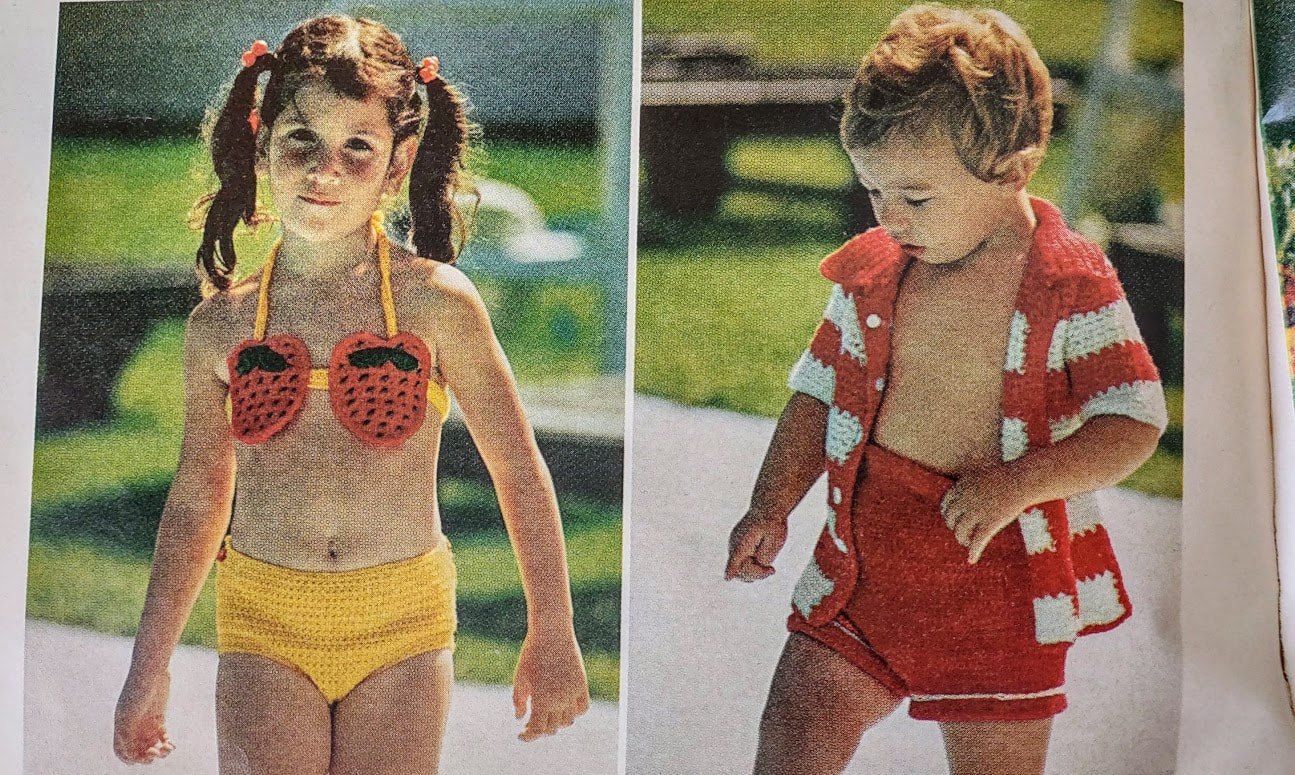
Instead of dwelling on that failed hat lets look at some fun crochet fashion from the summer of 1973. These are from a magazine that I hadn't even heard of but found at Vintage Knits. The magazine has knitting, crochet and one tapestry pattern. 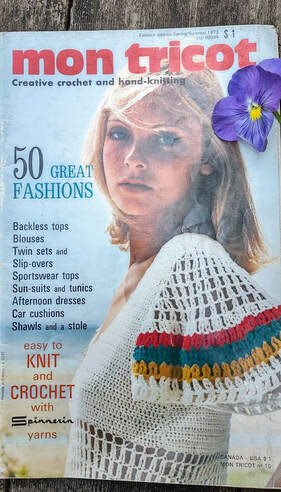 Let's start out with what they say is a wedding dress and hat. They describe this as, "a "trad/mod" dress in a super openwork pattern; just the thing for a summer bride and can be sued as an afternoon dress later on." The shoes are definitely 1970s! 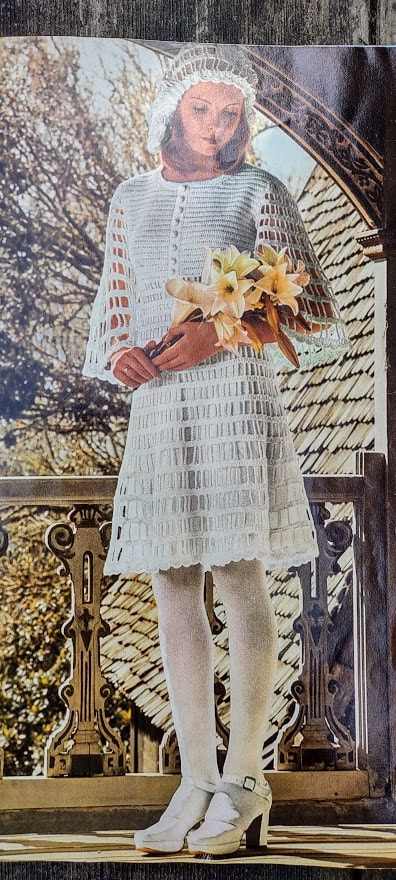 Next we have some sun dresses and swimsuit cover ups. These are all things I wouldn't be surprised to see at the beach now.
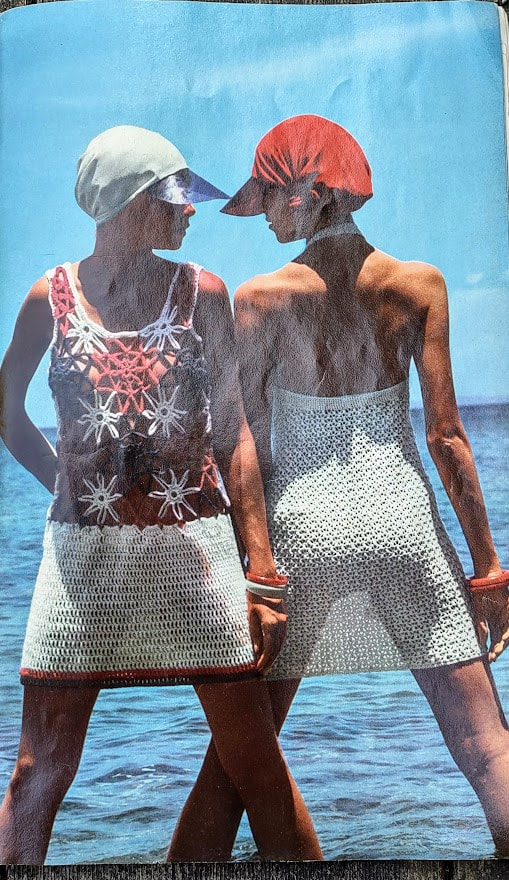
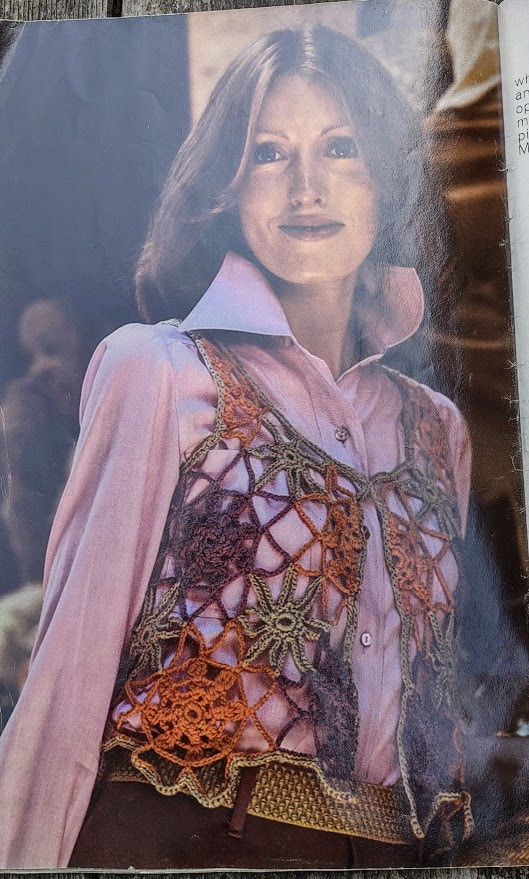
I love the chevron pattern of the first swimsuit here and am amused by the strategic flower placement on the second suit. 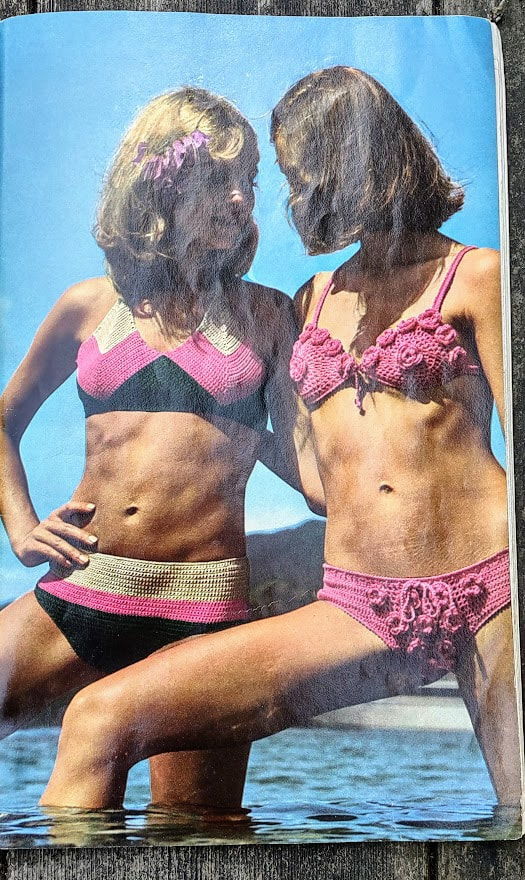 I love this maxi dress and it comes with a pattern for a shell stitch bottom. The description says, "Long dresses are becoming more and more popular; this one with it's open-work pattern and striped borders can be worn as a hostess dress or for an evening out." 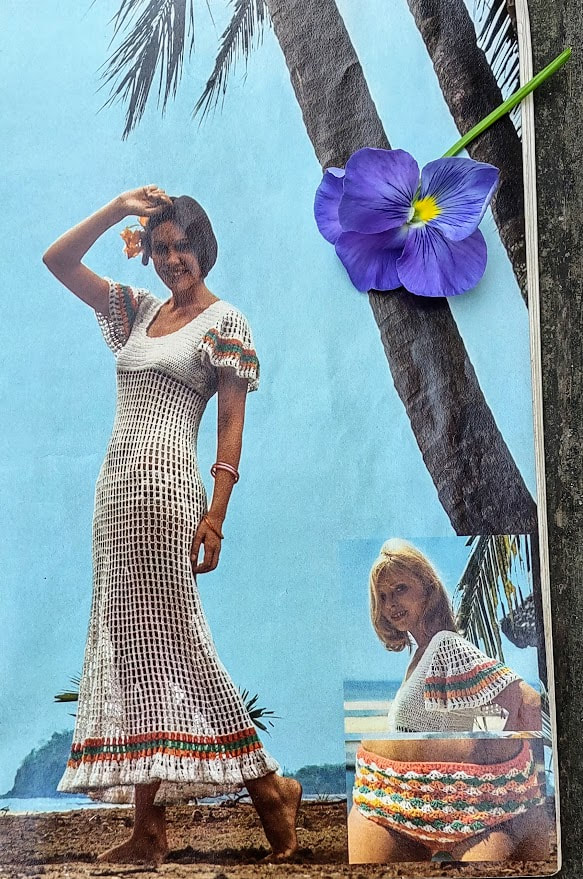 And last, we have two vests that look like they'd fit right in today.
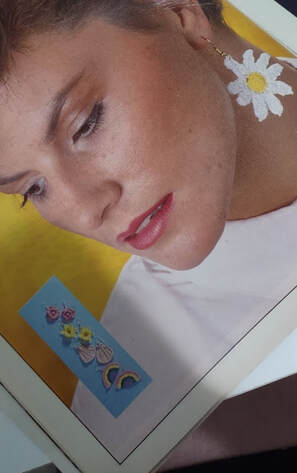
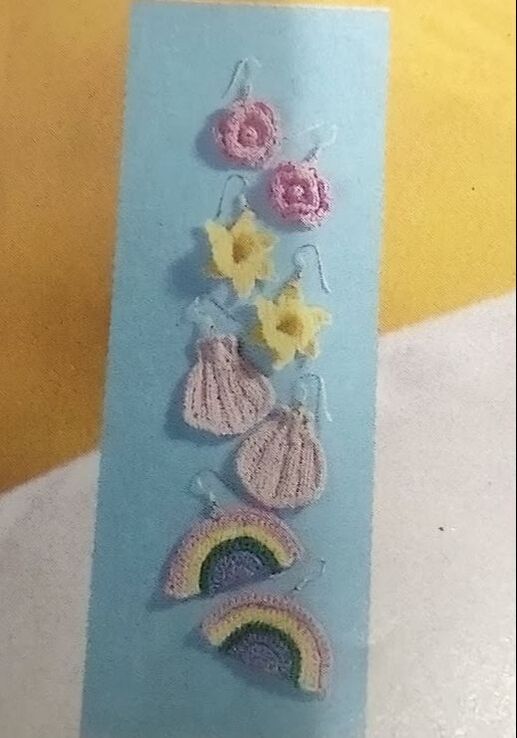
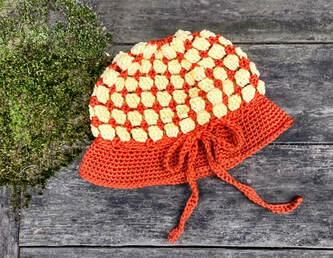
Do you have a favorite from this magazine? Next week I'm working with Strawtex for a hat! 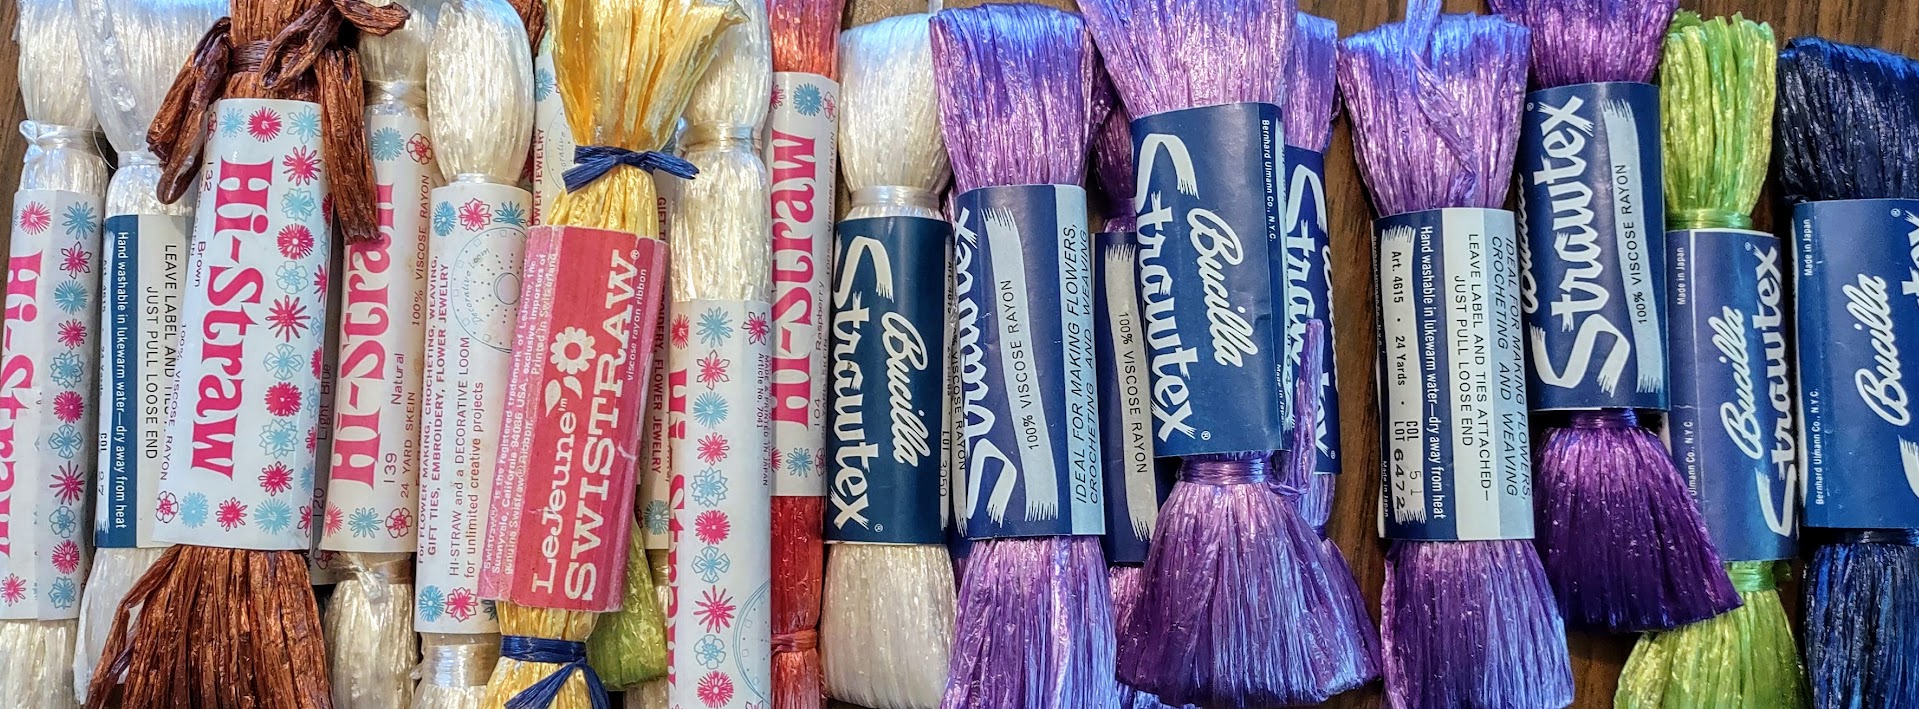 This is the only Workbasket hat pattern I have for June. I was surprised there weren't some sun hats or other options but there turned out to not be that many hats in June magazines. This was one of the few I found in my pattern stash and it's a baby hat. 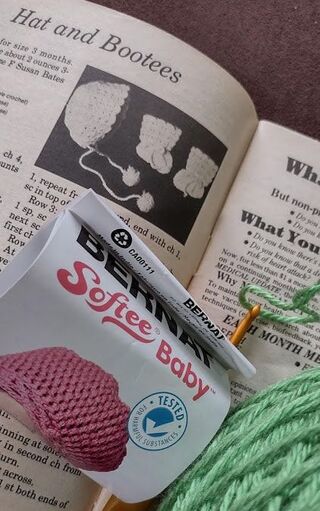 This pattern uses 2 ounces of 3-ply baby yarn and a size F hook. I used Bernat Softee Baby yarn which is one of my least favorite baby yarns. It has a shine that I don't love and feels a little plasticky before you wash it. It's ok after washing but it doesn't feel nice on my hands as I use it. There was no gauge given so I hoped it would come out relatively baby sized. It starts with making a medallion for the back of the head and then goes to rows for the sides and top. Add a tie and it's done. Seems pretty simple. The pattern had a portion that was written in a way I haven't seen before. "Rnd 7: Dc around. Rnd 8; 10: Sc around. Rnd 9: Sl st in first 6 sts, ch 2, dc around to within 6 sts from end, ch 1, turn." A little unusual to have 8 and 10 together but I understand it right up until we get to the end of round 10. I think there's a mistake in the editing and round 9 shouldn't have the "turn". The pattern hasn't had turns until the rows so it seems odd to do it after round 9. Round 10 has no instructions to turn but that seems like the logical place to turn your work since we're changing to rows. Row 1 of the top starts out saying "2 dc in same st as chain 2", yet there was no chain 2 at the end of round 10. This probably should have read: Round 7: Dc around, join to first dc, ch 1 Round 8: Sc around, join to first sc, ch 2 Round 9: Sl st in first 6 sts, ch 2, dc around to within 6 sts from end, ch 1 Round 10: Sc around, join to first sc, ch 2, turn That's what I did and I think it worked out ok. Here's the finished hat and it looks like it would fit a small baby. I don't like doing poms so I skipped that part. 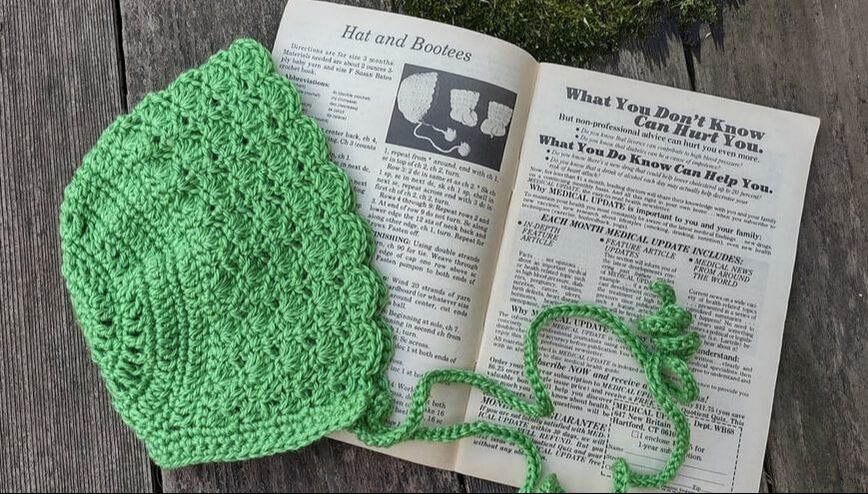 Next week it's a pattern from the Columbia Minerva "Teach Yourself to Crochet" again. I bought a bunch of patterns from Vintage Knits so I'll have some really fun stuff to share for the last week in June and the first weeks in July. Vintage Knits is closing down and having an awesome sale so if you like to have the original vintage patterns, magazines or books now is the time to head over there and get some. Here's a photo of about a fourth of the patterns and magazines I bought! 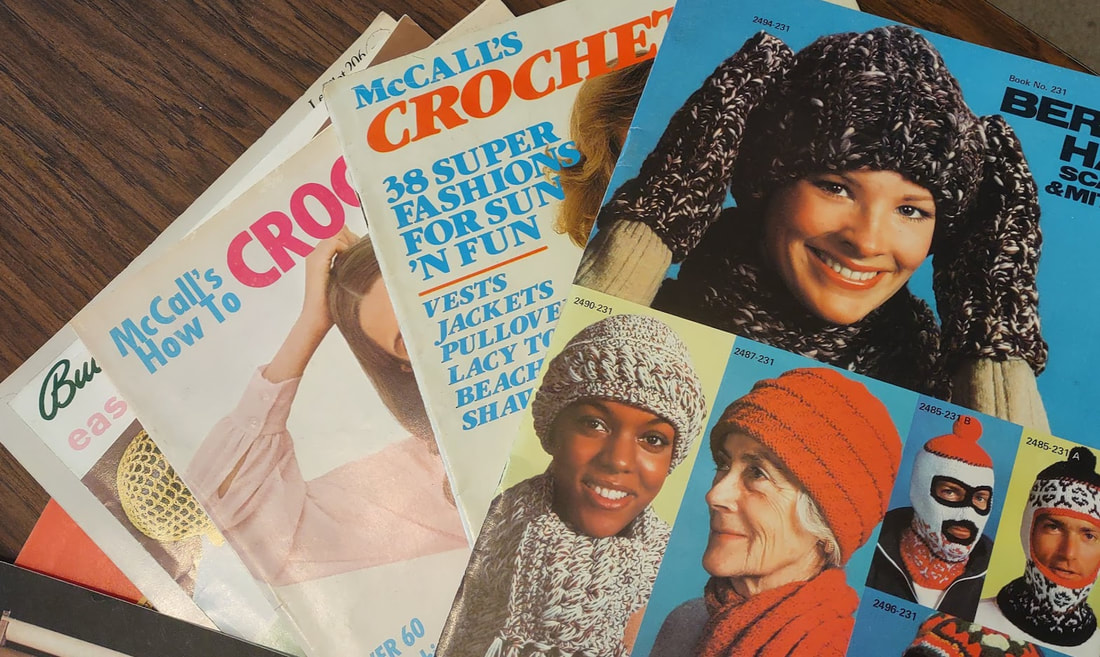 There aren't a lot of hat patterns in the magazines for June so I'm breaking some of my self-imposed rules, This week's pattern is earrings (technically worn on your head) from the 1990 (a few years past the year I was considering "vintage") issue of Crochet World Winter Special. Specifically, the rainbow earrings.
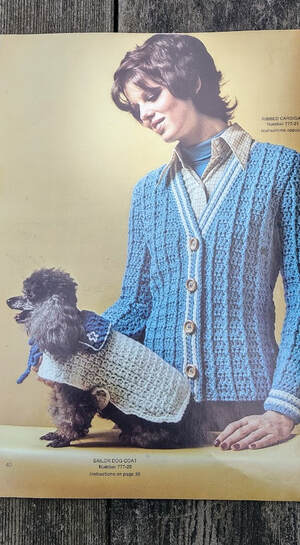
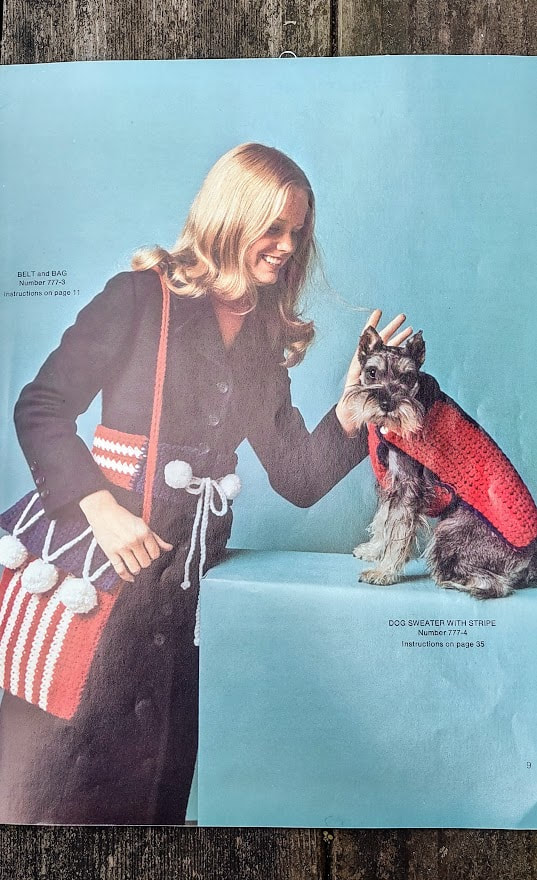
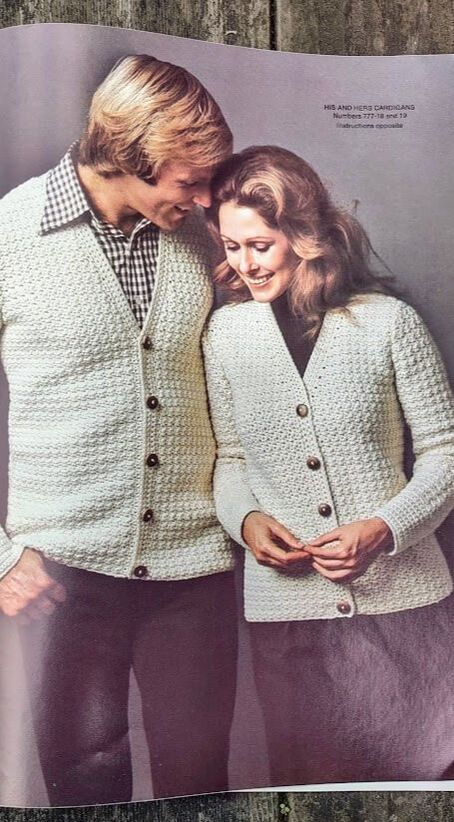
The pattern is rated as "easy" in the magazine. It asks for Knit-Cro-Sheen (a size 10 crochet thread), a size 10 steel crochet hook and a set of earring wires, posts or clip ons. I still have some jewelry making supplies and plenty of earring hooks. I also have a lot of thread and it turned out that I had the perfect color combo for these. I used a 1.25mm hook for these and there was no gauge given. That shouldn't be an issue since they're earrings and fit is a personal choice. These were a little fiddly with the thread and the tiny hook so I don't think it's super easy to do. I only did 8 rows of the pattern because I wanted to use 7 colors. The rows have stitch counts after them which is nice except when they're wrong and one row was wrong. Both row 3 and 4 had the same stitch count. Row 4 had increases and no decreases so that would be impossible. Aside from that issue this was fairly easy and the results are adorable. I'll give this pattern a 4 out 5. Here are my 1990 Rainbow earrings: 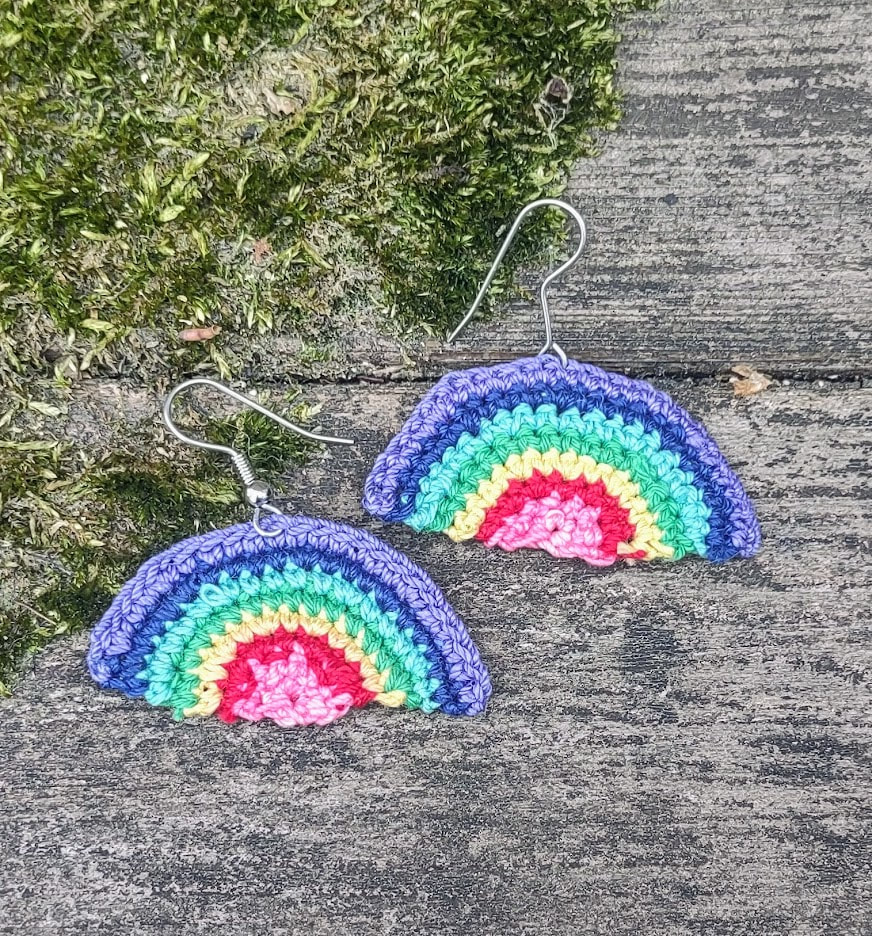 This week's hat comes from Columbia Minerva's "Teach Yourself to Crochet", published in 1972. The booklet has a lot of adorable patterns that look fun to make. Before we get to the bucket hat here are a few of the pattern photos from the booklet. First the ones that have dog sweaters in the pictures:
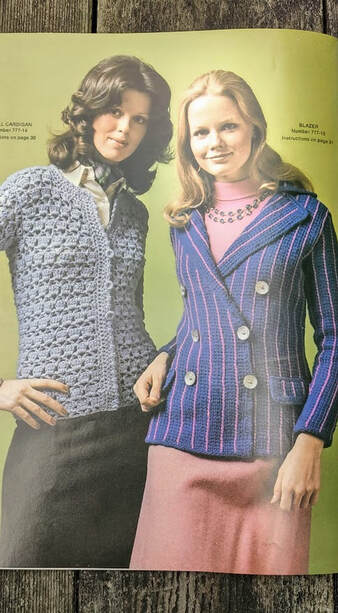
Cardigans and Blazers:
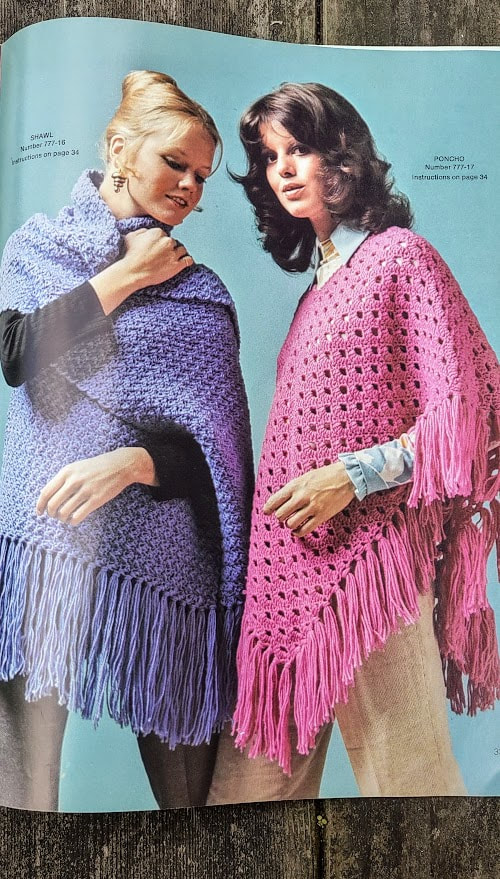
A Shawl, Poncho and Shrink:
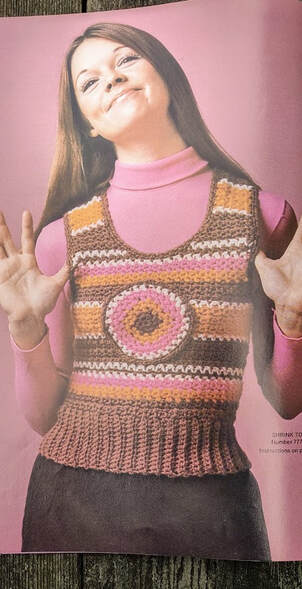
There aren't a lot of hats in the June magazines so I might make these in June:
And here's the bucket hat that I made for this week's hat pattern:  This hat uses worsted weight yarn in two colors and an H hook for the hat. It does give a gauge for a G hook that you use for the mittens but not the H hook. I had yellow and orange yarn that matches this photo pretty closely. The yellow is Impeccable and the orange is Lion Brand Basic Stitch.  The hat is worked from the bottom to the top. Then the brim is crocheted on using the other side of the starting chain at the bottom of the hat. This was pretty easy to follow and the only quibble I have with the pattern is that it tells you, "work in pat, dec'ing 4 hdc groups evenly spaced around" which means the crocheter has to do that math for that. Since this is a beginner book I was a little surprised by those instructions. This turned out to be almost exactly like the photo and is a super cute hat. I'm giving this hat 5 stars. It was easy to follow the pattern. It's cute and functional. Above all, it fits!
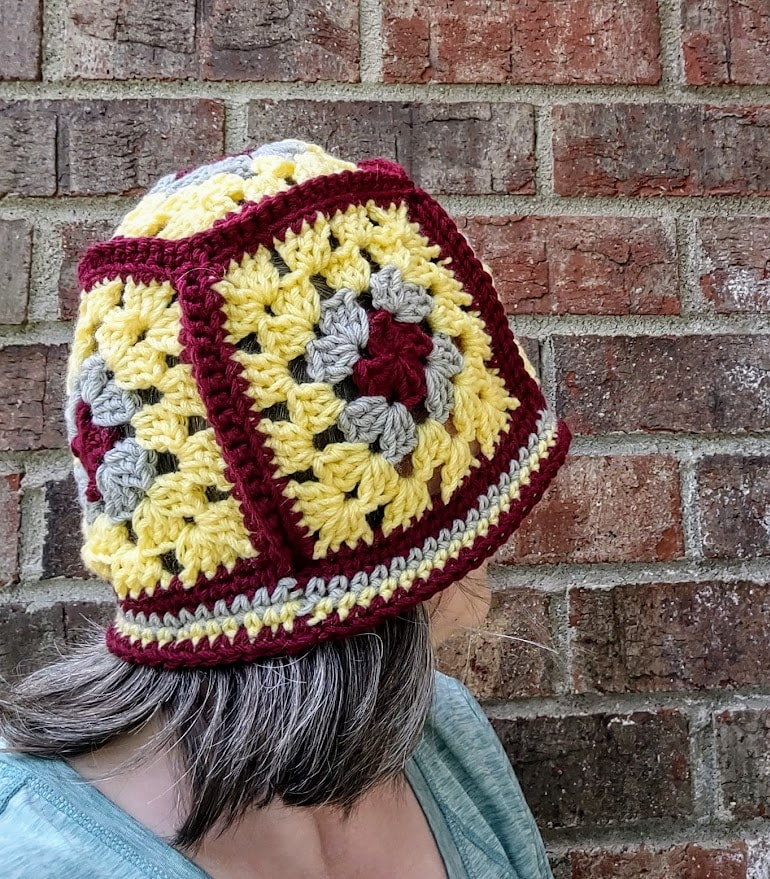
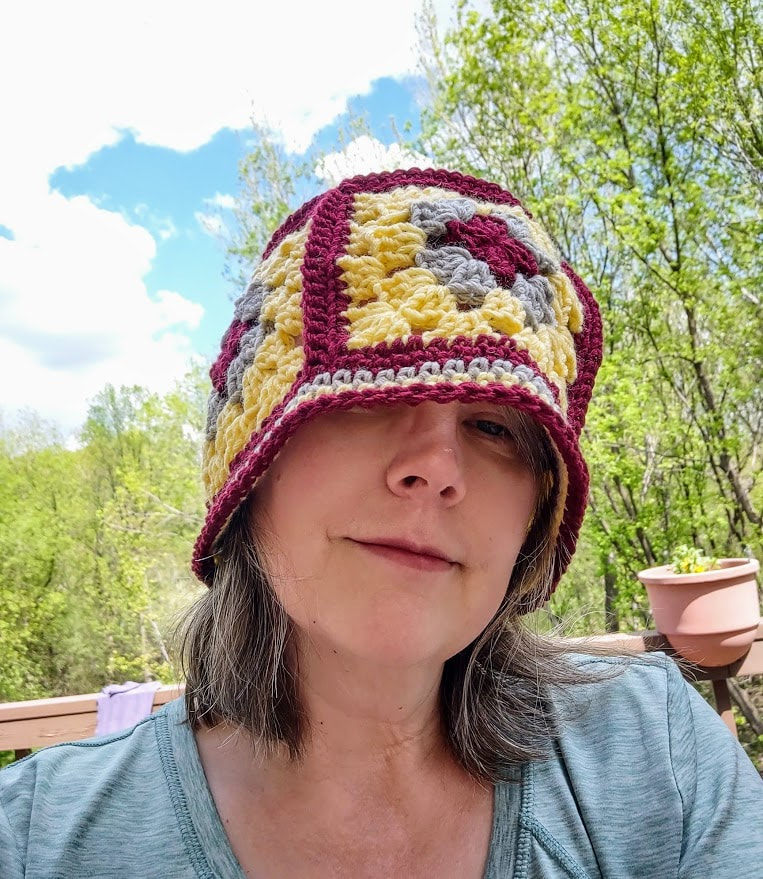
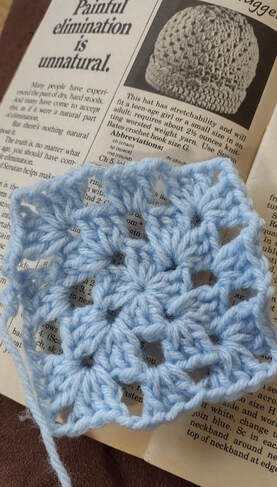
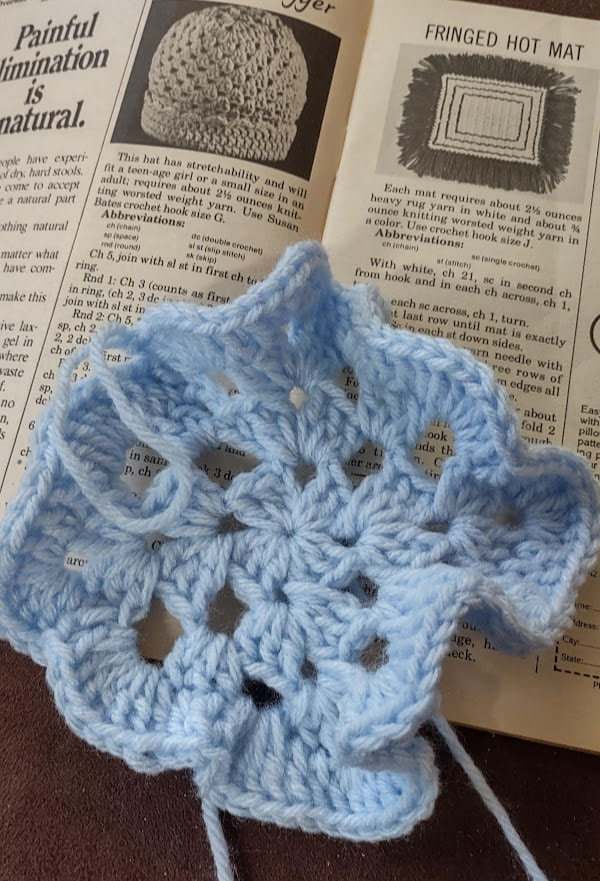
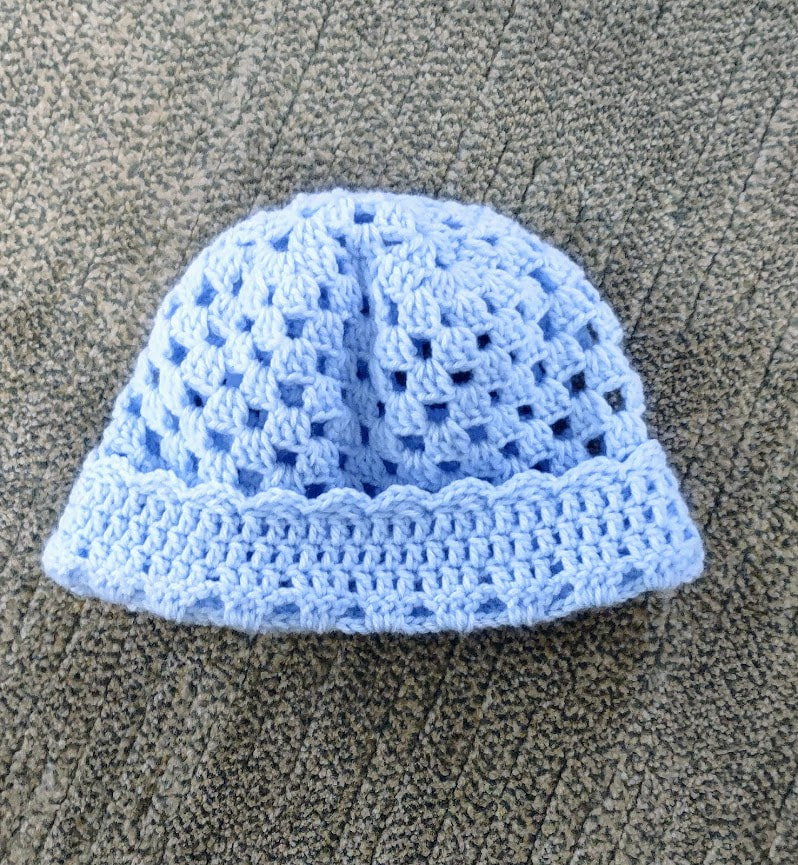
This week we have the classic granny square hat. This particular pattern is from 1971 and is in a booklet with vests aka shrinks, a scarf and a Hipster hat. 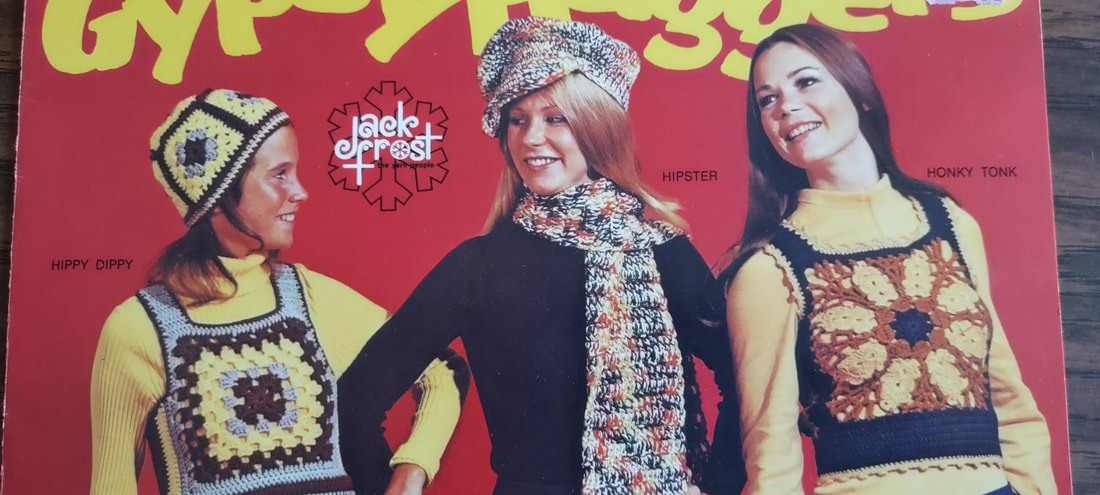 One of the problems with vintage patterns is figuring out the right hook size and this booklet is a good example of that. Many patterns give a gauge to help solve the hook size issue, though we seen that doesn't always produce a hat that fits. The Hippy Dippy hat (the yellow one in the photo) does give a hook size but it doesn't follow the letter or millimeter sizes most current patterns use. It says that the hat should use a "No. 9 Crochet Hook for the Adult size". This isn't completely outdated. Most of my older hooks still have a letter and a number on the hook. A No. 9 hook is typically the same as an I hook so that's what I used for this pattern. The child size uses a No. 8 or H hook. The pattern uses worsted weight yarn and I managed to find some in my stash that is pretty close in color to the photo. I'm using Impeccable Yarn by Loops & Threads for the yellow and maroon and the gray is Big Twist yarn. 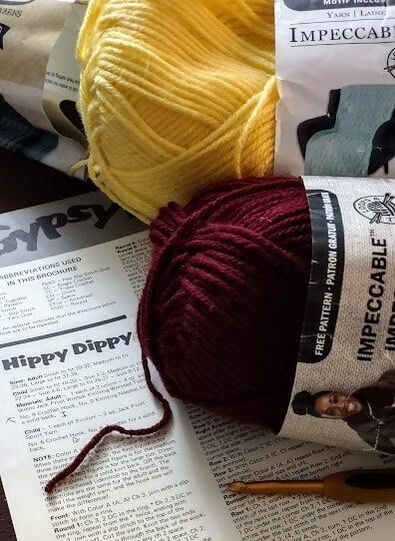 There was no gauge given for the pattern or any pattern in this booklet but the directions were pretty easy to follow. This has you make 5 granny squares and join them with one square as the top of the hat. Then you add three rounds of single crochet at the bottom to finish it off. 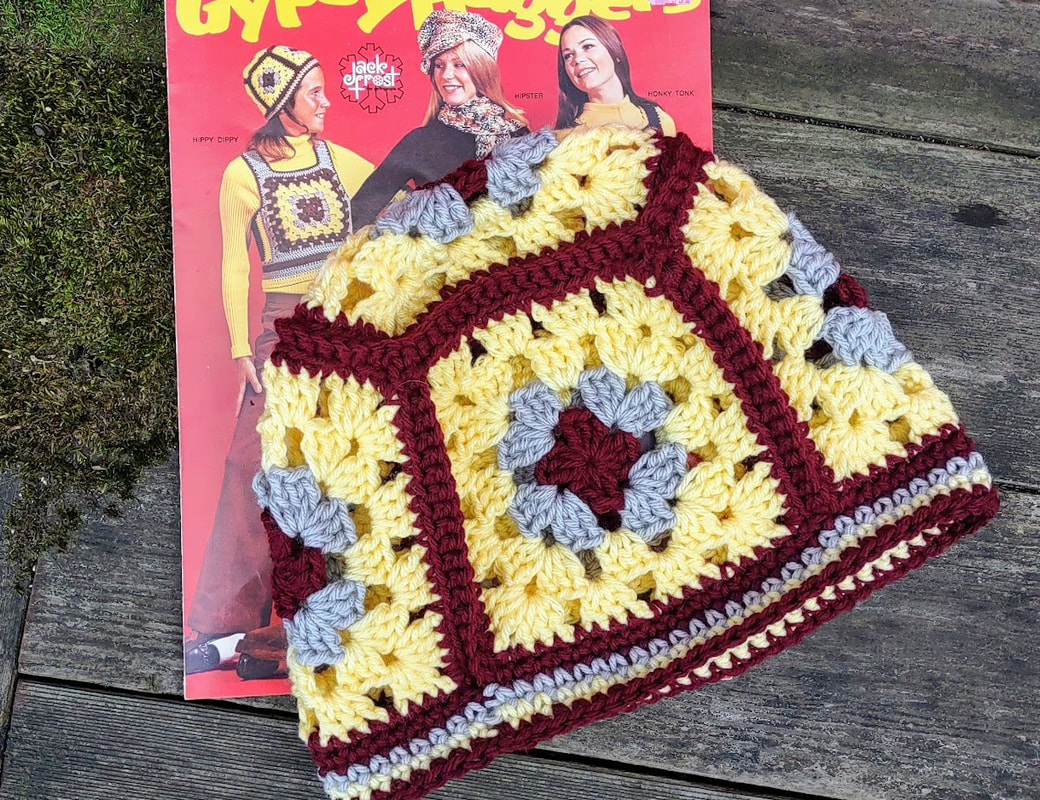 This looks like a classic granny square hat and I think I did a pretty good job of recreating the hat in the photo. Now the real question, does it fit me?
Nope. It's a little too big. If I made this again, I'd drop a hook size. I don't really love their way of joining the squares either. I think I'd use a join that doesn't give the ridge.
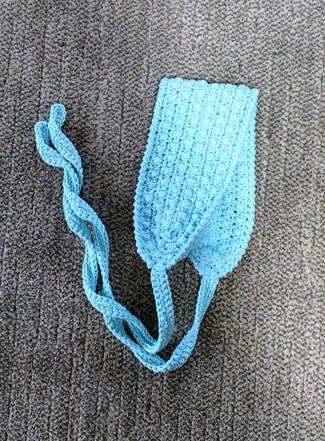
I'm giving this a 3.5. It's cute, the pattern is fairly easy to follow but a gauge would have been really helpful. Next week I'll have a vintage pattern for a bucket hat! My sister-in-law, Julia, tells me that they're "in" and I have started seeing a lot of patterns popping up for them. The pattern I have doesn't use the term bucket hat but it looks a lot like some of the other patterns I've been seeing. This time I have a baby hat to review so I can't answer the question, "Does it fit?". This pattern is from the May 1974, Workbasket Magazine  This pattern says it's for a "six-month-old size" with changes for a one-year-old. I made the smaller version. I'm sure if fits a six-month old child somewhere out in the world. Materials required are an ounce of baby yarn, a size C hook, some ribbon and a button. Baby yarn is a little vague. I have yarn that calls itself baby yarn in fingering weight, sport weight and DK. Fortunately, this pattern gives a gauge in both rows and stitches. I tried some DK weight first and that was way over the gauge so I dropped down to this Panda Cotton I've had in my stash forever. I believe that this is closer to a fingering weight and the gauge came out perfectly. This is a very simple pattern. I ran out of the first color of Panda Cotton but had more in a different color to finish it off. I couldn't find any ribbon that was the right size in my jar of ribbons so I made the ties in crochet instead.  I'm going to give this pattern 4.5 stars out of 5. I'm only marking it down for the use of baby yarn instead of being a little more specific about the actual yarn weight.
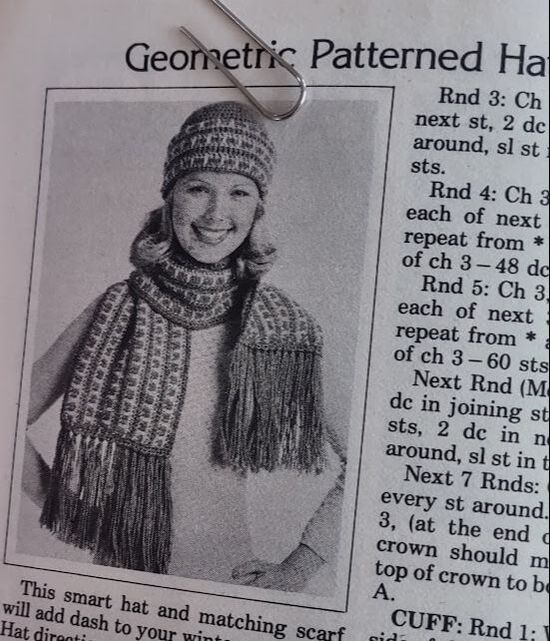
Next week: The Granny Square Hat! This week I'm reviewing a hat pattern from the May 1982 Workbasket Magazine. This is the second pattern I've made from this particular issue. Back in 2018, when you voted on the pattern I would make, I had this hat as one of the options to choose from. The pattern that won that year was this capelet. Here's the magazine photo of the hat I did this time.
The pattern says that directions are given for a small head with the medium sized changes in parentheses. I chose to make the small size. Materials listed are; an acrylic blend 4-ply yarn in three colors and an H hook. This pattern also gives a gauge but I didn't check my gauge even though it said in large all caps, "TO SAVE TIME, TAKE TIME TO CHECK GAUGE." This pattern was pretty easy to follow and I have no complaints about the directions. The pattern is done in the cuff part and then you fold the cuff up twice. I used three colors of Big Twist yarn that I had in my stash and it came out ok. 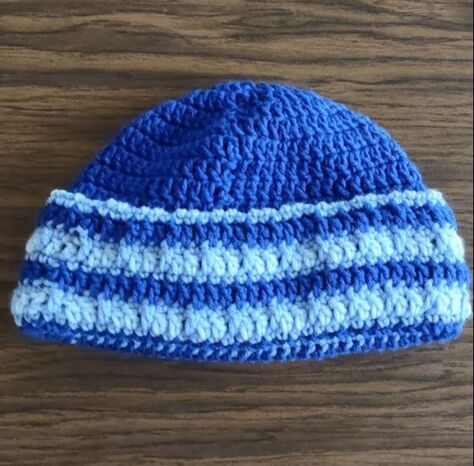 Getting it folded up to match the photo wasn't as easy as I thought it would be and it makes that cuff part pretty thick. I also wish I had planned the colors a little better. There isn't enough contrast between the light and medium blue to show off the stitch pattern. Overall though, this was a fast and easy pattern and it fits! I'll give this a 4.5 out of 5 stars. 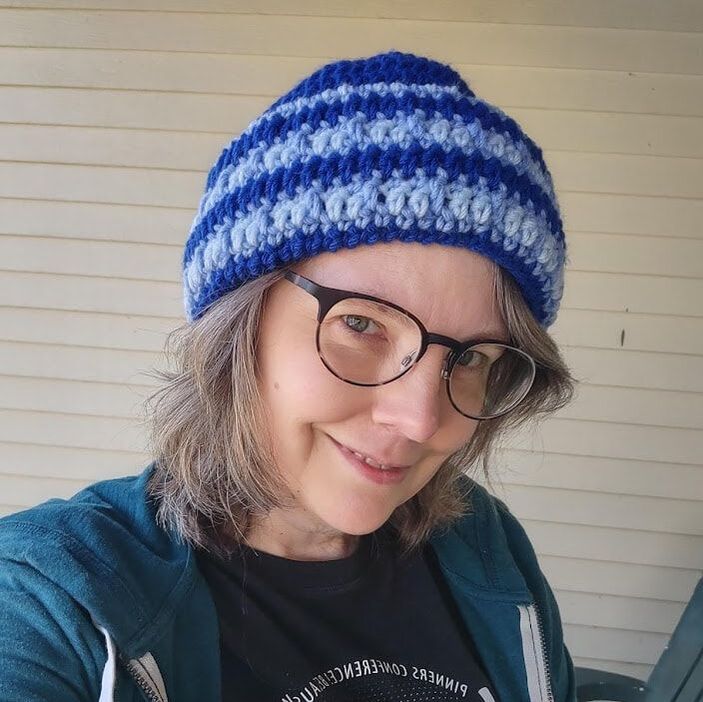 Last week I showed you the finished Daisy hat but couldn't find the magazine to show you the way they thought it should look and all of the other Daisy patterns they had. I didn't find the magazine but I did find a photo took of that page in the magazine. 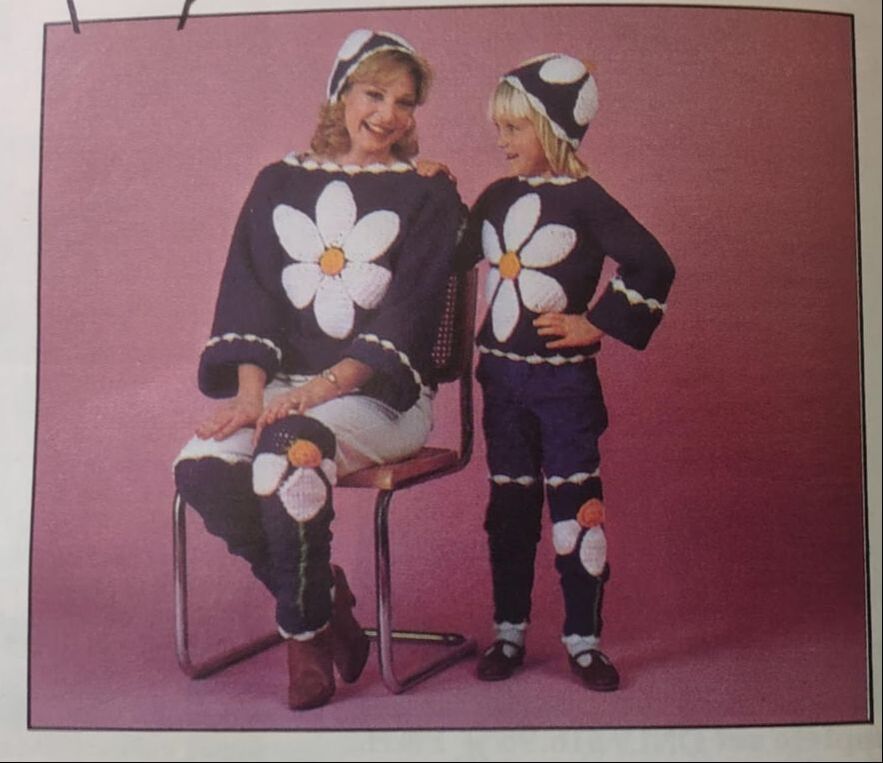 I don't have the pattern to reference but if I remember right there was an issue with the increases that made the hat look like this: 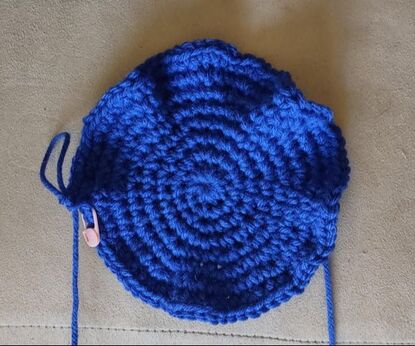 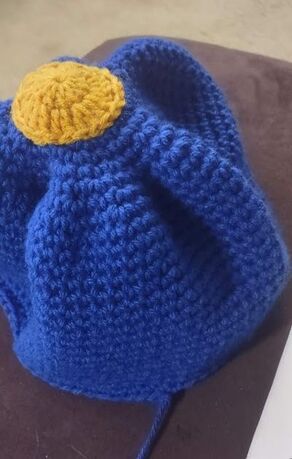 I'm going to lower my rating to a 2 out of 5 because something is wrong with the directions. The May patterns will include a geometric patterned hat from 1982, a baby hat from May 1974 and one of the hats from this pamphlet: This week's hat is one I really looked forward to making because the photos in Workbasket Magazine were pretty awesome. The good news is that the hat is done. The bad news is that I can't find the Workbasket Magazine with the pattern so I can't show you the rest of the Daisy patterns. This hat used worsted weight yarn and it came along with a set of patterns based around this daisy pattern. 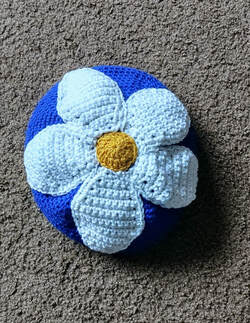 The patterns included; the hat, an afghan, a sweater and leg warmers. The hat is made as a regular hat and then the daisy pieces are sewn on. It's hard to tell but they have you put a little stuffing under the center piece. There's a shell stitch border on the hat too. It's...a little big. It's very loose on my head and feels like a mushroom out of Mario Bros. The applique is thick and I'm not sure what the purpose of stuffing the daisy center on the hat is. 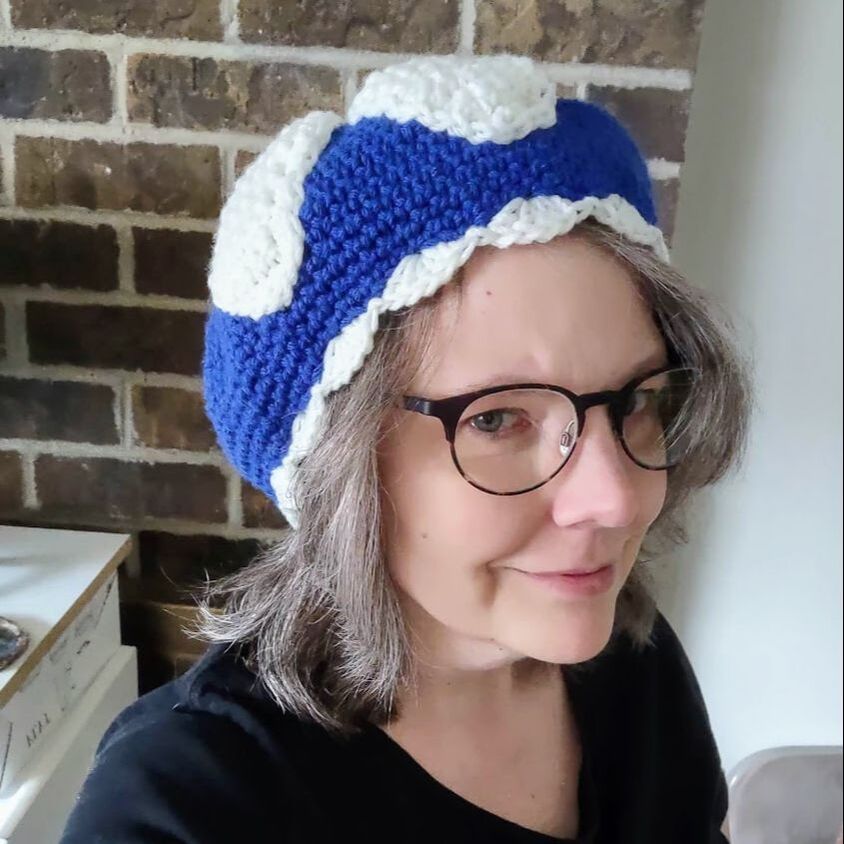 I left the ends unfinished so I could take it out and turn it into a bag or something a little more useful than a giant mushroom hat. 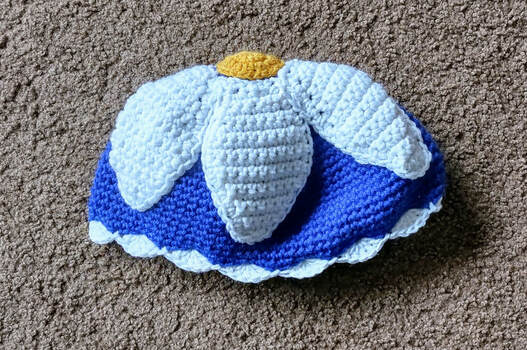 I can't really rate this one since I don't have the instructions anymore but based on fit I guess I'd give it a 3 out of 5. Next week I'll have the May patterns! If I find that missing magazine I'll share those photos too. This week's pattern is from Workbasket Magazine, April 1965. It's the first pattern that isn't a hat. This time we have a headband. 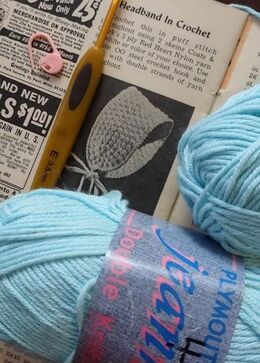 This pattern calls for Coats & Clark's 3-ply Red heart Nylon yarn and a size OO steel crochet hook. The yarn is held double for the whole pattern. The pattern does give a gauge and I got the gauge right with a size E hook and 2 strands of the Plymouth Jeanie DK held together. The headband is done in a puff stitch around a center row with increases at the end and it alternates rows of puff stitches and single crochets, ending up with four rounds of each. When I got to round 6 of the headband I held it up and it was already too big and yet the gauge was still right on. I decided to stop with the main pattern stitch there so it would be wearable for someone. There was still a picot stitch to do as a border but doing that stitch while holding the yarn doubled was annoying so I gave up on that and finished it with a crab stitch instead. This is what the original picot stitch looks like. 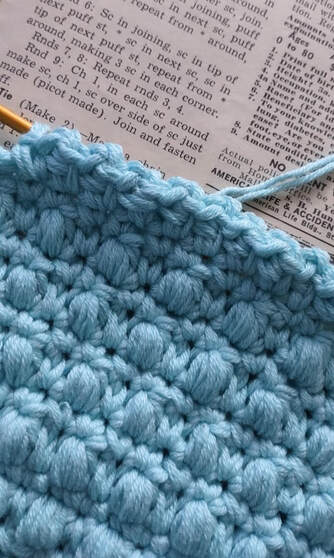 And here is the finished headband that doesn't fit.
I'm giving this 2 out of 5 stars. It's unlikely to fit anyone as written. I think that this could work if it was just one strand and the hook is dropped down a size.
Friends suggested it could be a belt so maybe this has other uses instead of a headband. Next week I have a really fun, springy hat pattern that I wanted to try as soon as I saw it on the cover of the Workbasket Magazine. I'll tell you now, it failed spectacularly! The first April hat is from Workbasket Magazine, April 1976 issue. I had high hopes for this hat based on the photo. It looked like it was a fairly simple pattern and hard to screw up. It says it has stretchability and will fit a small size in an adult. 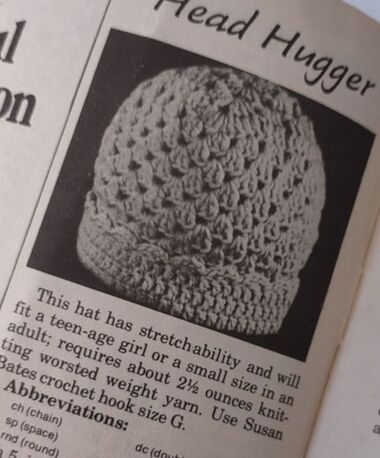 I used Big Twist worsted weight yarn and G hook. The pattern did not give a gauge. This starts out with a granny square for the top and then works down. What could possibly go wrong? The first photo shows the hat through round 3. The second photo shows round 4. The pattern wants you to dc in each dc around and do 6 dc in each chain 2 space. Round 3 has a lot of chain 2 spaces. If you put 6 dc in each one you get the second photo and that would make a very big hat.
By looking really closely at the picture I figured out that they really mean just the corner chain 2. Now it looks better. This photo is through round 5. 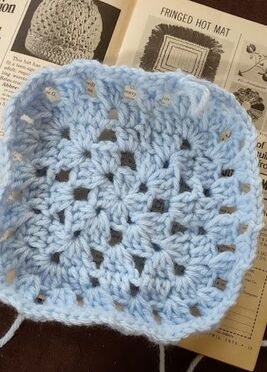 After repeating round five 10 more times and adding a couple rows of dc and a little shell stitch you get an ok hat. I think this would be better in something other than acrylic though.
It fits and I figured it out but I'm giving it a 3 out 5 because the directions have a mistake in them that beginners would struggle with. If you make this hat remember that round 4 is wrong.
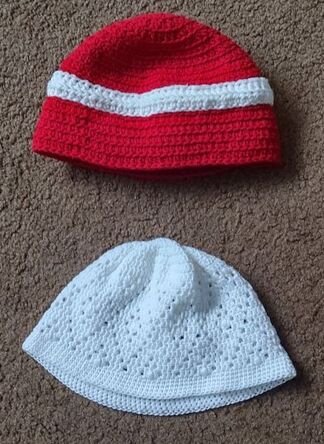
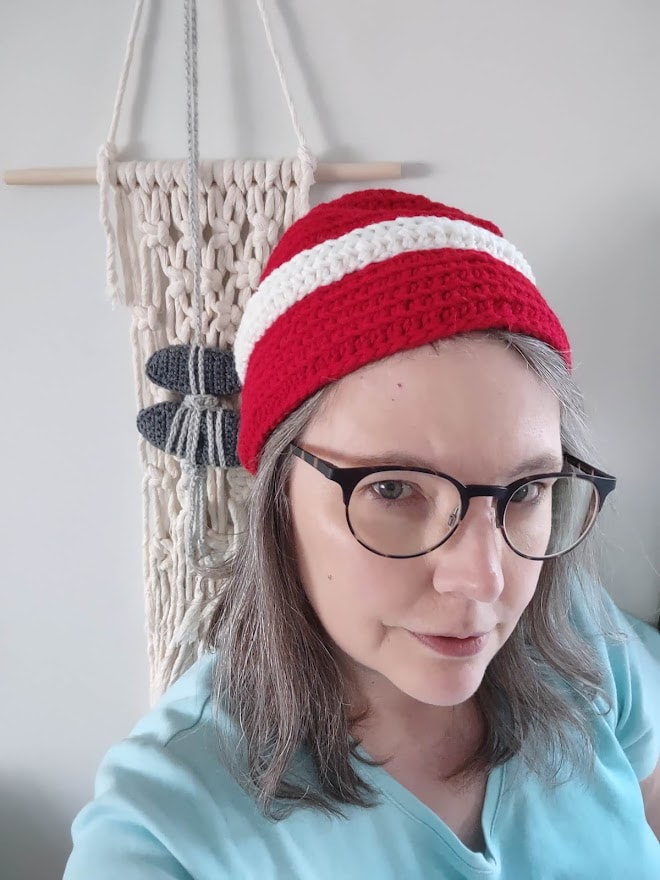
Next week I have a headband instead of a hat! I'm sure that will work out perfectly right? I'll just start out by saying this magazine has a lot of really fun photos and cute outfits. The hat patterns have been easy but the adult hats have been sized poorly. This one was the same. The halter pattern is done with size 10 crochet thread (one strand) and the hat is done with three strands held together. They look cute together! It's hard to see but there is a crochet covered button on the hat. 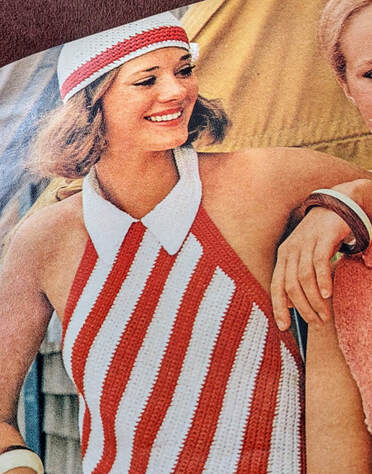 There are two separate gauges given; one for the halter and one for the hat. The hat is described as one size fits all and includes elastic in the last row around the head and the cute button. They say to use a size F hook for the hat and that worked perfectly to get their gauge. And yet, it was so small by the time I got to the last row that I didn't bother with the elastic or the button. Here it is compared to the other two hats. 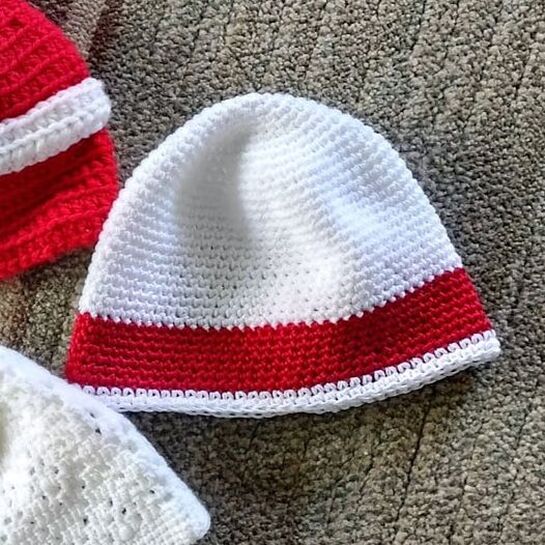 I'm giving it 2 out 5 stars. Sizing was incorrect and I'm not sure what the elastic would have accomplished. None of these hats were complicated and I could have easily adjusted this weeks hat to make it fit by doing additional increase rows and adding more to the length. I wanted to follow the pattern as much as I could though and since it would fit someone I just left it as it was. I'm glad the Good Housekeeping month is over and if I make any of the clothes in the magazine I'll have to use their gauge and math to figure out actual stitch counts to get the right measurements. Next month we're going back to Workbasket Magazine for some springy hats and one headband! This week we have a hat for kids. The description says, "The bands of white trim emphasize the bold main color." Even though this is described as a girl's cardigan and hat set, I think any kid could wear this.  The suggested materials are Columbia-Minerva Nantuk Sweater & Afghan Yarn in two colors and a size F hook. I had some worsted weight acrylic yarn in red and white that I used. 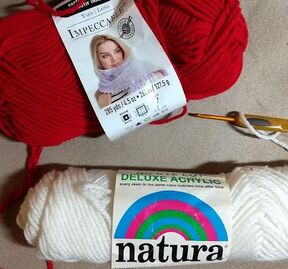 This pattern gives a gauge but I (gasp!) did not do a test swatch to make sure I could match it with my yarn and hook choice. I measured it at the end of the project though and the gauge did match. This is a really basic hat that's done with half double crochets in the back loops to give it a ridged look. The second to last row of the main color has you decreasing by four stitches and it's finished with a slip stitch. The white stripe is made separately and sewn on. I guess this adds texture but if I wanted a stripe I'd probably just change the color there. The sizing is pretty good for a kid's hat. Here it is compared to last week's hat and on my head.
This gets a 4 out of 5. The pattern is pretty easy to read if you understand how to increase "evenly". The sizing is accurate this time. The lack of the 5 star is because it's just a basic hat with a sewn on stripe.
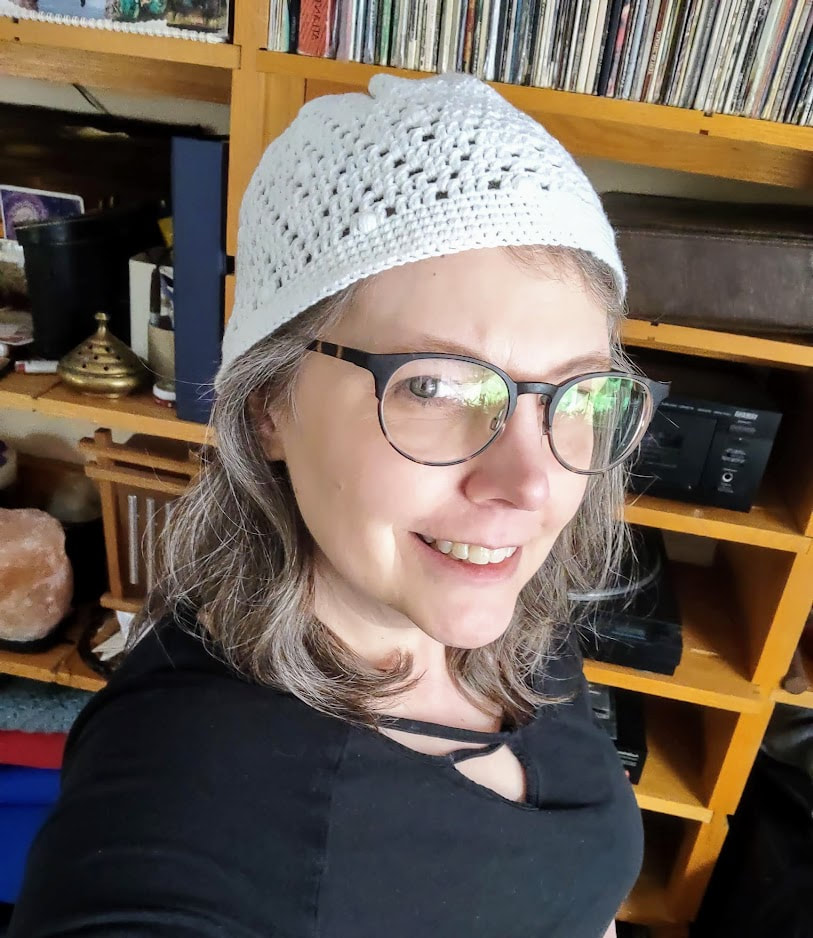
Next week we have the final hat from this magazine. It's done with crochet thread and I have no idea if it will fit. The first hat for March is this adorable hat they call a "Crocheted Head-Hugger". Spoiler alert - it really does hug your head.  The suggested yarn is Columbia-Minerva Nantuk Fingering Yarn and a Boye steel crochet hook No. 2. I used a 2.25mm hook and this Berroco yarn I picked up at a Textile Center garage sale. The suggested yarn appears to be 100% acrylic and the Berocco is nylon and acrylic so I think I got pretty close on the yarn.  This pattern gives a gauge of 6 stitches = 1 inch and 3 rows = 1 inch. I got the gauge exactly with the B hook. The pattern is pretty easy to follow and it's very specific for each row instead of saying something like "follow" pattern or even "repeat row." Here's how it turned out:
I double checked the gauge in the finished hat to make sure it wasn't off. That was still exact. I tried to count the rows in the picture to see if they did more rows and I don't think that was the problem either. The band around the head is the same stitch count as the rest of it so I'm not sure why it looks like it's a different size in the original photo. It's a cute hat...for a kid. Again.
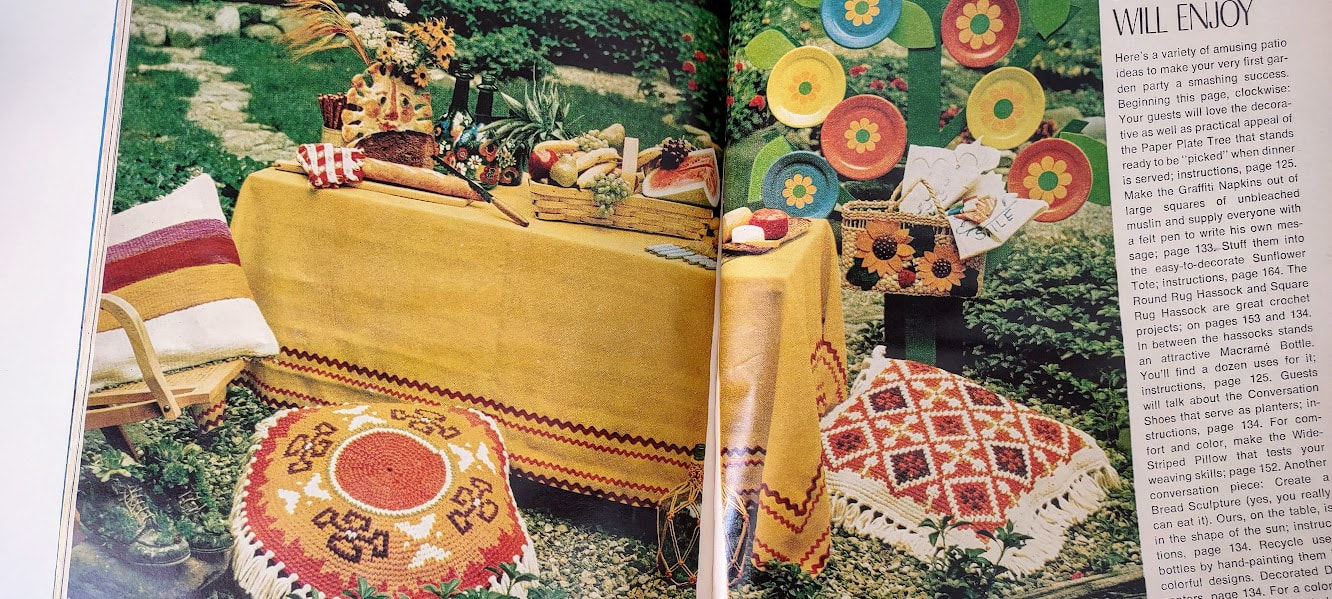
To get something like the photo here are the things I'd try if I was going to do it again. Once the band is done going up a hook size or two might make the top more poofy and a big enough for an adult. You could also figure out how many stitches to increase to get the diamond pattern and do an increase row before you start the top part. I had high hopes for this one but I was a little disappointed so I'm giving it three stars out of 5 for the misleading photo. March will have patterns from just one magazine; the Good Housekeeping Needlecraft Spring-Summer 1974. I found it at a used bookstore in Fergus Falls called Biffley's & Bookmark. My lovely mother-in-law bought it for me along with a few other Workbasket magazines. 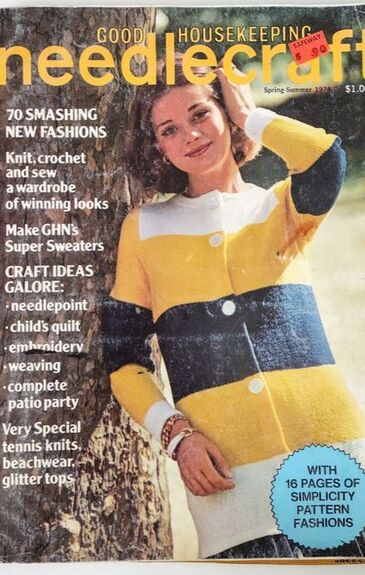 This magazine has so many fun 1970s projects. I pulled three crocheted hats that I'll share during the month but for now, I want to share some of the other awesome projects in the magazine. This photo has all of these items that there are directions for:
 There are sewing patterns and cute crocheted kids outfits.
This cute crocheted beach outfit: 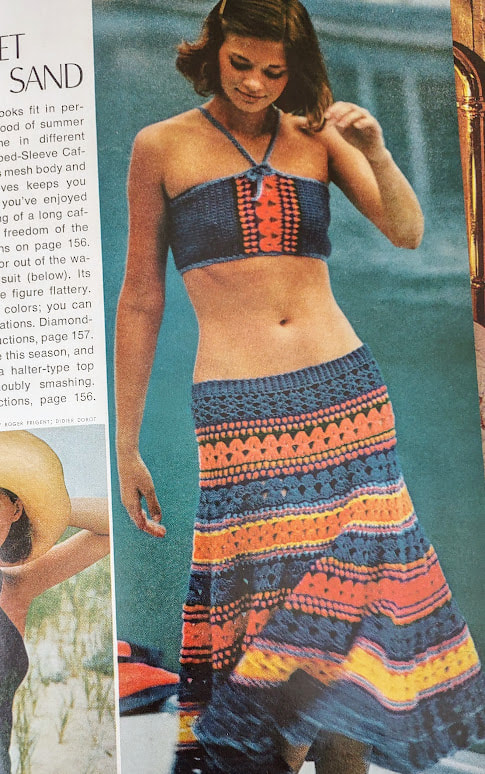 Knitted and crocheted swimwear:
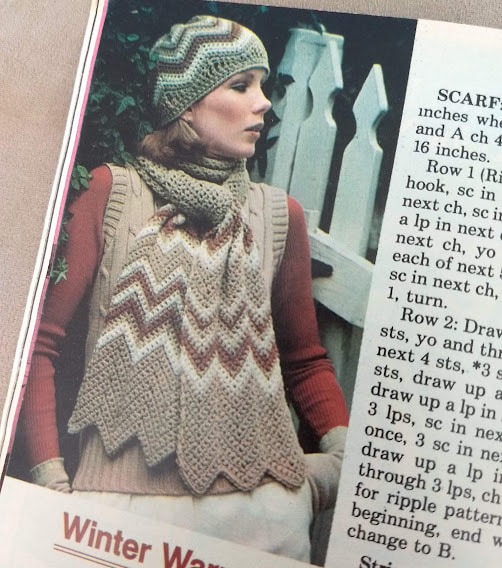
And this grouping of bazaar projects: 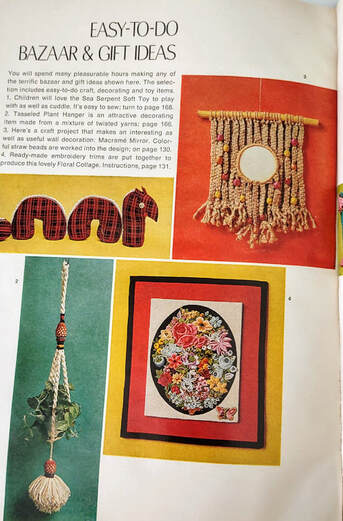 So many fun things! I could do an entire post on just the advertisements in this magazine. This one is for American Thread yarn. 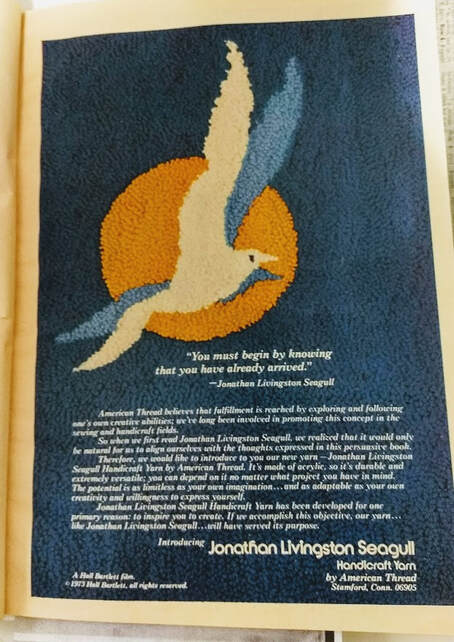 Next week I'll have the first of the three crocheted hat patterns I found in the magazine. It's an adult hat that is styled in a very 70s way but if it works it's a classic hat that could be work today. This week's hat comes from a pattern book that has no copyright date. We can narrow down the year a little bit based on the yarn used in it. The hat pattern uses Lily Rug Yarn, Art 241. From the few sources I can find online, the yarn was made from 1937 - early 70s. Based on the style of the cover photo, I'm going to guess this is late 60s.
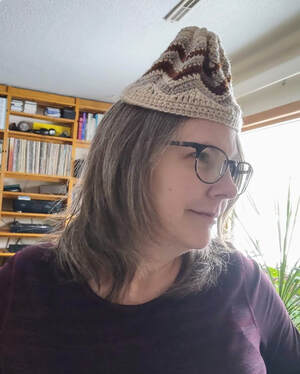
The booklet never tells you what the weight of the rug yarn is but it seems like most rug yarn is either a worsted weight or bulky weight. This pattern does give a gauge so that should be enough to figure it out. Of course, I totally ignored that and tried a worsted weight yarn with the suggested I hook as a practice run. I finished a very small hat and then measured my gauge which was much too small. None of the other yarn I had gave me the right gauge so I ended up needing to buy yarn for this project. We went to Joann's to get yarn. It seemed like the 6 weight yarn would be too big and the 5 weight was to thin. And then Joel found this on and end cap and on sale: 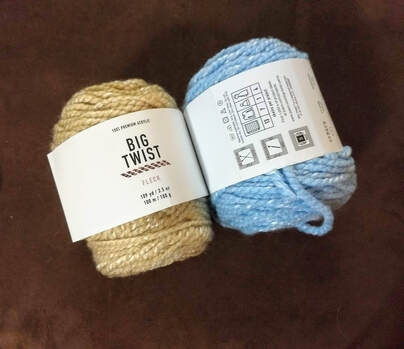 Big Twist Fleck Yarn Now we can start the pattern. The hat pattern takes up less than three inches on the page and starts out easy working top down to through row 9. Then it tells you to join the contrast color and work the same pattern as on scarf pockets for six rows. Here's where the pattern starts to be questionable. If you work the first 6 rows of the pocket you will end up with the pattern I have on the small hat. To get the hat pattern you need to start at row 3 of the scarf and switch the colors. The flower is a long strip of increases that are kind of scrunched up and sewn together. Once you have the strip done, the directions say, "sew flower as illustrated". 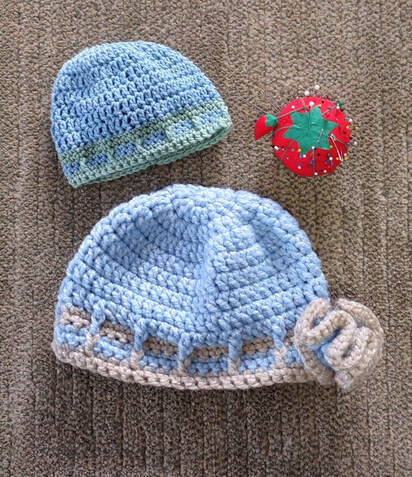 This turns out pretty cute. I think the matching scarf would be cute with the pockets too. This pattern gets 4 out of 5 stars. If the pattern was less confusing at the end I would have given it 5 stars. The gauge issue was mostly a yarn substitution issue and if I'd used their suggested and discontinued yarn it probably would worked right the first time.
The March patterns are all coming from a 1974 Spring-Summer Good Housekeeping Needlecraft magazine I picked up in a used bookstore in Fergus Falls! I'll show you those and some other fun things from the magazine next week.
The hat for this week is from the February 1973 edition of Workbasket Magazine. Here is their photo. She looks so happy!  This pattern is very simple. There are 11 rounds of double crochet before the popcorn stitch and it's done in a classic hat style with increases up to round six where you do the rounds with the same number of stitches. The directions for the popcorn stitch take up more room in the magazine than the rest of the hat. It tells you to use a G size hook and knitting worsted weight yarn or what you need for gauge but then only gives a gauge for the knitted sweater. I didn't have enough bright pink to do the color in the pattern so I went with the yarn below.  This hat is described as "close fitting". I'd describe it as small and decorative. It barely comes down to my ears. To make this more than a decorative hat you could add another three rows before the popcorn stitch. Overall this is an easy hat, the directions are good and it's cute when done but just not very practical without some adjustments. I'll give it 3 out of 5 stars.
Next week I'm doing a hat that looks like it might be bigger than both of these and uses "rug yarn". Rug Yarn weight is a mystery but at least this time the pattern gives a gauge! I thought this pattern would go well. The instructions are pretty clear and since it's worked flat and sewn up, it was pretty easy to do the actual crochet part. Things are not always as easy as they look though. First, here's the yarn I used; Deborah Norville Everyday and some vintage Columbia Minerva. Both are 100% acrylic but the Everyday yarn is much softer. I don't think this played a roll in how these hats turned out.  This pattern says to use a size H hook for the hat and it tells you how to change colors which is nice for anyone who might be new to crochet. This is crocheted from the brim up. Directions start out with chain 72 to measure approximately 17 inches. I used the H hook, chained 72 and measured. It was more than 17 inches so I dropped the hook size down to a G. This time I got 17 inches with 72 chain stitches. Gauge achieved! You start out with a few rows of single crochet for the brim and then use higher stitches to start the ripple portion. The directions were pretty well written. Once I had the flat piece ready to sew up I knew that the gauge was either off or the woman in the photo was much smaller than she appeared. Here's the magazine photo next to what I got with a G hook that I thought matched their gauge.
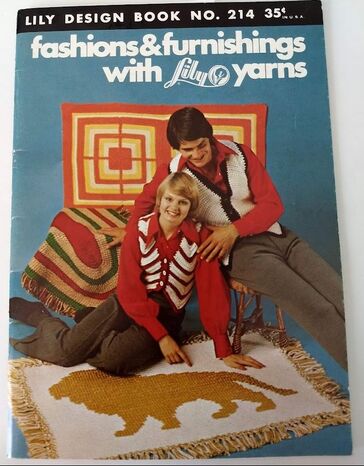
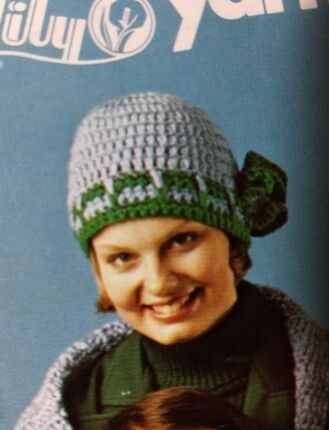
Maybe there was a typo in the gauge so I did another hat with the recommended hook and totally ignored their directions that 72 chains would be 17 inches. This looks better but it still barely covers my ears and I even did an extra row because it still looked small after I finished the rows in the pattern. Did people have smaller heads in 1981? If you have this pattern I'd suggest going up another hook size and possibly adding additional rows if you want something that covers your ears. I'll give this pattern 3.5 out of 5 stars. It's fine, not great. Ignore the gauge and trust your instincts on this one. 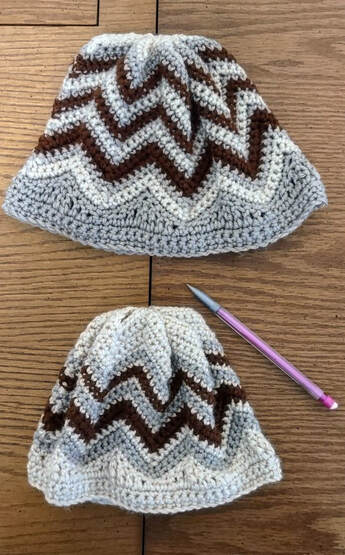 Next week, I'll review the popcorn stitch hat pattern where I will ask again, "Did people have smaller heads back in the 70s and 80s?" I have three hats planned for this month. First up is a ripple hat from the February 1981 Workbasket Magazine. I'll have that one ready for a review next week. While the pattern seems pretty straightforward I've already run into gauge issues. 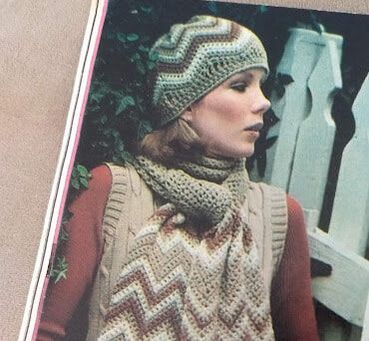 The second hat will be this pink hat with popcorn stitches from the February 1973 Workbasket Magazine.  The third hat will be this hat from the Lily Design Book No. 214. I couldn't find a publication date but based on the style of the patterns I'm going to guess late 1960s or early 1970s. It even has a pocket scarf pattern to match it. Pocket scarves were very popular last winter! 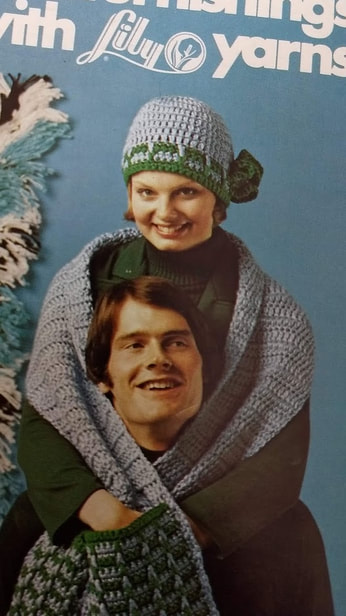 |


Proudly powered by Weebly