|
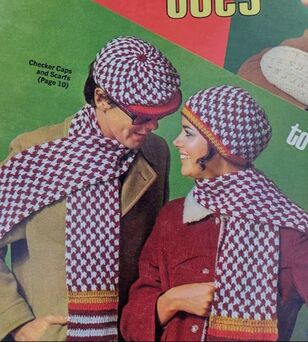
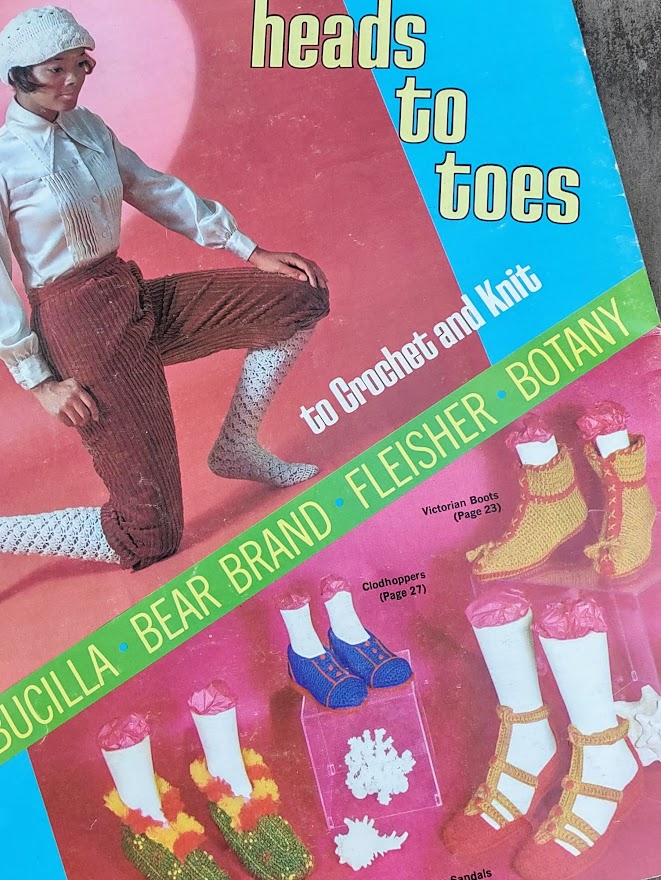
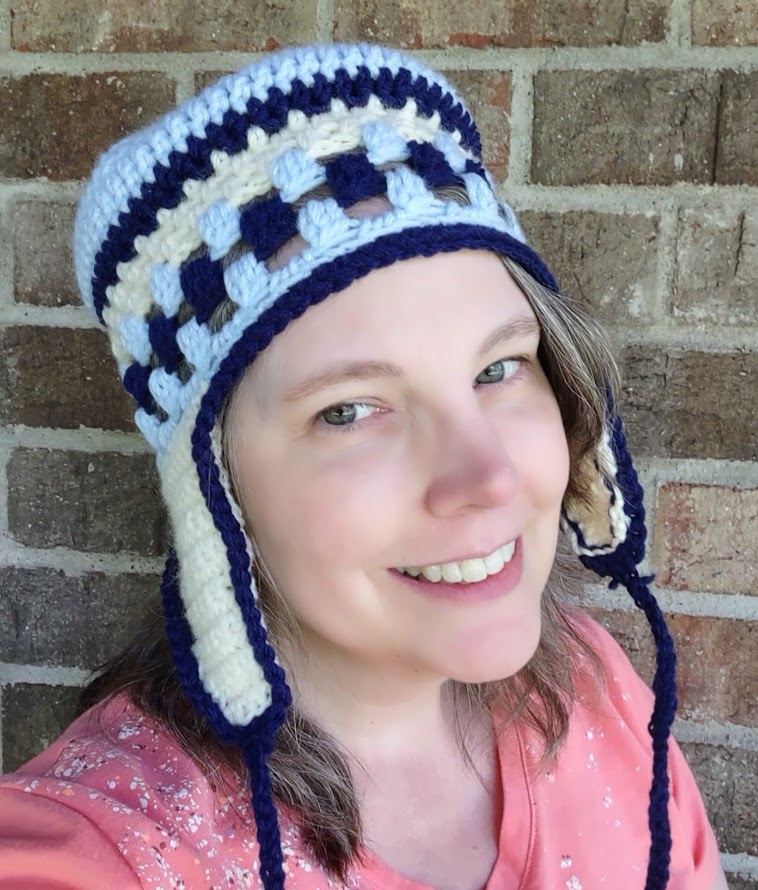
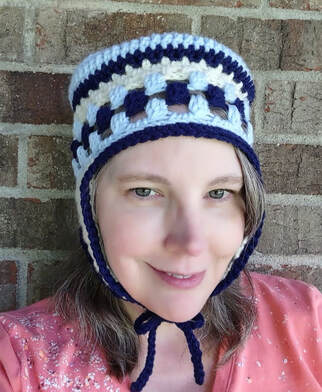
November will have two hats from this booklet called Heads to Toes. This booklet has both knitted and crocheted hats and um...things for your feet.
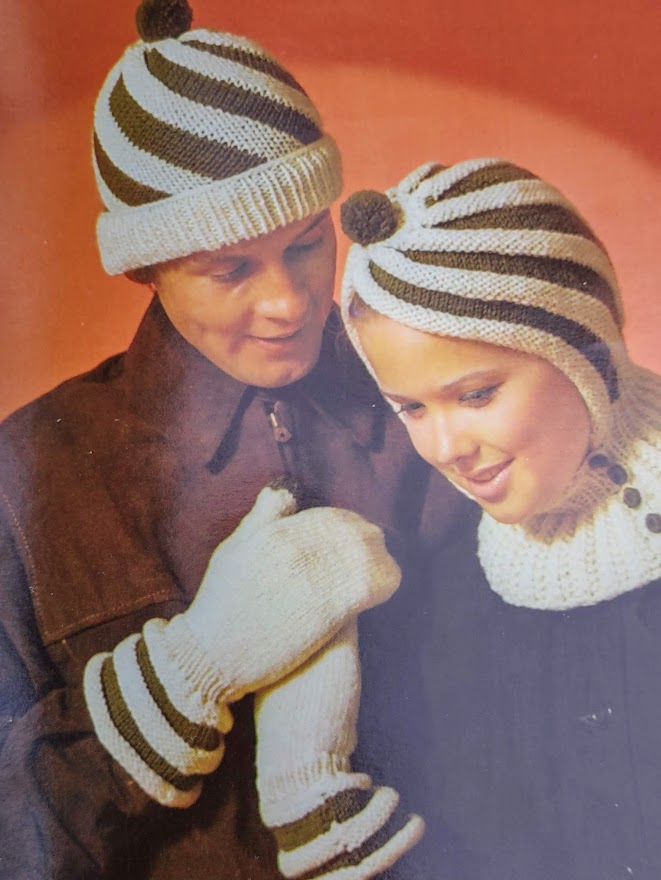
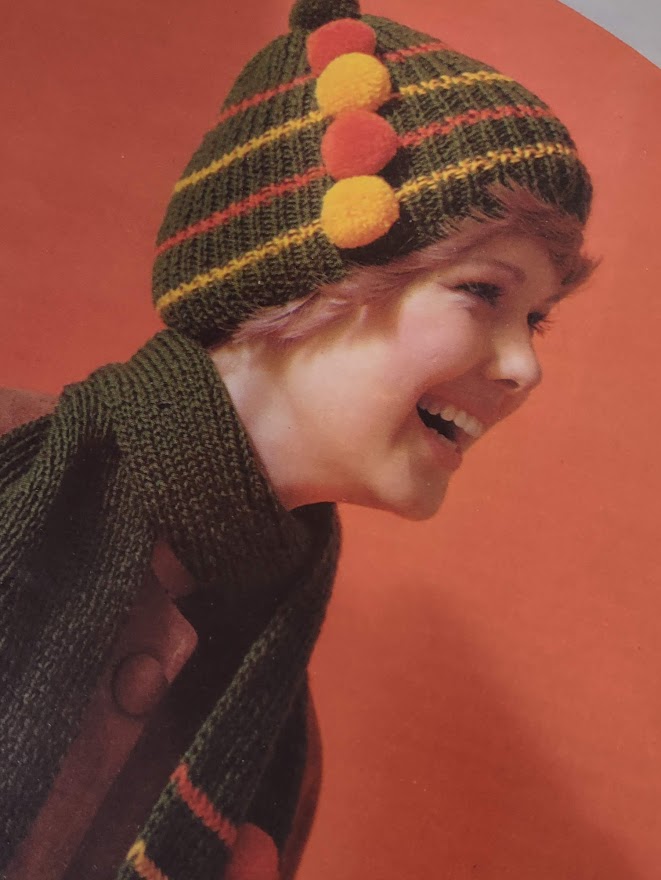
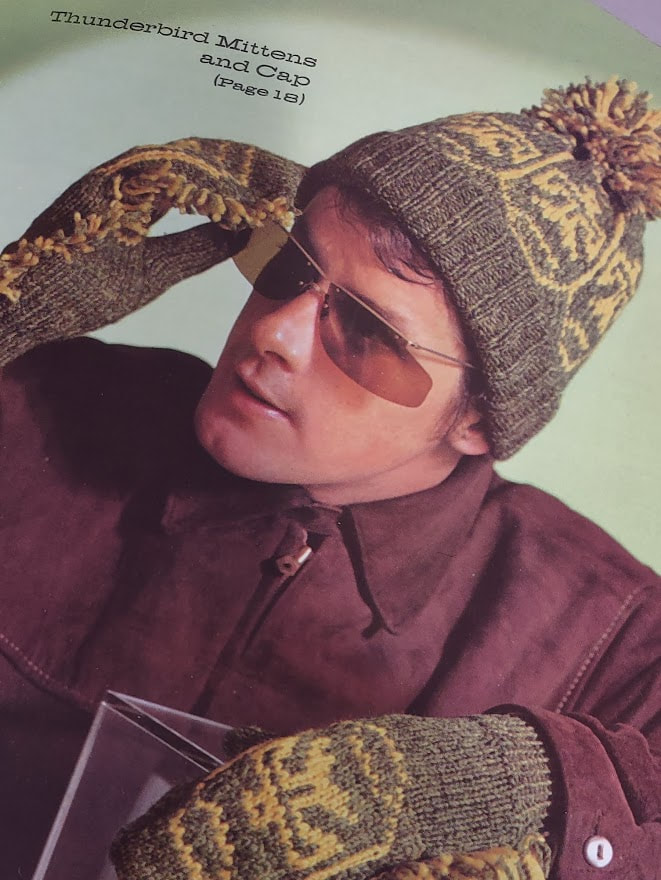
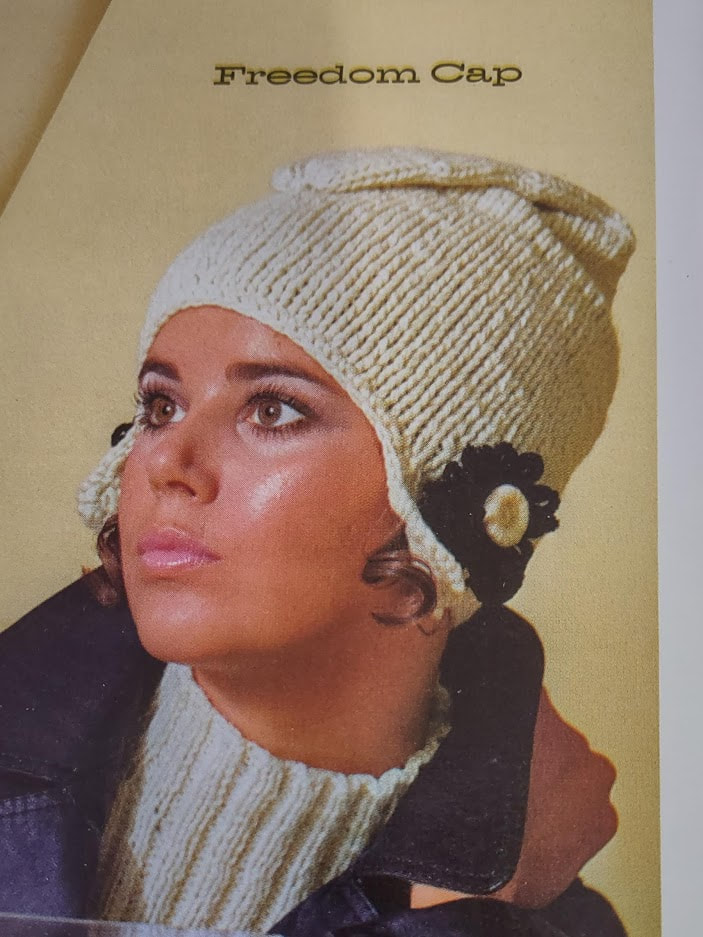
The "Toes" patterns include; Indian Moccasins, Clodhoppers, Victorian Boots and Roman Sandals. I'm intrigued by the Victorian boots but the colors they used are pretty terrible. They're the item under the word "Botany" in the photo above. One of the ways you can tell this is from the 70s is that some of the patterns and the names they chose for them are not appropriate today and of course they are all crocheted. We have a Babushka scarf and an entire outfit that is dressed up to look Native American made of a Serapi, Head Band and Pouch (aka poncho, headband and purse). That leaves me with four patterns from this booklet that I can make. Three of the remaining four have brims and want you to crochet some buckram between the layers and I'm just not willing to put that much work into a hat. The checkered hat on the cover will be the first one I make. Some of the knitted hats are fun too. I really like the Swirl Hats. They're unusual but kind of cool. The cowl on the one the woman is wearing looks practical and cozy. The Thunderbird Mittens have that odd fringe that seems like it would get snagged on everything but the hat is pretty nice. The Pom-pon Hat has a lot of pom-pons on it so I guess that name makes sense. I'm not sure I would wear that but it might fit someone else's personality perfectly. I don't know what's going on with the Freedom Hat. Is it called that because there's so much free space in that flap that's folded over her head? (After I posted this a reader gave me a link to this information about Phrygian hats which was very interesting and completely explains why that hat is called a Freedom hat. )
Next week I'll have the finished Checkered Hat to show you!
0 Comments
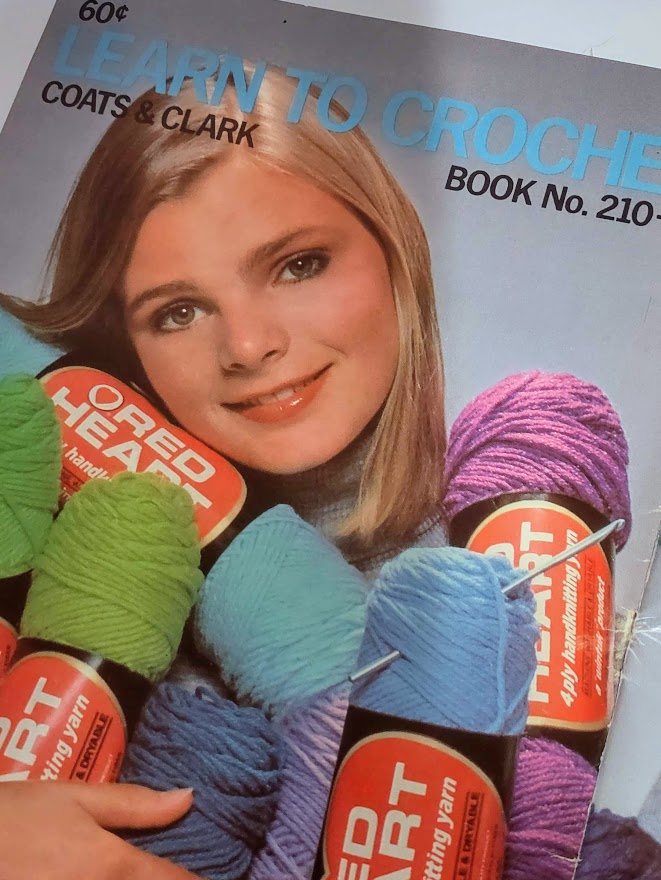
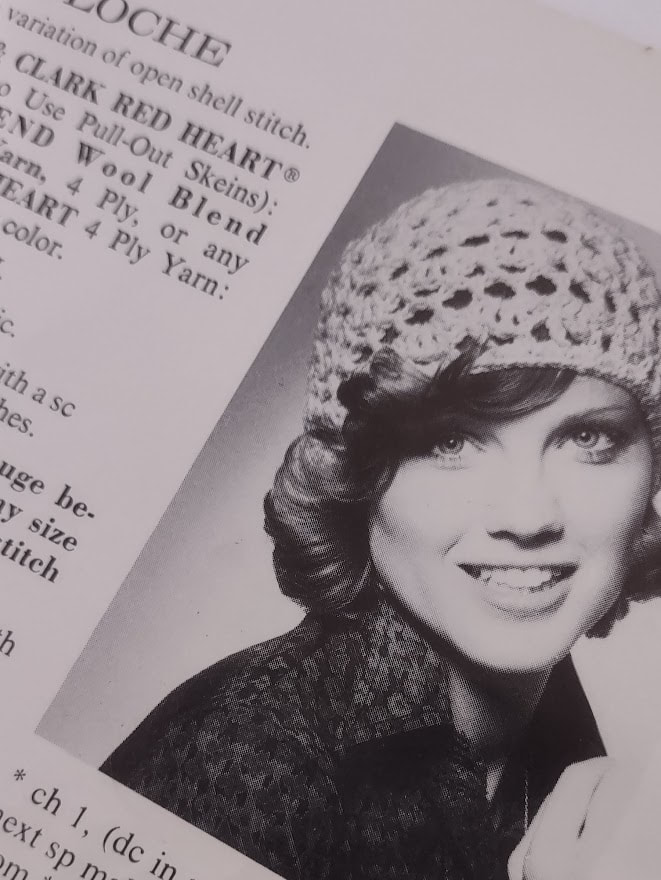
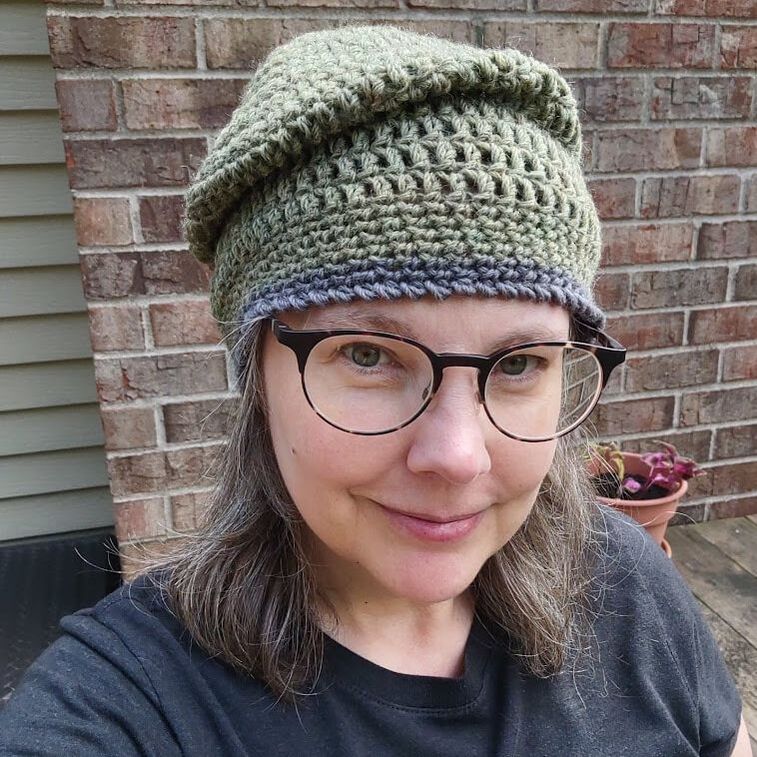
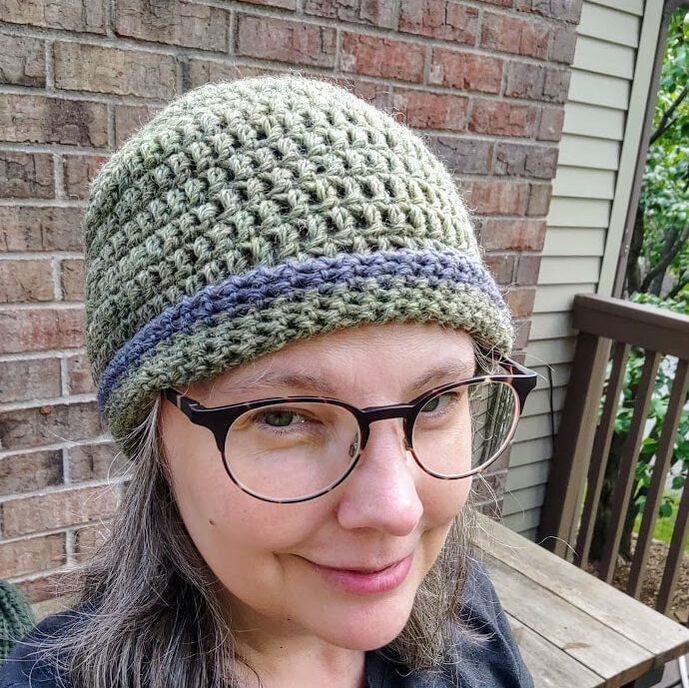
For this week's pattern, I pulled out one of the Learn to Crochet books. This one is from 1974 and has a dozen or so patterns in it with the Cloche being the very last one in the book.
This pattern uses 3 ounces of worsted weight yarn, a size I hook, 3/4 yard of round elastic. I had some leftover worsted weight Lion Brand Heartland in the color Hot Springs (aka purple) but I didn't have 3 ounces. I had about 2 ounces. I've found that a lot of patterns will give the amount needed as a full skein even if you don't use the full skein. The hat seemed pretty open so I was skeptical that I'd really need 3 ounces. The pattern gives a gauge that I matched so I started. It's worked in the round starting at the top. About half way through the hat I realized two things; I was not going to have enough yarn to do that hat as written and, I didn't want to do the hat as written. It was already close to the right size and since I wasn't going to have enough yarn I decided to cut it from 20 rounds to 15. The last step tells you to hold the elastic along the top of the last round and work over it. What it doesn't tell you is to measure it around your head and tie the ends together at some point. Maybe that's obvious but this is a beginners book and I think they should be a little more specific in their instructions.  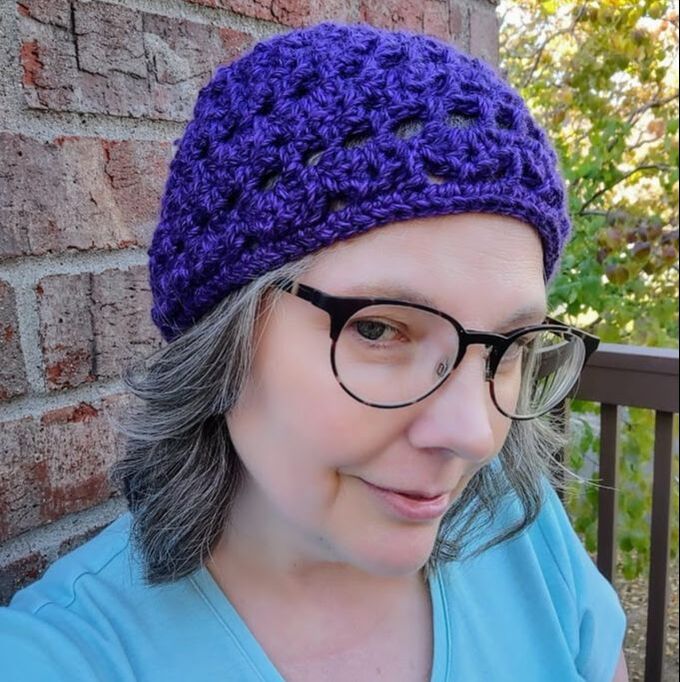 I'm giving this a 3.5 out of 5. If I'd done all of the rows it would have been pretty slouchy. Even though I made the elastic shorter it's still kind of loose around my head. The directions could have been a little clearer for the finishing. It mostly fits.
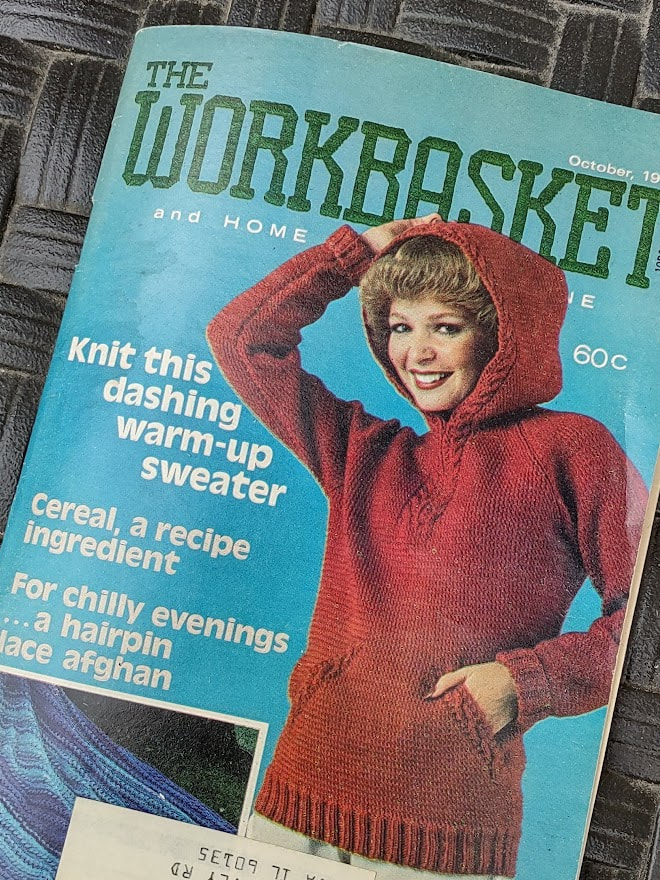
For November, I'm going to pull from a couple of different booklets. The first one is from 1970 and has some interesting patterns.... This week's hat comes from the October 1979 issue of Workbasket Magazine. It is one of five crochet patterns in the issue. The others are a cardigan, a hair-pin lace afghan, a hexagon pan holder and a disco bag. Sidebar: I saw the disco bag listed in the contents and thought, "Interesting! What makes it a disco bag? Is it sparkly or colorful?". It is none of these things unless you decide to make it that way. It's just a regular flap purse made out of regular chenille yarn. I guess that would make it soft and fluffy but that doesn't seem very "disco".
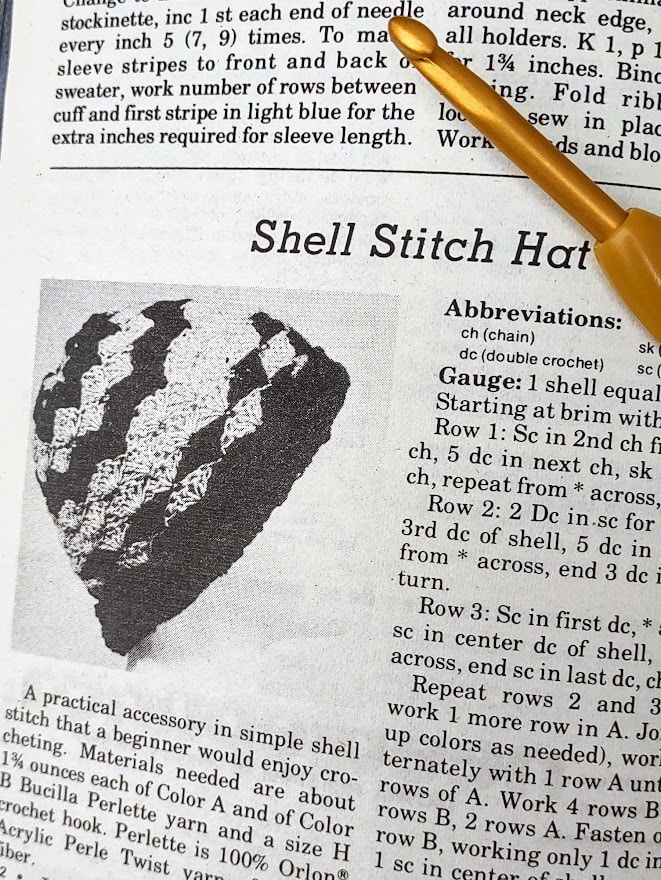
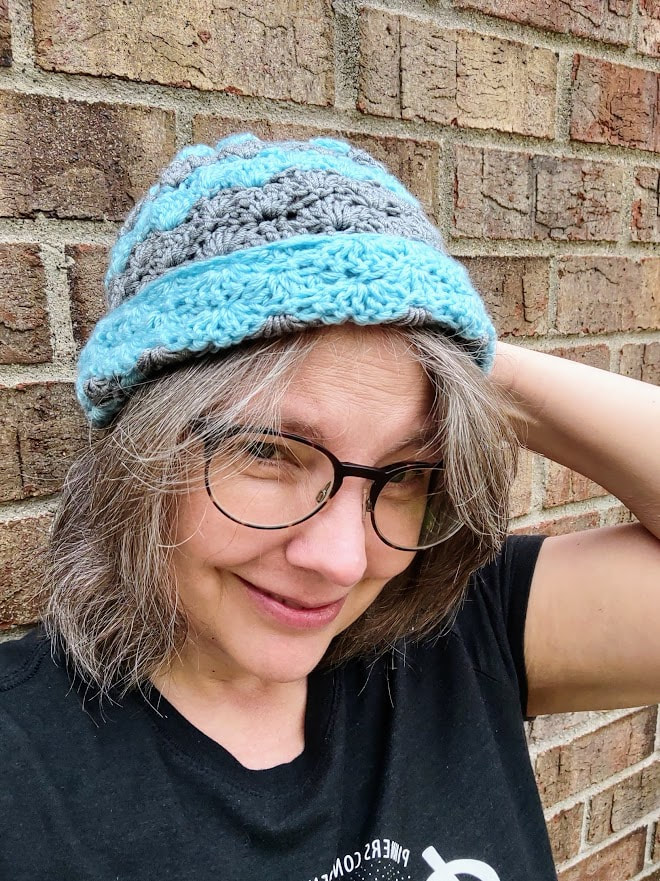
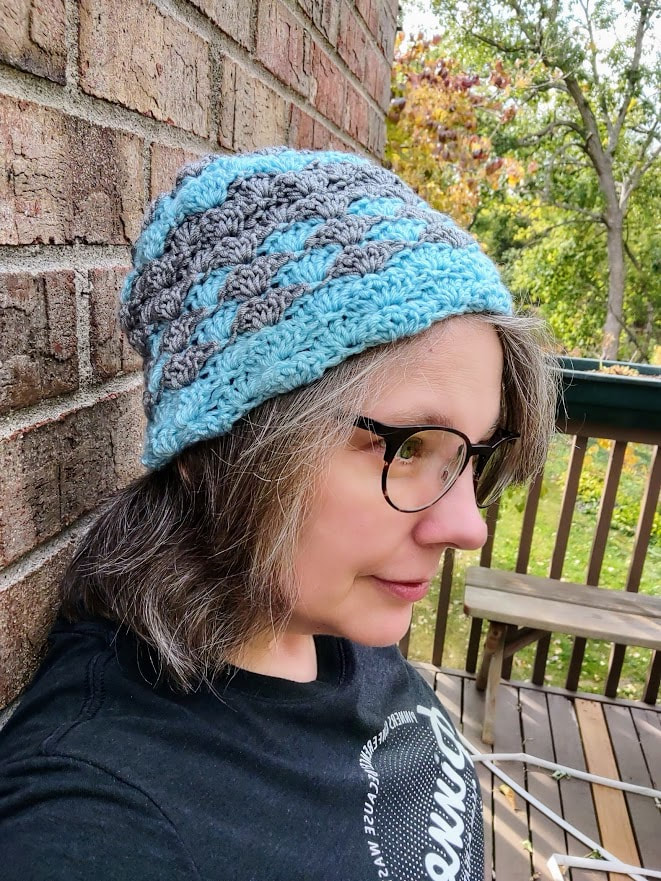
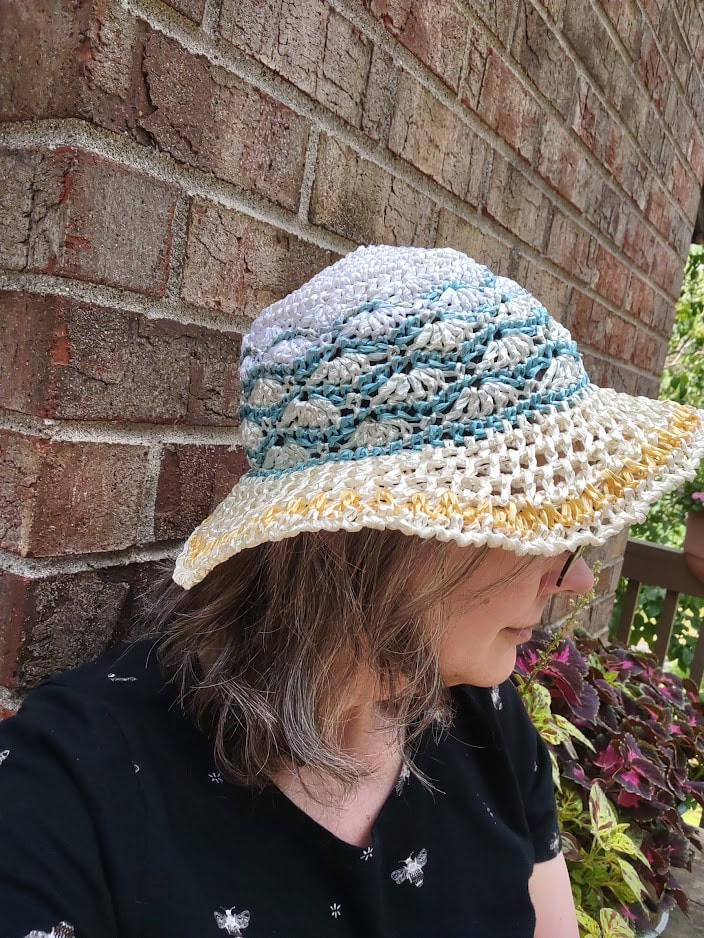
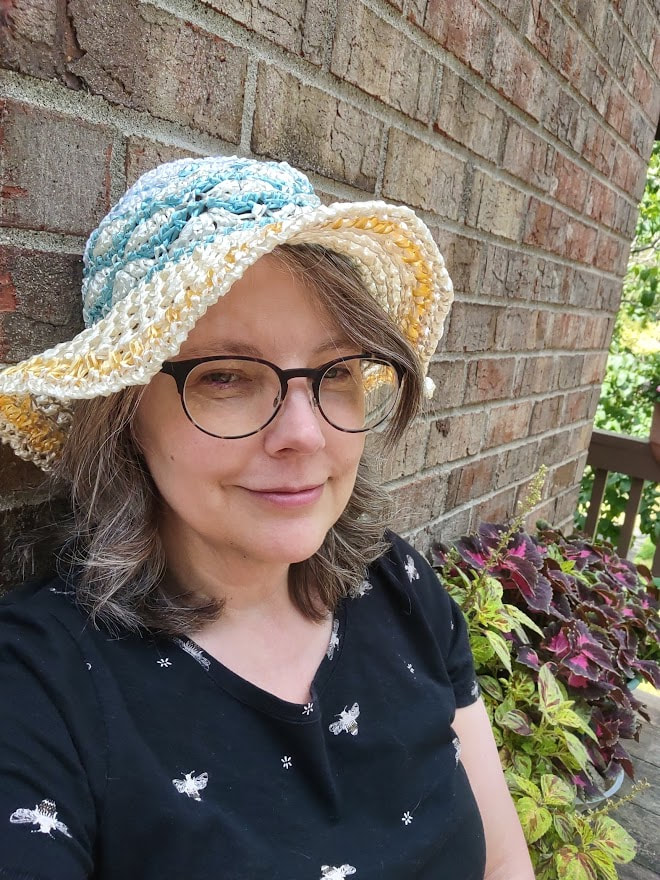
The Shell Stitch hat uses a size H hook and sport weight yarn. I used some leftover Master Knit Lucero in gray and Premier Yarns Everyday Baby in blue. Both are super soft yarns. There is a gauge given and I was close enough to it that I felt fine going on with the pattern. This is another pattern that's worked side to side and then sewn together and gathered at the top. This type of construction worked pretty well for the stripes. I was able to carry the yarn up the sides and hid it in the seam which meant fewer ends to sew in. Any ends I had left on the sides were used to make the seam the same color as the stripe. The instructions were pretty simple and easy to follow. I didn't quite understand why there are fancy stripes that are then folded over so you can't see them. Why is there even a fold? Here is the finished hat, with it folded up and a side view without the fold.
I'm going to give this a 5 out of 5. It fits, the directions are clear and you have the option of wearing it folded up or a little slouchy.
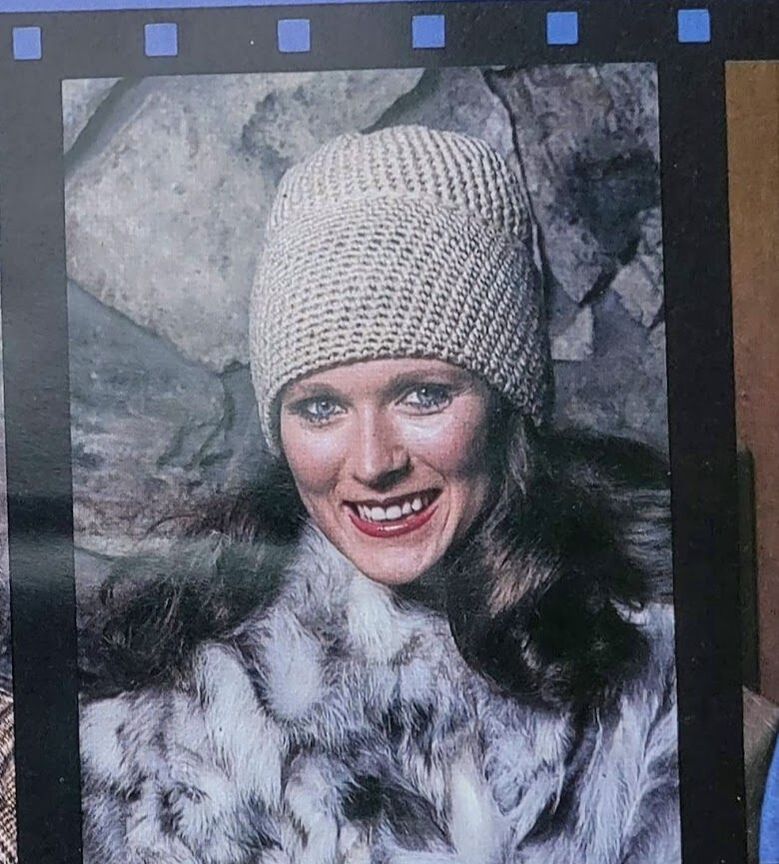
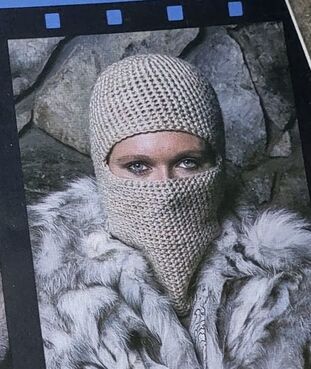
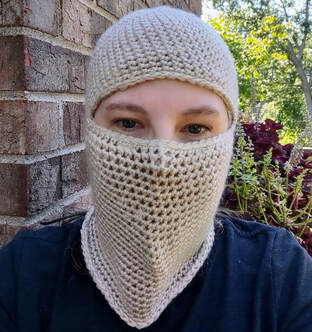
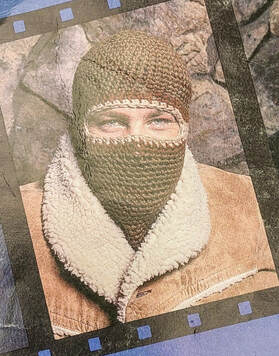
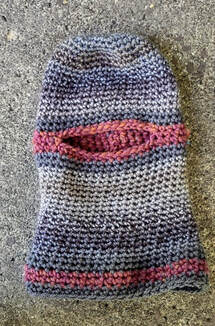
Last month I did the "Bulky Crocheted Ski Mask" and it was very very tight on me. I thought I'd try another ski mask pattern in the leaflet to see if I could get a better result. This is called "Crocheted Ski Mask or Cuffed Hat" and uses four ounces of worsted weight yarn and J hook. It has a gauge that I was a little short on and instead of using a bigger hook I decided to make the large size.
This worked fine. It's a very simple (boring) pattern that's done top down and has no decreases at the bottom. You can see in the photo that it just goes straight down. I don't have a problem with that but if you don't add a scarf the wind could easily blow right up the bottom of the mask. I used one of my favorite discontinued yarns; Deborah Norville Premier in a color that comes pretty close to the one in the leaflet.
I'll give this a 4.5 out of 5 just because it's so open at the bottom I'm not sure it how it work in it's ski mask form.
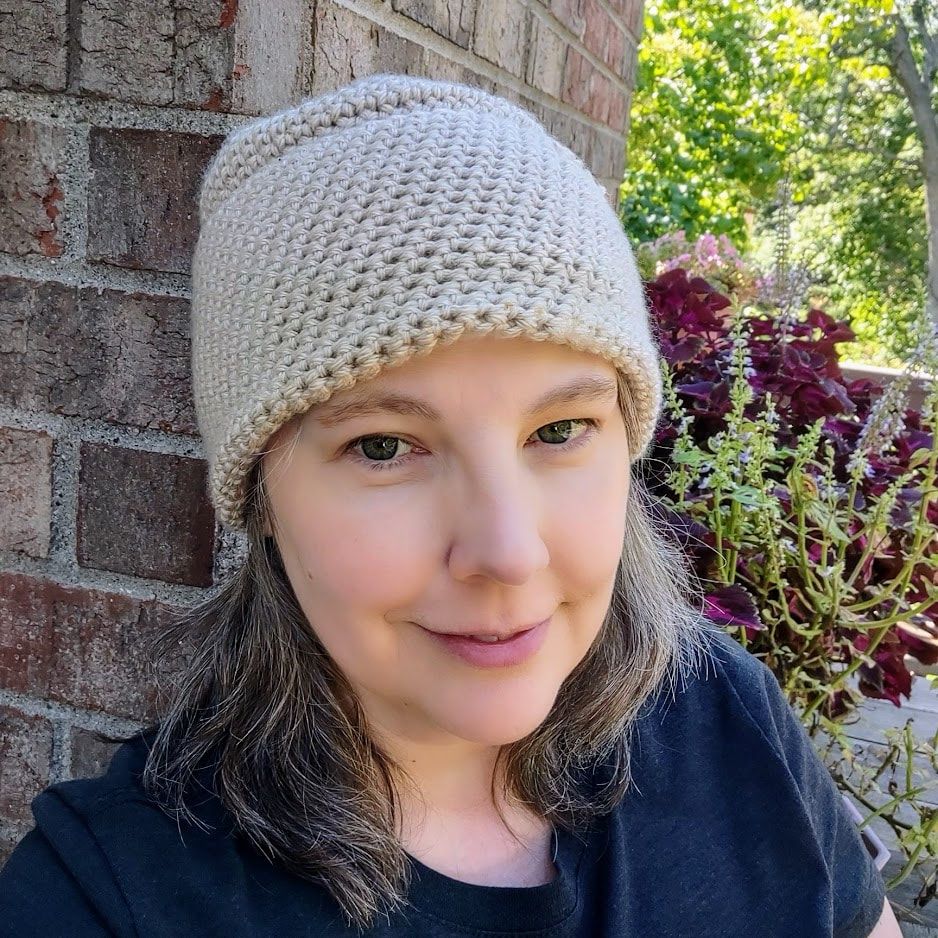
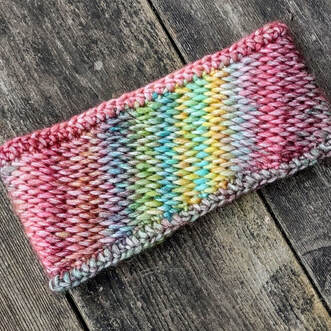
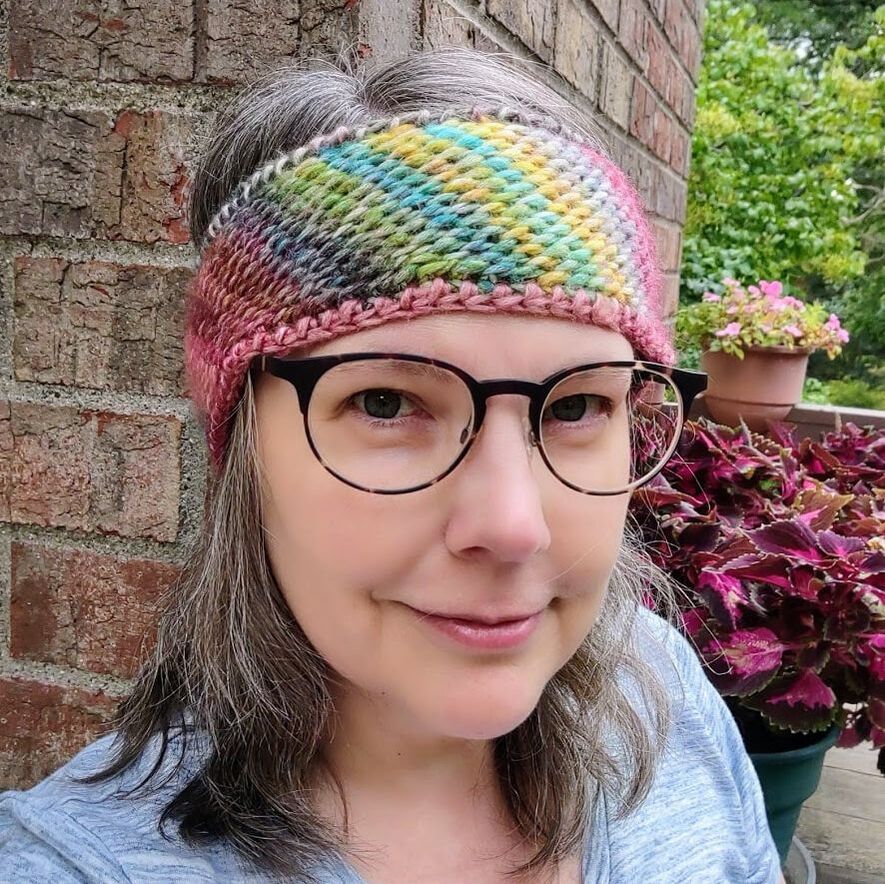
What should I do for 2023? There are only a couple of months left of the year and I'm starting to think about what I should do next year for this blog. 2022 was the year of the hat. What should 2023 be? I could just keep doing hats. I don't have a shortage of vintage hat patterns. I thought about doing bags, purses, tote bags, etc. I don't know if I could do one a week though. Potholders? I have tons of patterns for potholders. Let me know if you have ideas! This is the sixth pattern from the Leisure Arts booklet, "Caps, Hats and Helmets". This time it's not a cap, hat or helmet though; it's a headband. It uses Afghan aka Tunisian stitch. I think this is the second project I've finished with this technique. 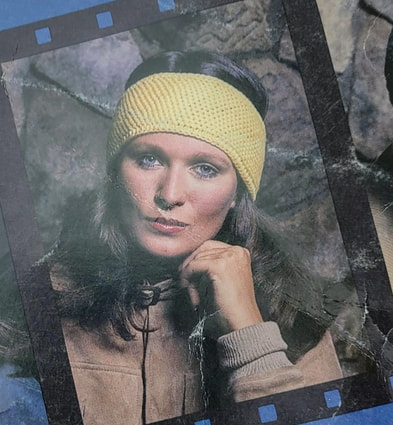 The pattern uses 1 ounce of sport weight yarn and a size G aghan hook and regular hook. This was a great project for some smaller leftover yarn and I had the perfect yarn for this. I forgot to take a photo but it's Knitting Fever Painted Mist in the color Cirque Mystique. I used most of it for this cowl: 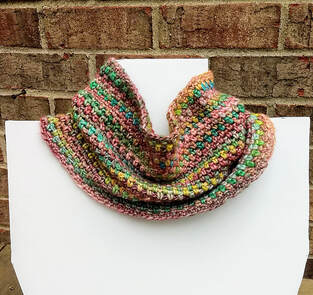 The pattern used a slight variation on a basic afghan stitch where it increased on one side and decreased on the other. This gives the finished headband it a bias cut look. I didn't have a size G tunisian hook so I just used a regular G hook and this worked fine. The headband isn't wide enough to need the longer hook. The instructions were easy to follow and didn't make me look up how to do the stitch. They included photos of the different steps to make it even easier. This is a great pattern for someone who is a beginner to tunisian crochet like me. It's worked as a long rectangle that's sewed up in the back and then an edging is added. I made this headband in just a couple of hours. Headbands aren't something I would usually wear. They tend to slide right up my head and look ridiculous but I do love how the yarn did some self striping on this pattern. I'm giving this a 5 out of 5. The pattern is well written for beginners. It's fast and it fits!
October Workbasket Magazines (at least the ones I have) were surprisingly light on hat patterns. The patterns they did have were ones that seemed really boring or were for babies so I decided I would just keep on making the hats in the same booklet I used for September. This week we have the Crocheted Hat with Earflaps. This is the fifth one out of the book. The first three scored high but last weeks ski-mask let me down a little. This week's hat is a little more complicated but not over the top difficult. 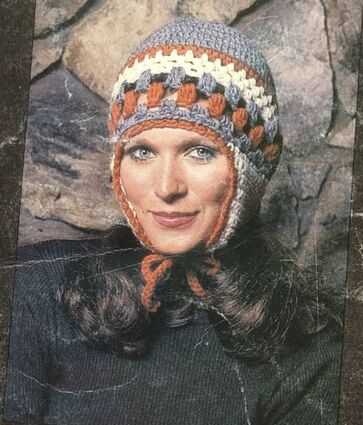 This pattern uses worsted weight yarn in three colors. The pattern gives the amount you need as weights: one ounce of gray and a half ounce each of rust and ecru. I weighed some scraps I had to make sure I had enough of each color. I used sky blue instead of gray, dark blue instead of rust and cream for the last color. I matched the gauge given with the recommended G hook. This is worked top down with the edging done at the end and the (short) ties done separately. Overall I didn't think this was a difficult pattern but I had few problems. I know I should over estimate the yarn I need but they gave such specific amounts and I wanted to trust them but I ran out of cream yarn so one of the earflaps has a slightly different cream color. 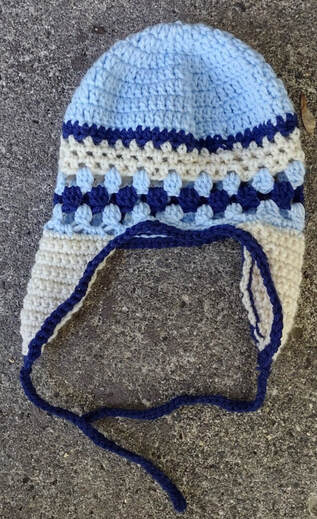 The next problem is the fit. This was really tight on my head and if I pulled it down to try to mimic the leaflet photo it completely covered my eyes. If I left it above my eyes like the photos below there was a lot of extra space on top of my head. I'm not wearing my glasses in the photo and it isn't because I thought it would look better; it's because I couldn't get them on under the hat. If you look at the magazine photo at the top of the post, it looks like the ear flaps are really far forward and I wondered if they were really covering her ears. The ear flaps are equidistant from each other and probably should have had a little more space in the front. The hat also looks like there's space on top of the model's head too. I actually tried to pull it down to be more like the magazine photo and the ties broke off. The ties were done separately and then sewed on with the yarn and I didn't do a great job of getting them secured. That was the last straw on this hat. It went straight into the garbage.
I'm giving this 1 out of 5 stars. The directions were fine but it doesn't fit. The fit is a little odd in general and their estimate of the yarn required is a little off in the wrong direction.
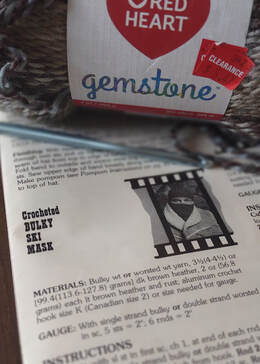
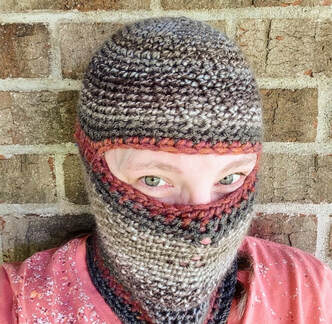
Next up we have the Crocheted Bulky Ski Mask. This is the fourth one I've made out of the leaflet and they've all gone pretty well. Will this go as well as the others? Let's find out. This uses bulky yarn and a size K hook so I thought this would be pretty easy and fast to do. There is a gauge again which is awesome and I matched it with the Red Heart Gemstone I found on clearance. I used some scraps of bulky weight for the contrast colors around the face. The pattern also has three sizes and I made the small size.
This is a pretty simple pattern that's worked top down. From the picture I thought the contrast colors would only be around the eye opening but they are worked all the way around. My contrast colors were gray and a variegated reddish color. The gray kind of blends in the with the main color but the red pops out more. The only difference on the sizes for medium and large was one more round of increases at the top and a few additional rows to make it longer. I wanted to use up the rest of the scraps I had so I switched back to those for the bottom rows of the ski mask. As this was working up I started to think that maybe the small wasn't the best choice on the size. One more round of increases would have made a little less constricting. In the photo below it looks like it fits until you notice how my nose is poking out between the stitches. This hat was very tight. Definitely a kid size. Aside from the sizing issue though this is pretty easy to make. I don't love the color of the yarn I used for the main color but it was surprisingly difficult to find bulky weight yarn that wasn't velvety or some other novelty type.
I'm giving this a 3.5 out of 5. It doesn't fit and their sizing directions don't seem like they'd make much difference between the large and the medium. It is an easy pattern and could easily be used as a starting point for anyone who wanted to adjust it to fit other sizes so it's not a total loss.
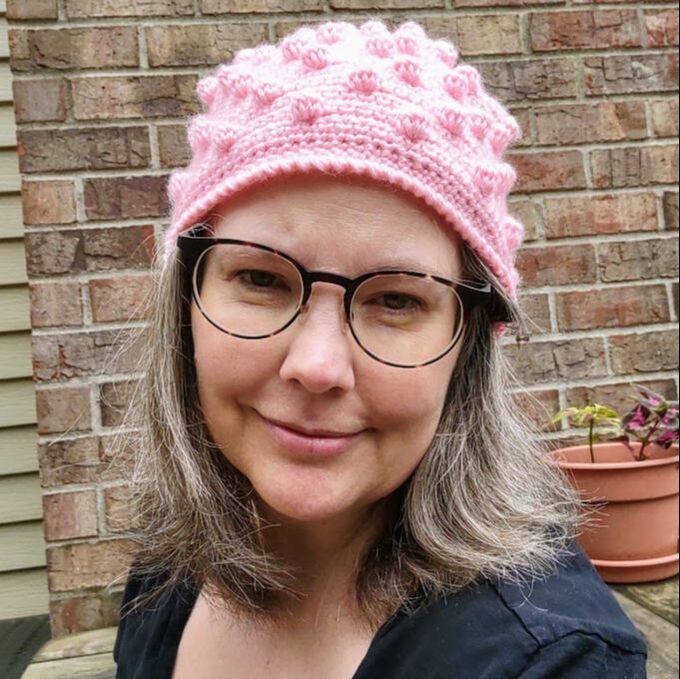
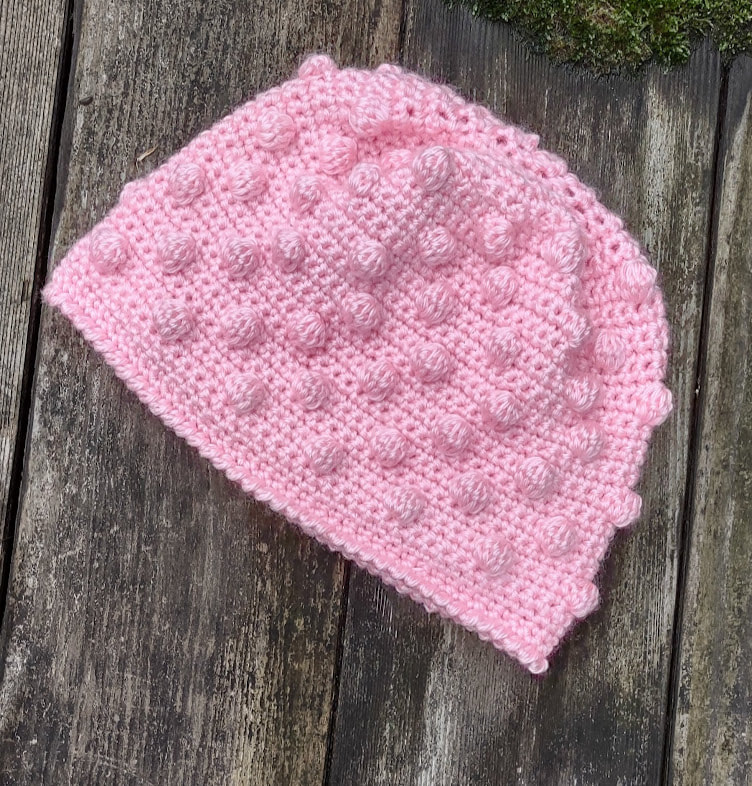
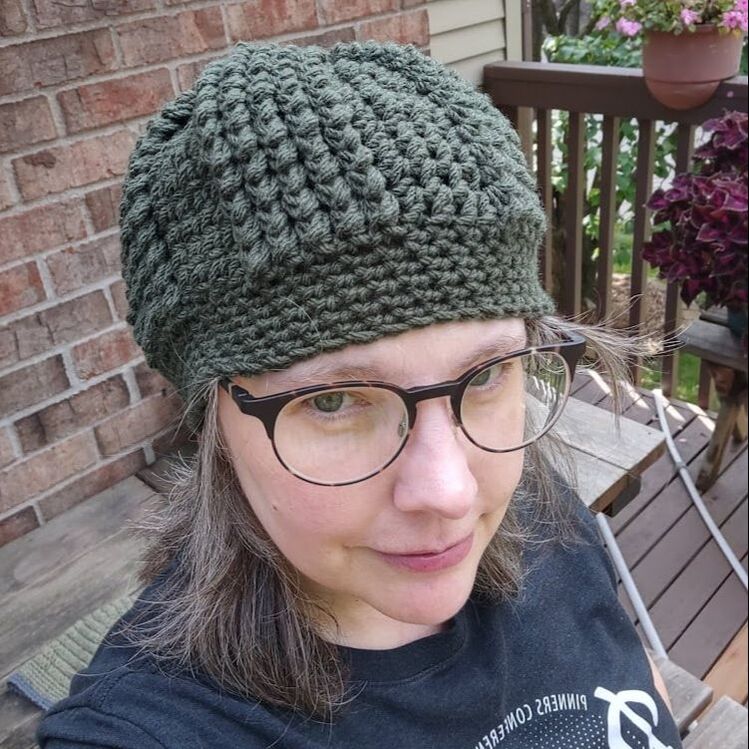
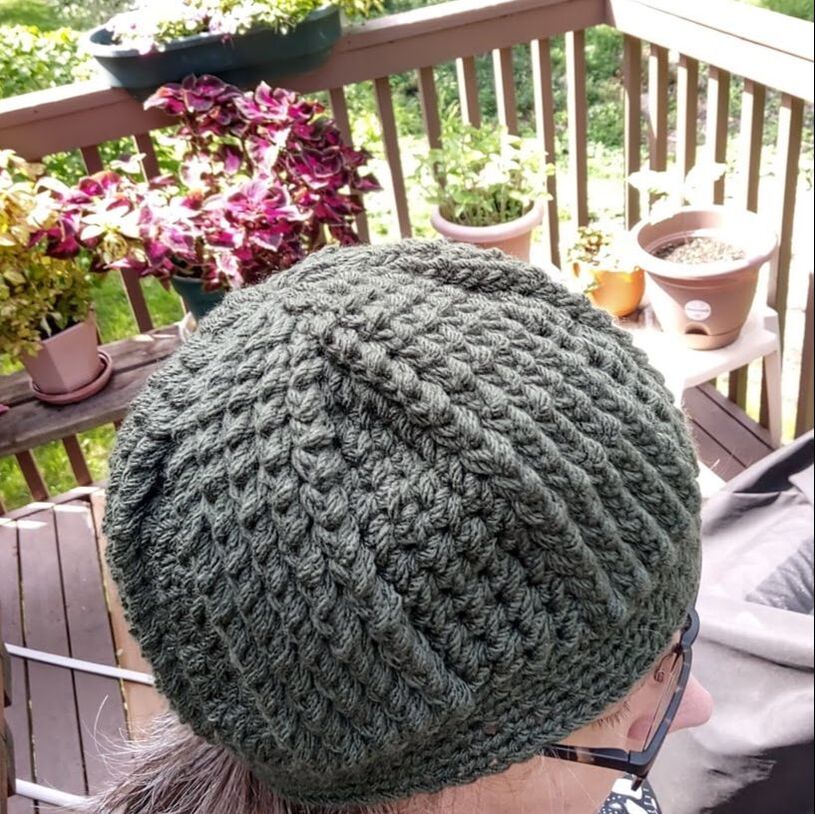
This week I have the third hat from the Leisure Arts booklet and it's a Bobble Stitch hat.  This uses 4 ounces of worsted weight yarn and two different hooks; an F and a G. This pattern also gives a gauge and once again I can get the stitch count gauge right but the row height is a little off. I used an acrylic yarn in pink from my stash that had no label. The pattern uses the G hook for that hat part and then switches to the smaller hook for the band. The construction of this hat is a little different than most. It's worked flat for the main part of the hat with decreases at the top. Then it's sewn together with a seam down the back. The band is worked after the seam is sewn and is just single crochet with a reverse single crochet as the border. Like the previous hats I made from this booklet, this hat was easy to crochet, the directions were clear and easy to follow and it made a nice hat that fits. It was a construction method I haven't done for a hat and I was happy with how it worked and was super easy. I'll give this a 5 out of 5 stars. I'm pretty impressed with this booklet so far!
The second hat from the Leisure Arts Leaflet is this Winter Warmer Hat. There are two versions in the booklet. The photo for the one I made is below. The other one has the brim turned up and flowers embroidered on the brim.  This hat uses sport weight yarn and an I hook. I had some partial skeins of Knit Picks Wool of the Andes Sport that might not be enough on their own but I figured I could change colors at some point in the pattern if necessary. A gauge was included again and this time it even gave instructions on how to check your gauge with a 10 row square. My gauge was fine for width again and a little off on the height. This hat was very simple. This is worked top down and is rounds of double crochets joined with a slip stitch at the end of each round. The band is single crochet worked to a length and a reverse single crochet for edging. I ran out of the main color and did have to change colors at the end but I think that just adds a little more interest to the simple pattern.  There isn't anything wrong with this hat but it was a little bit boring to make. It's also a long hat - not surprising since the photo makes it look long. This is a good hat for beginners and the reverse single crochet at least makes it a little more interesting. I'll give it a 4.5 out 5. In the first photo below, I'm trying to wear it like the model in the leaflet. The second photo is how I would probably wear it if I was keeping it. If anyone is interested in any hats I post, let me know and I'll give them to you for the price of postage.
For September, I'm making hats from this Leisure Arts 1978 leaflet. 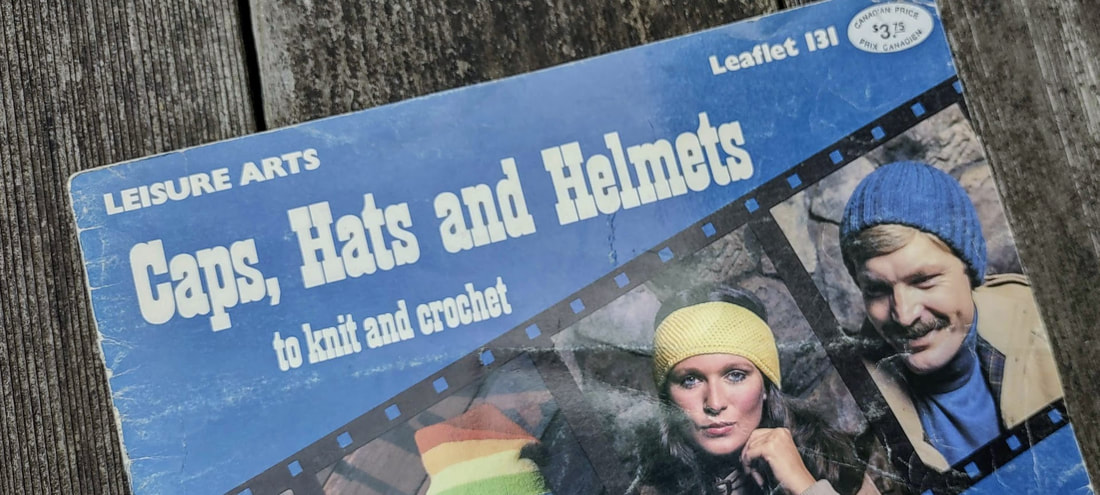 This week's hat is called, Cluster Stitch Cloche. This hat is worked from the top down and has a really interesting stitch pattern. It's made with worsted weight yarn and a size J hook. The pattern includes directions for two sizes; regular and large. I made the regular size. The pattern even gives a gauge!  I had some leftover Loops and Threads Impeccable yarn and this worked fine for my gauge on the width part but I was a little big on the height part of the gauge. This should just make the hat a little taller so I wasn't worried about being a little off. I don't have anything bad to say about this pattern. The directions were clear and the cluster stitch looks good in this pattern. I like the texture that stitch gives and the top of the hat has a bit of stretch in it from the different sections of stitches. The band is just single crochet and doesn't have as much stretch as the rest of the hat but I think using a ribbing stitch in the band would detract from the stitch pattern. Here's the finished hat.  This gets a 5 out 5. The pattern is well written and easy to follow. It's not a difficult pattern and it makes an interesting textured hat. It fits and while it isn't my style it is a nice looking hat.
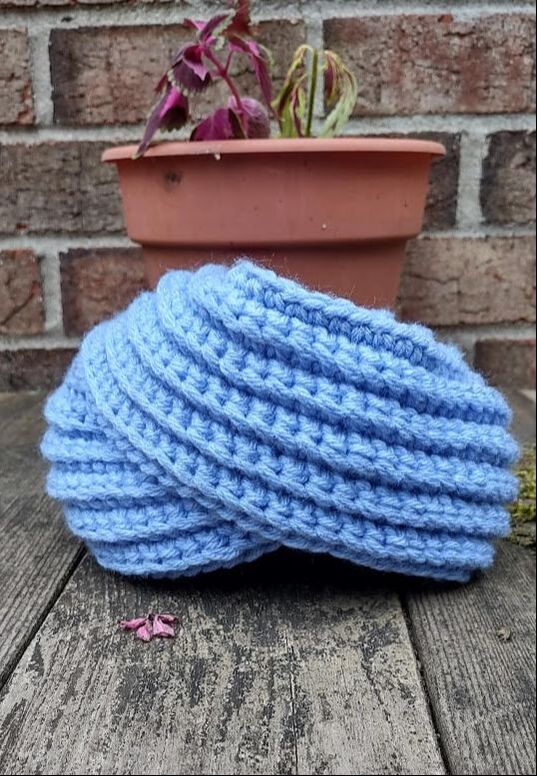
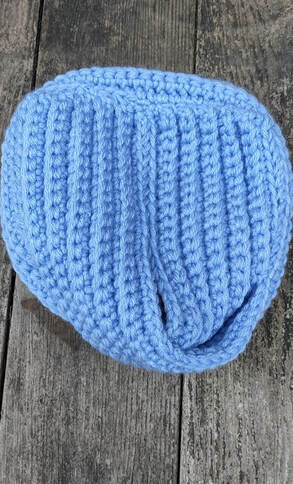
The Workbasket Magazine that the Shaded Beret came from had a second hat pattern for a Turban Hat. The construction looked interesting and it definitely was interesting in practice. 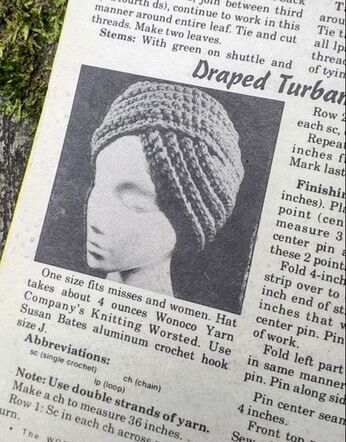 The pattern uses two strands of worsted weight yarn held together and a K hook so the crochet part works up quickly. The crochet part of this was very fast and easy because this is one long strip of single crochet worked in the back loop. The pattern gives you measurements to work towards (4 inches by 36 inches) and that would make it easy to adjust the size up and down if you wanted to. The finishing was a little harder to figure out. Here are the directions: "Fold work in half (4x18 inches). Place a pin on one edge at this point (center of the strip). Unfold and measure 3 inches on either side of the center pin and place pins at each of these 2 points. Fold 4-inch end of right hand part of strip over to center pin, easing the 4-inch end of strip in to fit within the 3 inches that were marked to the left of the center pin. Pin into place on the right side of work. Fold left part under and pin in same manner to the right of center pin." Here is a photo of what I ended up with after that pinning: 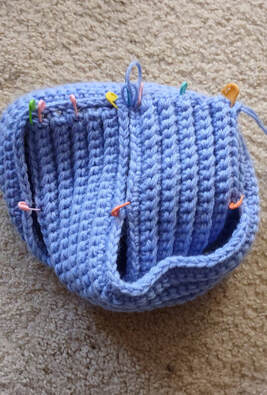 It took a few tries to get it there and then the pattern said to leave some parts open to make sure you're keeping the shape right. I think I got it mostly right. The top looks a little less wrapped than the front.
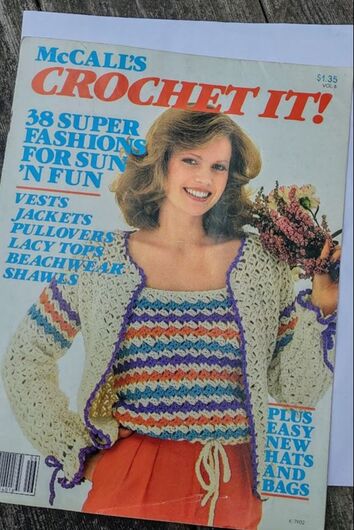
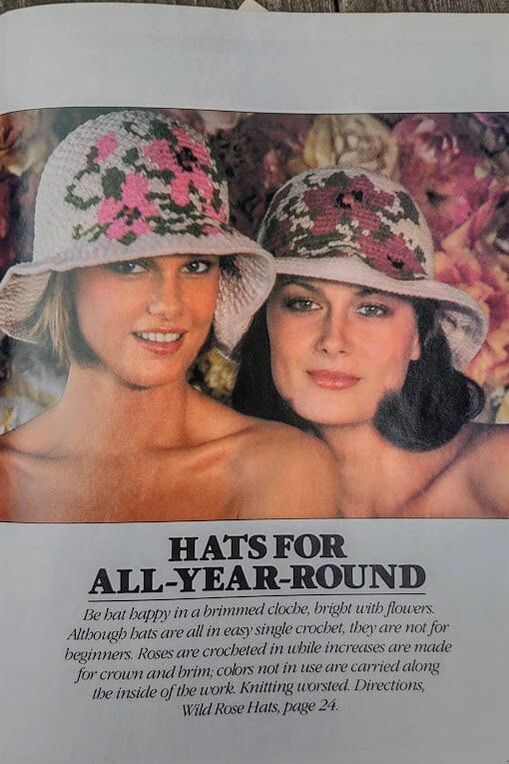
I'll give this 3.5 stars. The crochet is simple. I think there might have been way to write the instructions for assembly to make it a little easier to understand. I don't love this one but it wasn't terribly difficult and it fits. 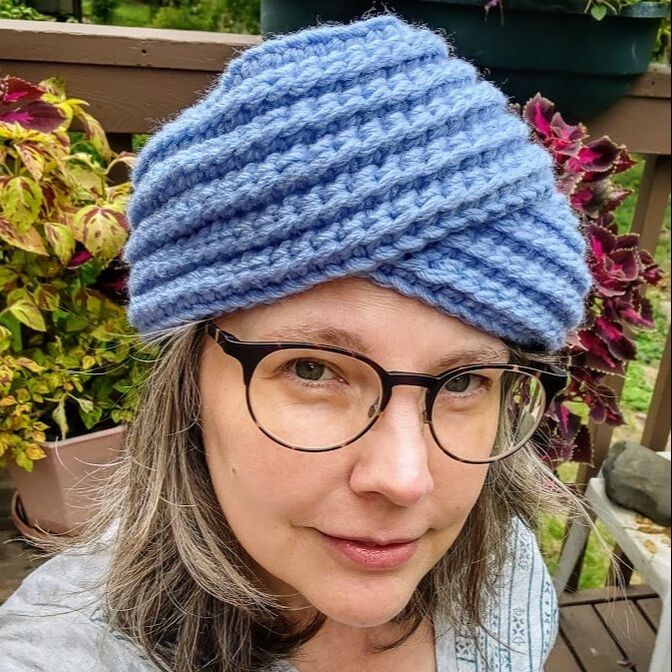 McCall's Crochet It has some really cute patterns and I'll do a profile of that magazine soon. One of my favorites is The Wild Rose Hat and since bucket hats are in again I thought I'd give this one a try. I've done some tapestry crochet before so this seemed doable.
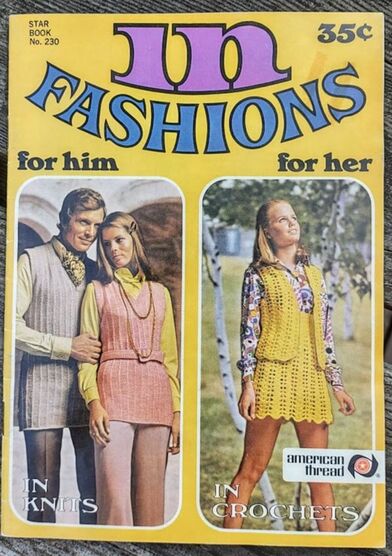
The pattern materials are worsted weight yarn; 4 oz. of white, 2 oz. each of green and rose and a few yards of black, red and light red. I used Lion Brand Cotton Ease in Lunar Rock, Rosewood and Bay Leaf for the main colors and I found scraps for the black and other two reds that used very small amounts. The pattern uses a G hook and gives a gauge that I matched in the top of the hat. What this pattern doesn't have is a graph for the roses. It goes row by row telling you when to switch colors. This hat turned out fine but there are a few issues with the pattern. In the photo above, it tells you to carry along the colors not in use and this works well for most tapestry crochet because most tapestry crochet uses two colors per row or round. There were large sections of this that had three colors and at the centers of the flowers it was often 4 or 5 colors. You can't really carry that many strands under a stitch without messing up the gauge so I started letting the strands float. If I'd had a graph of the pattern I could have used yarn bobbins for the colors. Without that graph I wasn't sure how many bobbins I'd need vs how many yarn floats I'd have. You can see the messy floating yarn in the photo below. Even with floating the yarn, I cut and sewed in a lot of ends. 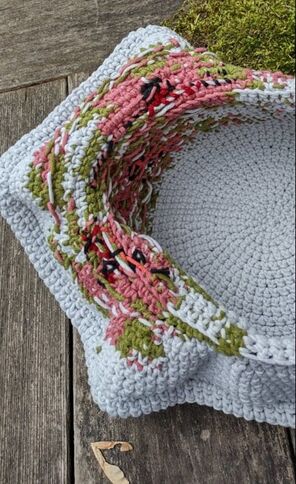 The pattern had more increases in the front than in the back but when I look at the magazine photo it isn't as wavy. I could block this out so it doesn't do that but I think it's ok without it. 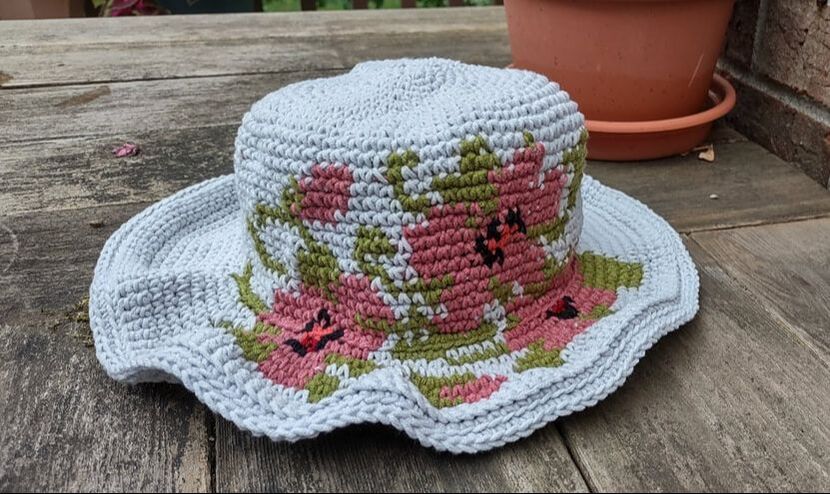 I've worn it out in public and had several compliments on it. My husband thinks I should line the brim so you don't see the floating strands. I'd definitely make this again with some bobbins and make some adjustments in the increases on the brim. I'm going to give this a 4 out of 5. It's pretty well written but would be better with a graph. It fits and it's cute. The brim is big enough to shade my eyes from the sun. It even semi-fashionable. 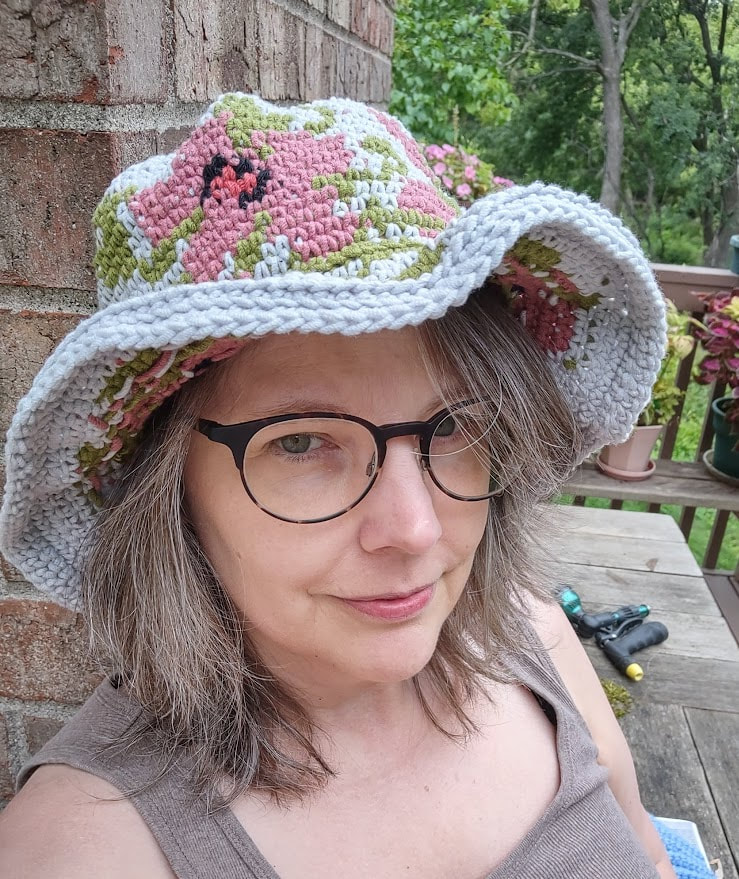 In early July I featured a pattern book called, "In Fashions for him for her" that has a section called flings and caps. One of the hats was so unique, I knew I had to make it.
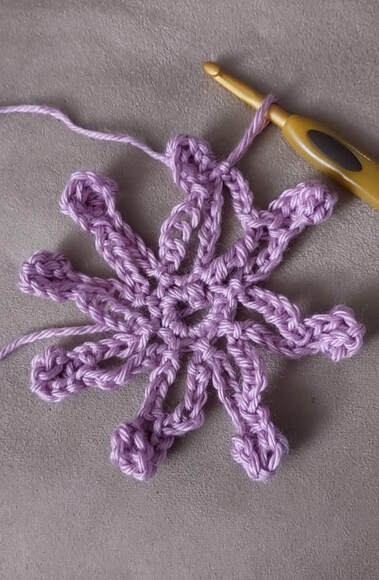
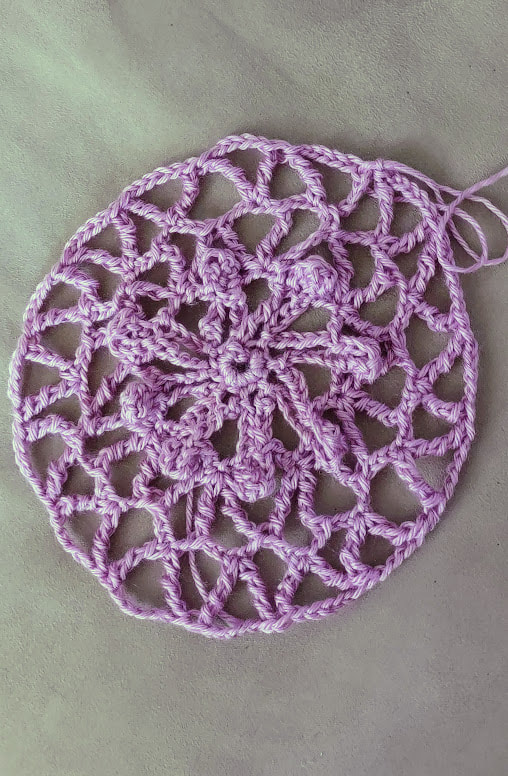
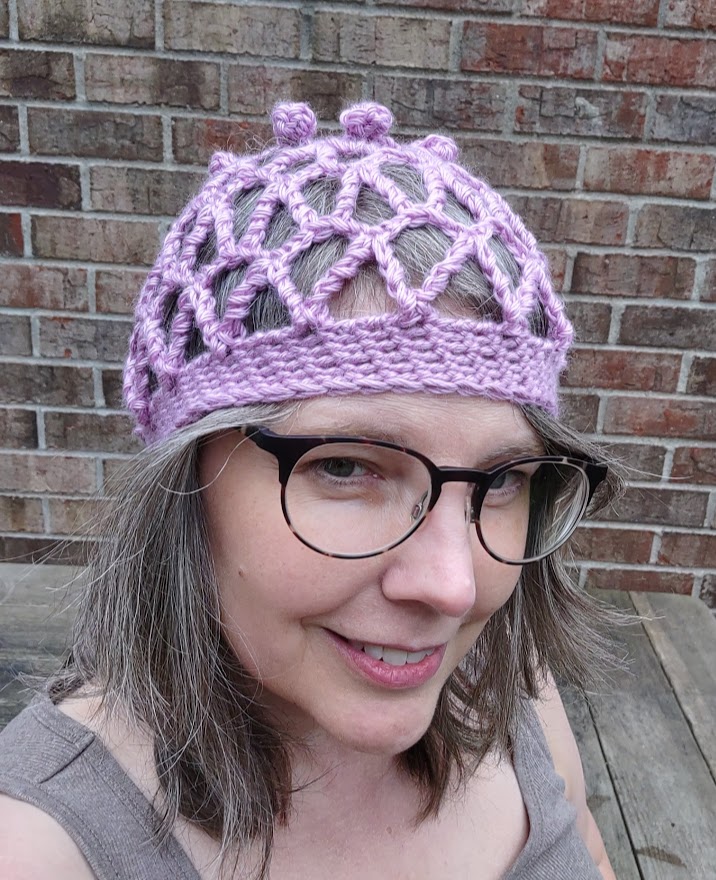
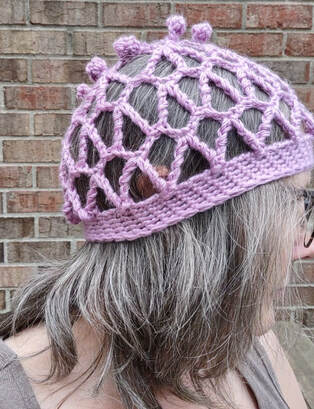
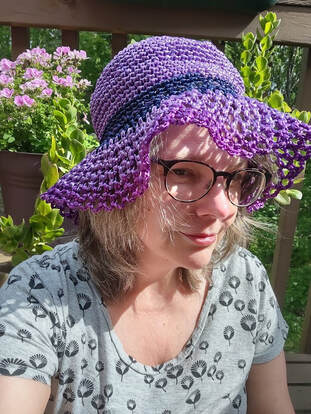
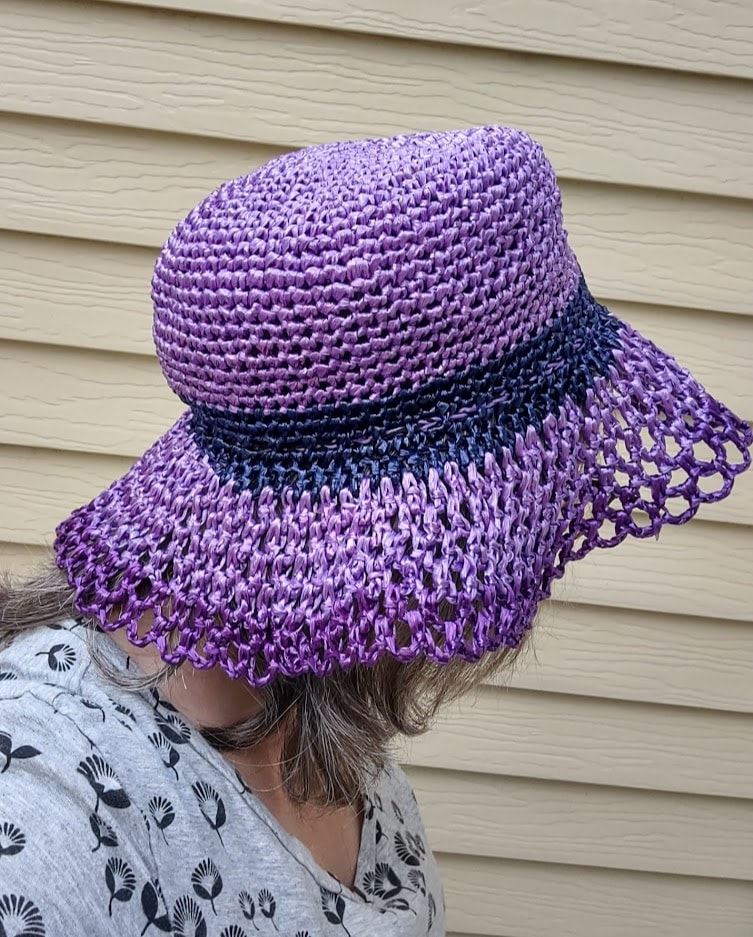
There is no fancy title for this hat in the booklet which is kind of a shame. The violet hat in the photo deserves a good name. It uses worsted weight yarn and specifies American Thread "Dawn" Knitting Worsted. It tells you that you will need a J hook and 2 - 4 oz skeins for both the scarf and hat. I took a chance with a partial skein of Lion Brand Basic Stitch Anti-Pilling Yarn in the color Prism. I had a little over an ounce of it to use and hoped that because it was a pretty open looking hat it would be enough. The hat starts at the top and works in rounds to the brim. When I started out I wondered if I was making a doily or a hat. In the photo on the right you can see the cluster stitches. Those are the ones that stand up in the photo above.
This wasn't a difficult pattern and it worked up quickly. There are a couple of rows where you're working around the back of stitches in the previous row that might be hard to understand if you've never done a doily or something that explains how to do those well. The finished hat seems pretty small when you look at it and I had doubts it would fit. Here's the finished hat next to my hand and a skein of yarn for scale. The weight of the finished hat is one ounce and I had just enough yarn to complete it. 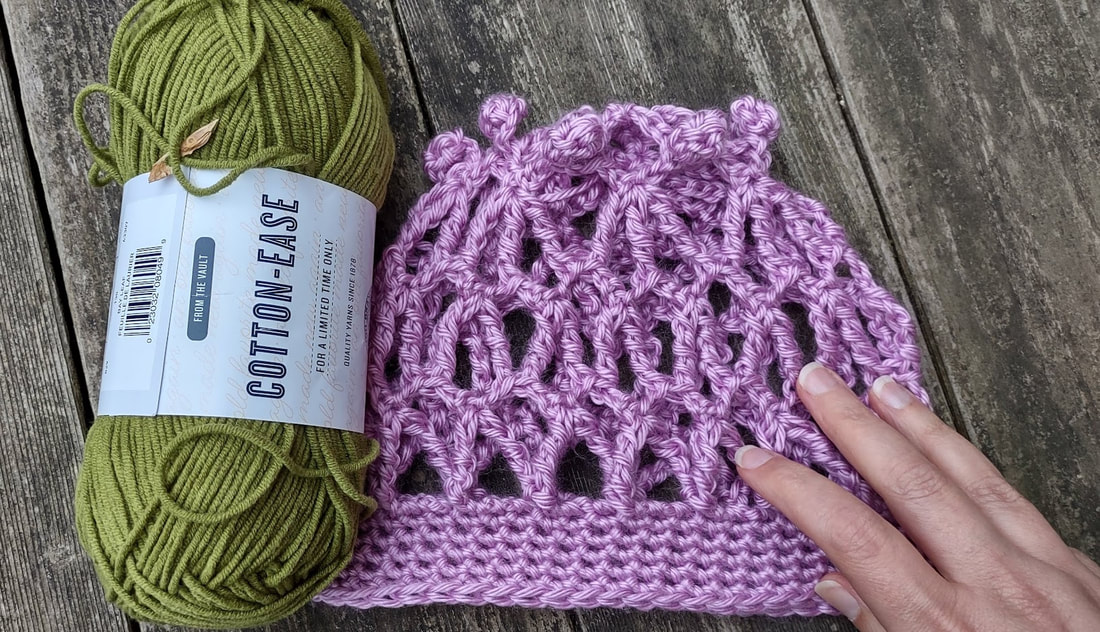 It turns out the mesh is a little stretchy though so it does fit. The band around the bottom isn't stretchy and that feels a little tight but it does stay on. I think this falls into the "decorative" hat type and since it is a booklet called "Fashions" I guess it makes sense.
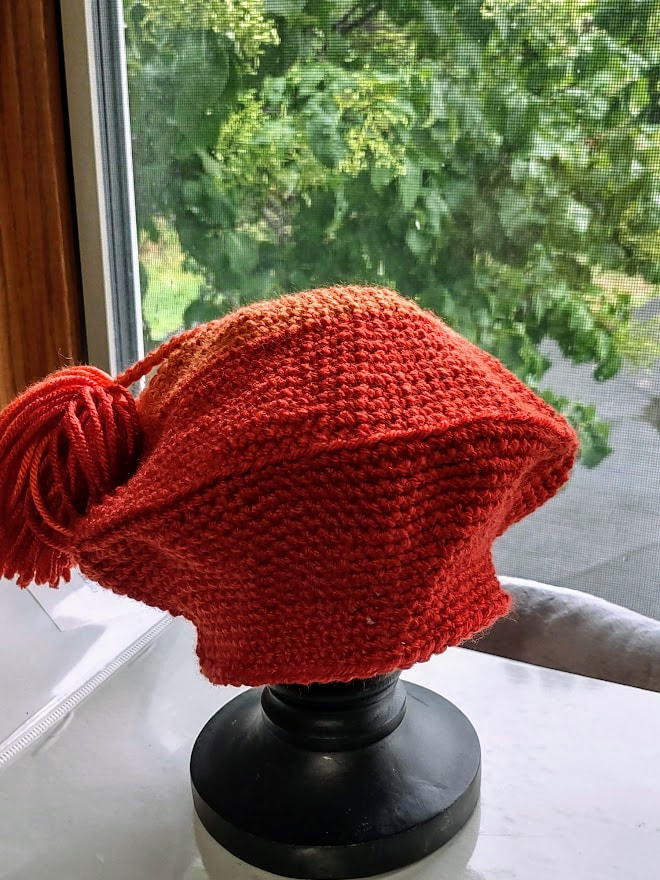
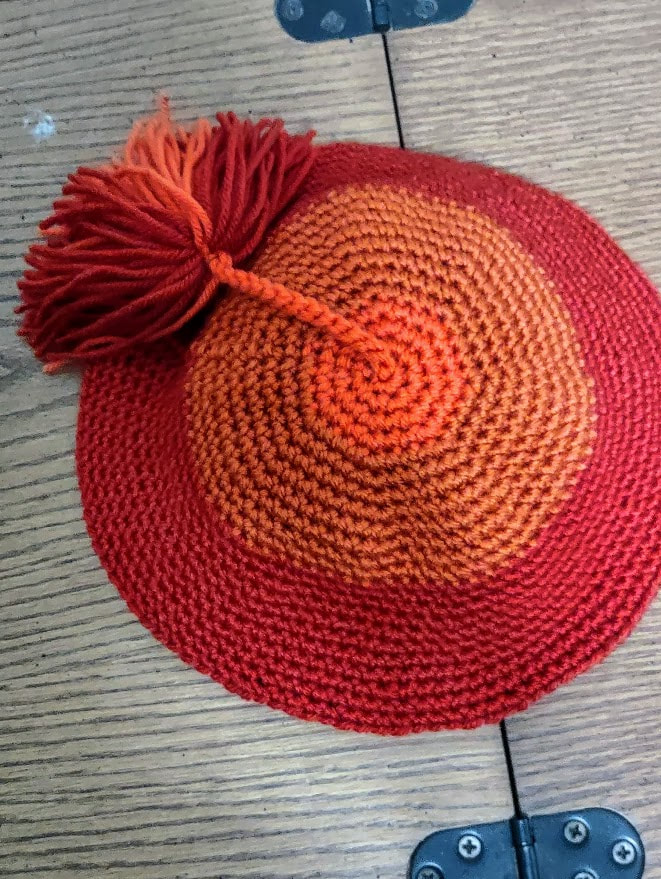
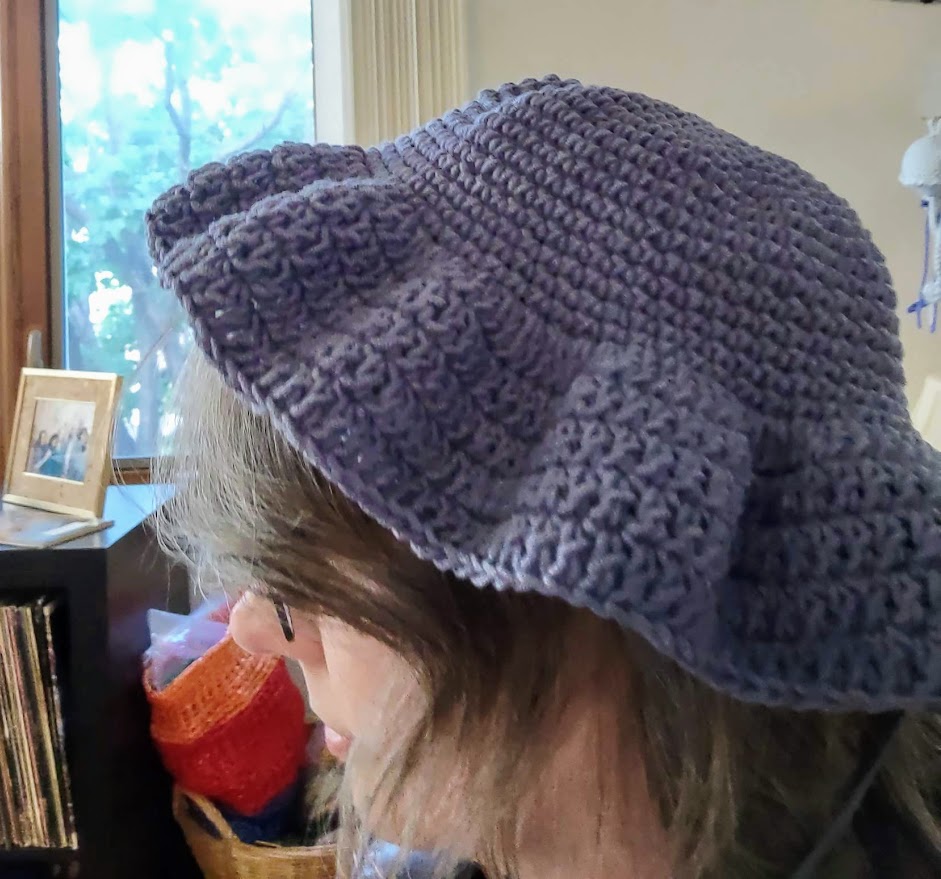
I'm going to give it 4 stars because the pattern directions were easy to understand if you've made doilies. It does fit but I'm not sure if it's actually useful or just fashion. Would you wear this? If you would wear it and you want it I will happily send this on to someone who would use it. 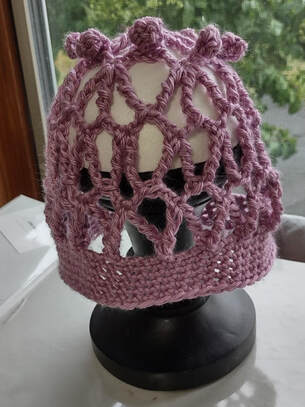 I'm still sticking with the 1970s. There are so many interesting patterns! This week I have a beret from the August 1973 issue of Workbasket Magazine. I was pretty skeptical it was going to look good. The pattern for seemed really simple though so I thought it was worth a try.  This pattern had three different sizes to choose from and used three different colors of worsted weight yarn and G Hook. They suggested copper as the main color and rust and deep rose as the two colors at the very top of the hat to create a gradient look. I used three shades of orange that were in my remnant pile. The pattern included a gauge which was only sort of helpful. While I could get the row part of the gauge to match, the stitch gauge wouldn't match unless the row didn't. Since this had different sizes I decided I would do the medium one and it should still fit. The directions were pretty good for the time frame. This means it tells you to increase evenly for a number of rounds instead of writing it all out. I typically end up writing a short-hand version on scratch paper to make sure I know where I am in the pattern. This pattern is just a circle top, a slightly slower decrease after the top for a bit and then three rounds of no decreases for the headband part. I made a two changes to the pattern as I went. Change 1: As I was getting close to the end of the top part of the hat, I noticed that there wasn't anything included to give it the nice sharp bend you can see in the photo above so I did the row after the last increase in the back loops. Change 2: I should have done the large version. With the gauge problem I was having, the medium version was pretty tight. I skipped a decrease around the headband part to size that part up to a large. Here's the final result:
I think this would be cute in rainbow colors or other gradients and it turned out much better than I thought it would. I'll give this a 4.5 out of 5. I'm taking off the half point for the gauge issue. I probably should have gone up a hook size and let the hat be a little taller but I don't usually have a problem with just one part of the gauge on single crochet stitches.  I think this photo has an odd school-photo vibe but we have rain storms today so taking photos on the deck would have been very wet.
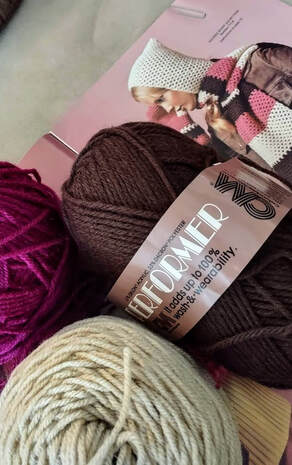
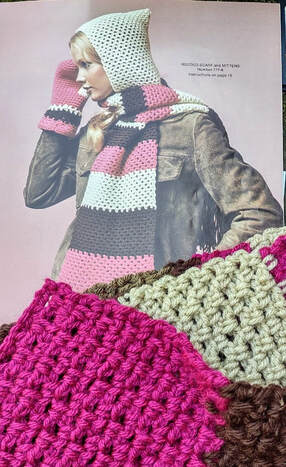
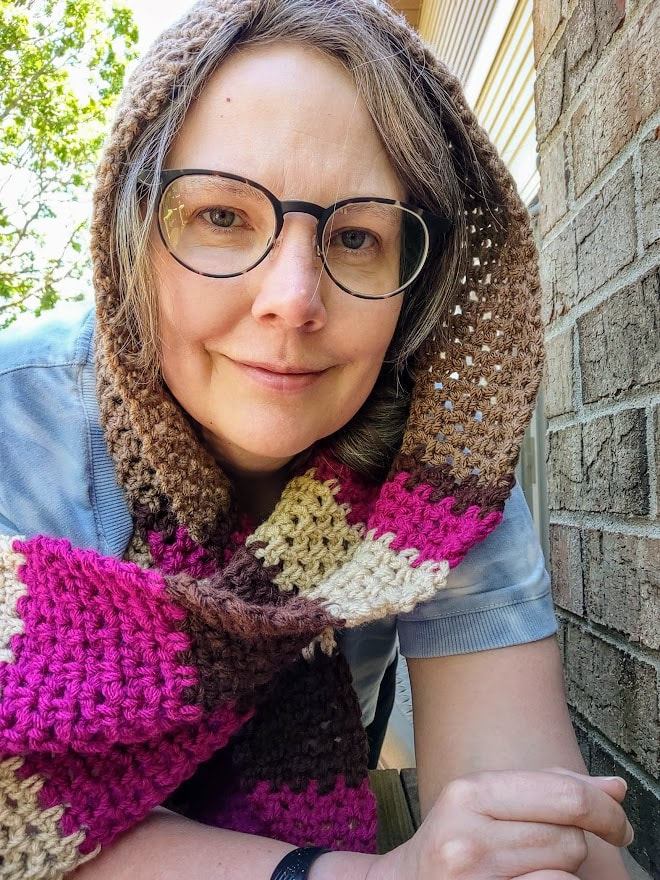
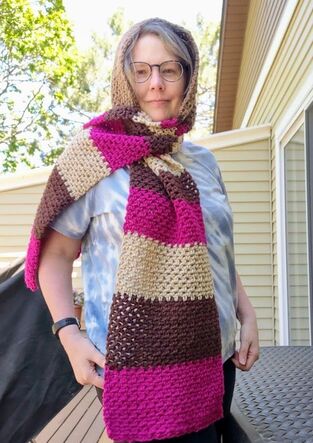
For this week I have another pattern from Columbia-Minerva's Teach Yourself to Crochet from 1972. This is perfect for a beginner, not so great for the heat we're expected to get in Minnesota this coming week. 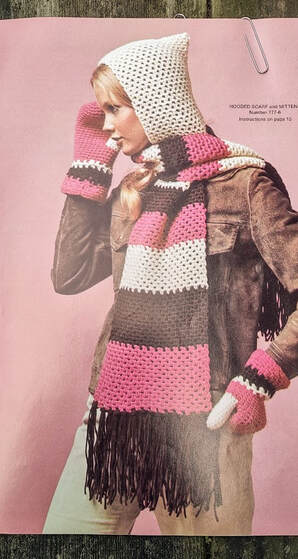 This is just a long scarf that is folded in half with 8 inches sewn by the fold to make the hood. It uses worsted weight yarn and since I liked the color combination in the photo I tried to replicate that with yarn I had. I used vintage Columbia Minerva Performer in Brown, some Red Heart Super Saver in Buff and an unknown yarn in Magenta.
This a one row repeat that goes; sc, chain 2 across and repeats with the next row having the sc in the chain 2 space. This is really easy and works up very quickly with the I hook. I didn’t think the fringe was necessary and I really hate making fringe so I skipped that.
This one fit and it was super easy and fun. This gets a 5 out of 5 stars!
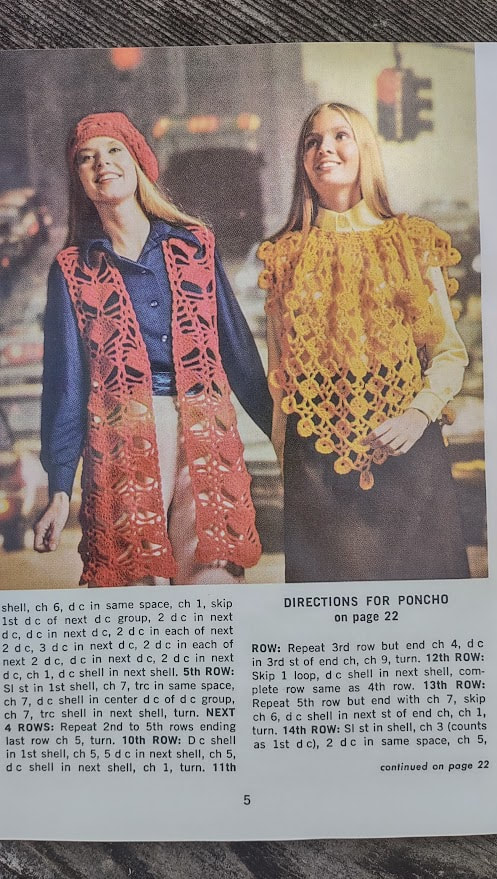
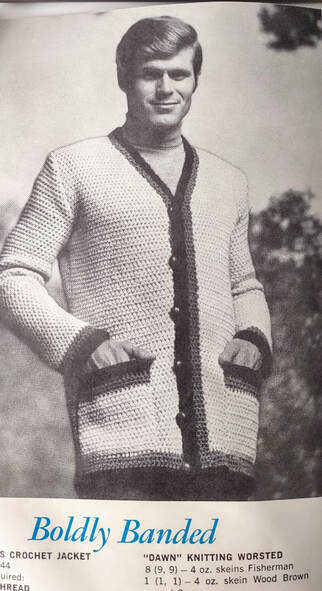
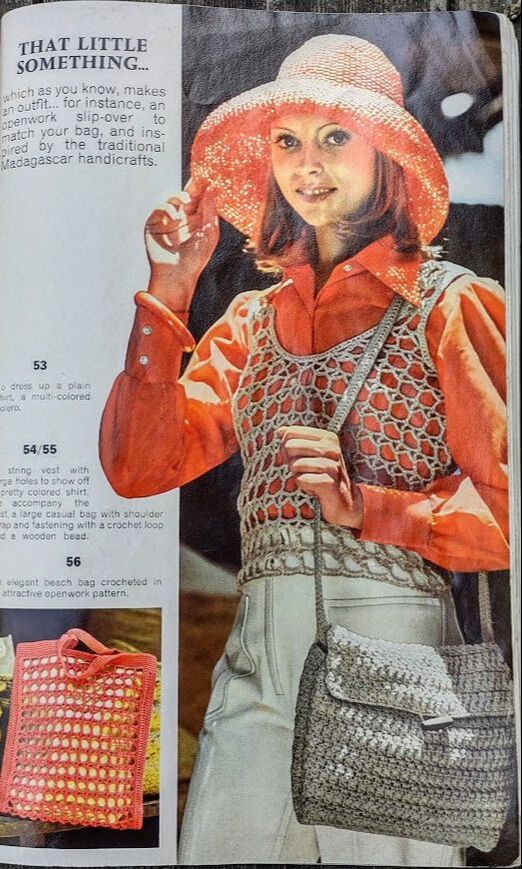
There's no date in this booklet but given that these are listed as "in fashions" I think they're safely in the vintage category.  The first photo patterns are called Make them Lacy and include the vest, hat, and poncho. The second is called Boldly Banded. The poncho seems more like an open vest but I guess it makes it easy to move your arms around.
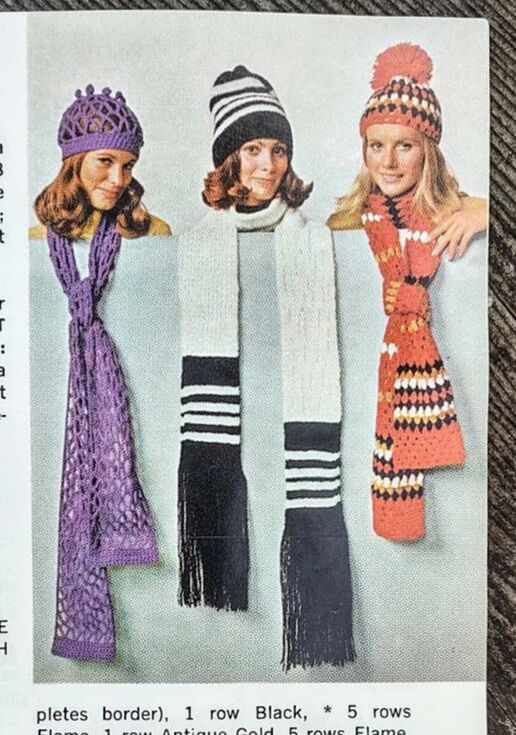
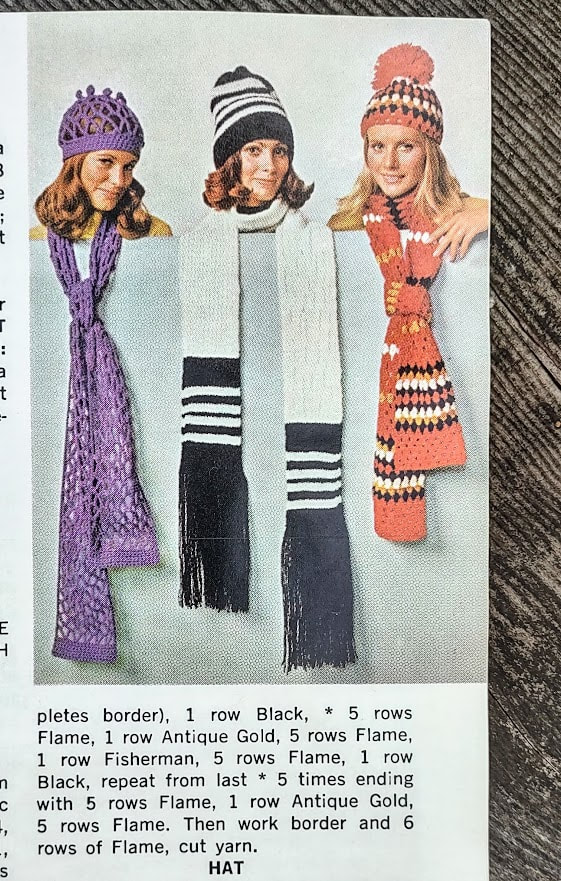
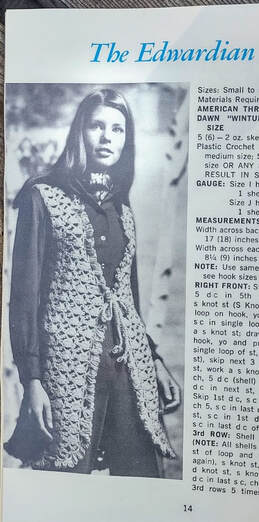
Next we have Flings and Hats. I guess the word "scarf" was just to boring to use. The two sets on the ends are crocheted and might end up in a future blog post. I'm intrigued by the purple hat in particular. The second photo is The Edwardian Vest. I don't think this would be completely out of place today.
I like the idea of this dress but I'm not sure if I'm sold on the flowery border. I think that might weigh the dress down and stretch out the top part. 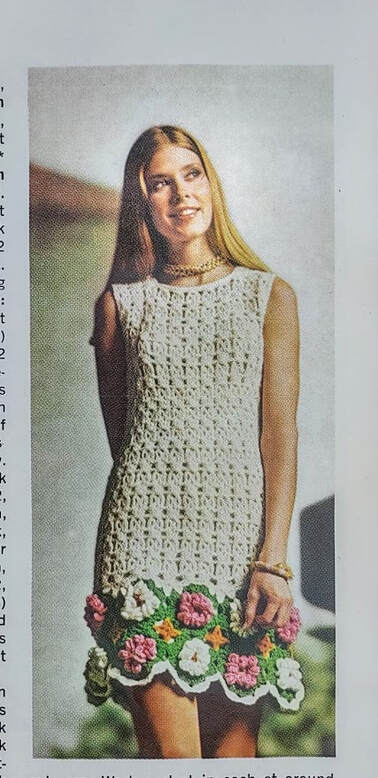 And last we have the Color Cascade poncho photographed in black and white. They suggest doing the main color in Olive Green with stripes in Burnt Orange and Lemon, or Tangerine and Amber. 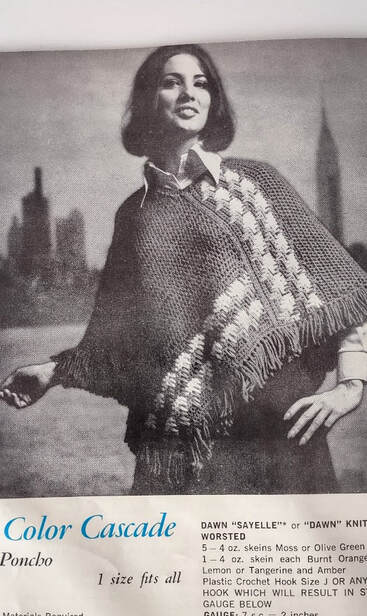 Do you have a favorite in this booklet?
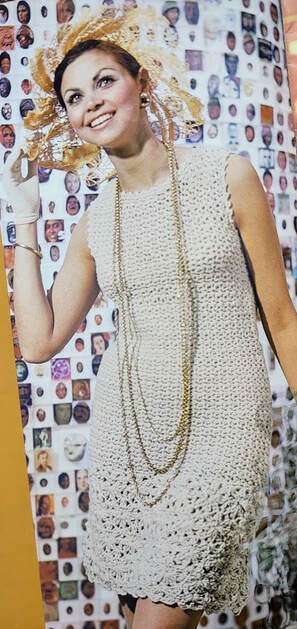
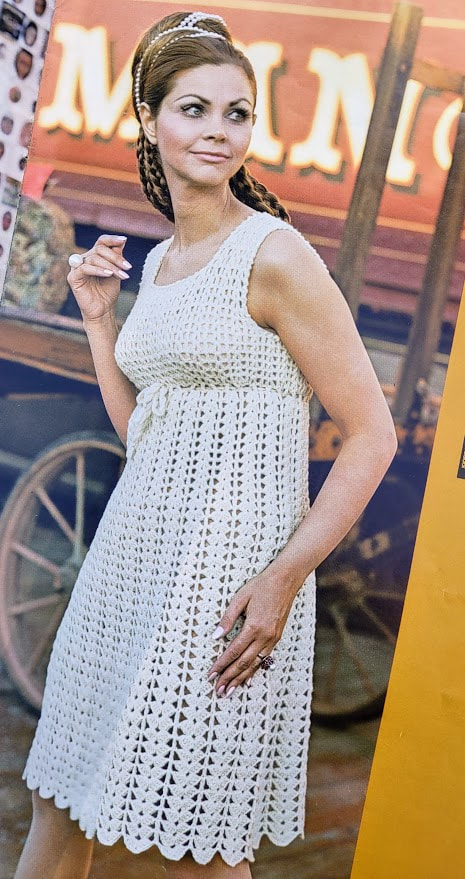
The next two or three weeks will be photos from vintage pattern magazines instead of finished hats. I've been working on getting my Dakota County Fair entries done and I'm traveling next week. This week I have the Afghan and Fashion Collection from Columbia-Minerva that was published in 1970. I am using one of these patterns to make an entry into the Dakota County Fair. Can you guess which one? Here's the very green cover with their Sierra Vista Afghan and Sonora Vest and Headband. 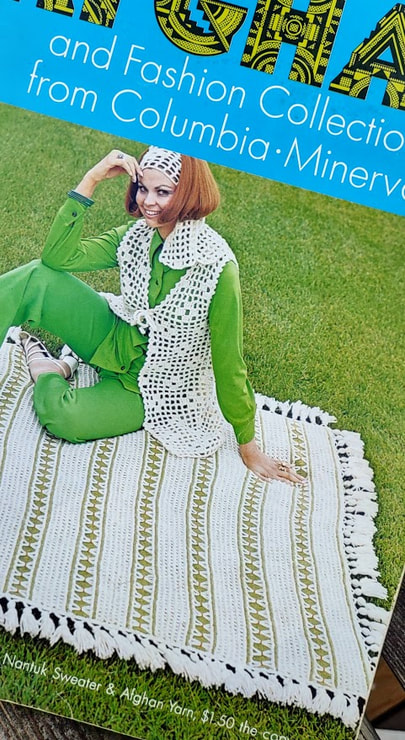 Next up is the Estrella Peasant Dress that I think is adorable. The afghan is knitted and crocheted. I think the flowers in the background make this extra pretty. 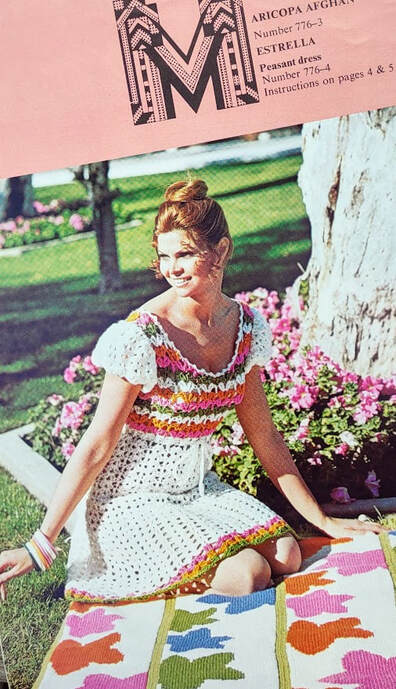 I think these two dresses would be fashionable today. The first one is called Snowflake and the second one is Point Imperial. The photo sets are interesting. The Point Imperial dress looks very fancy with the hair done up but it's in front of what looks like a wagon.
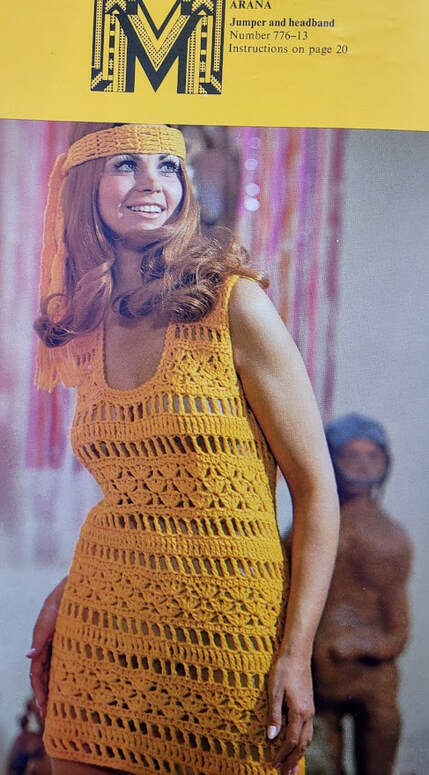
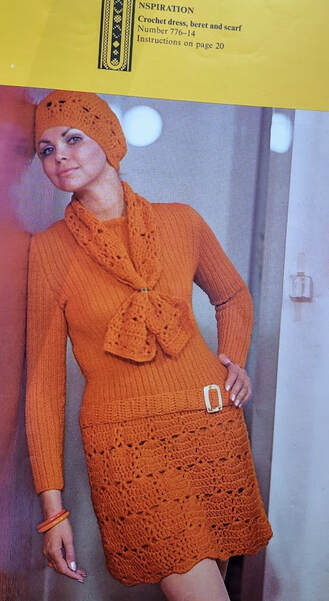
These two are in very 1970s colors. I'm not sure what the statue in the background of the Marana jumper is. The Inspiration dress, beret and scarf is partially knitted and one way you can tell that this is an older photo is that the taped up thermostat is still in the photo. I think my photographer sister would find this pretty funny.
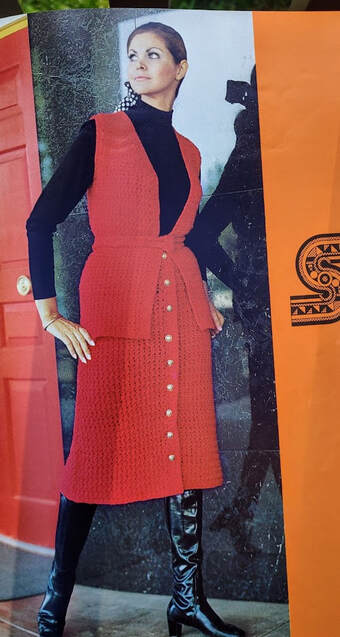
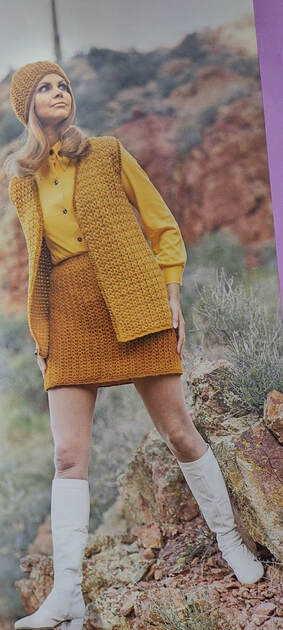
The red suit is called the Show Low Midi Suit. The gold outfit is called Old Basin Vest, Skirt and Cap. Both of these have some pretty awesome boots.
There are more photos than this but they are mostly afghans and less interesting than the clothing patterns.
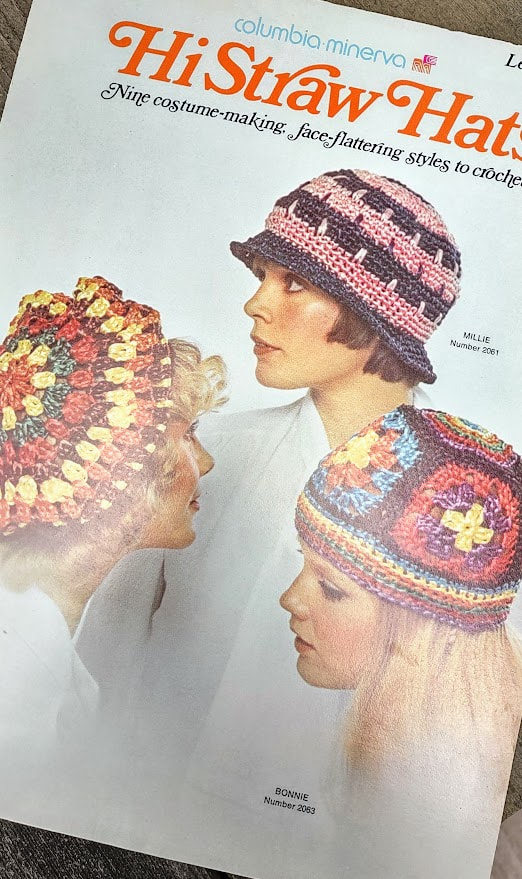
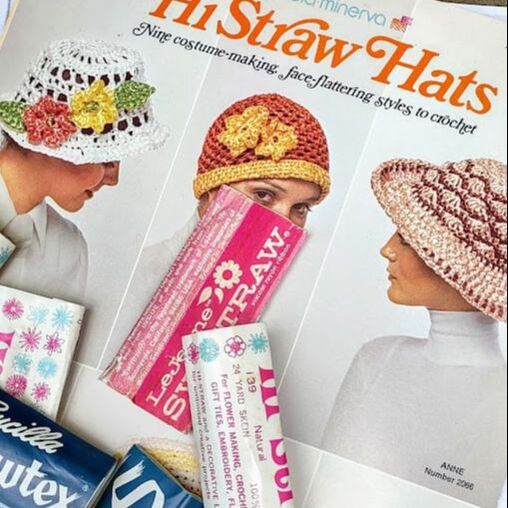
Any guesses on which one of these I'm going to make for the Dakota County Fair? This week I have another hat made with 100% viscose rayon straw type fiber. The book uses HiStraw made by Columbia-Minerva. I guess rayon raffia was popular in the early 70s. Here is the front and the back of the booklet.
I went with the "Anne" hat (upper right in second photo) because I wanted something with more of a brim. This fiber isn't super scratchy but I don't think the granny square hats look very comfortable and I didn't have enough colors to make the other options. The pattern asks for seven skeins of HiStraw in tan and three in brown. I had neither of those colors so I mixed up some different brands and went with two StrawTex white, five HiStraw natural, one HiStraw light blue and one Swistraw in a yellow-orange color. The Swistraw had this description on the label, "WONDERFUL, WASHABLE SWISTRAW Ribbon is a remarkably versatile viscose rayon strand - durable, soil and fade resistant, and it may be washed, dry cleaned, ironed and steamed (handle as synthetic textile). It is available in many dazzling colors in brilliant and matt finishes...ideal strand for many craft and needlework projects - freeform and loom flowers, crocheting, stitchery, weaving, lampshade wrap, macramé, gift packaging ties, embedding in resin." This was a pretty easy pattern once I got past some odd instructions where they had you doing a row into the base of the previous row. It made the inside look like this and the only reason I could come up with for this was to give it a little more structure. This is done for three different rows in the head portion and in every row for the brim.  They suggest a G hook and give the same gauge as the previous hat but for some reason I needed to go up a hook size to get the gauge right. About halfway through the sides of the hat it still looked a little smaller than I thought it should so I upped the hook size again to an H. This hat has you crochet over some round elastic to make sure the hat will stay on and that worked pretty well. I will say that this isn't the easiest stuff to work with but it isn't as bad as I thought it would be. It takes a little more wrist twist to get the full strand in the hook sometimes and my hands get a little more tired than they do with regular yarn. The results are pretty good though and it makes a nice lightweight summer hat. I'm happy with how it came out and it fits so I'll give this one a 5 star rating.
This week's hat is from a flyer I bought at Vintage Knits; "Bucilla's easy-to-crochet Bonnets and Bags". When I got it I realized all of the patterns except one use a specific type of fiber to make them. It was something I'd never heard of called StrawTex. StrawTex is 100% viscose rayon, a fiber made from wood pulp. I managed to find some StrawTex and HiStraw (I'll use that for next week's hat) on eBay at about $1 per skein and it included the perfect color to make the purple sun hat on the bottom right of the cover. While some of the other hats would have used less Strawtex, I wasn't sure that some of those beanie type hats would be more than just decorative. 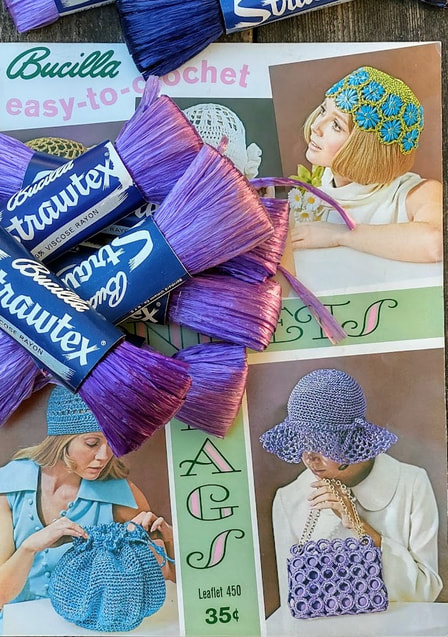 The pattern asked for eight skeins of StrawTex and each skein is only 24 yards. I had six of the lighter purple and added a darker purple and navy skein to get up to eight. It said to use an H hook or the hook to get the specified gauge. I used a G hook. This starts out by using a plastic ring at the top and while I was skeptical at first it was much easier to do that than try other methods with this type of fiber. The rest of the pattern was very simple and I was surprised that this fiber wasn't that hard to work with. I've used polypropylene fiber from Spinnerin before and that was sticky and hard to work with but this wasn't that sticky. My hands did get tired faster than if it was yarn though. I used the navy where the cord trim would go and used the darker purple on the very last rows to give it an ombre effect. I did not have enough StrawTex to do the cord trim so I did that in cotton instead. It's hard to see in the photos because it's much smaller than their version but it works to make the hat a little tighter. The finished hat had a very ruffly brim that I didn't love and since this was a natural fiber I thought it might block. The fiber label said it was washable in lukewarm water so it shouldn't damage it at least. I wet just the brim and the StrawTex got very soft and I was able to pin it in the brim width I wanted. This is not a hat you should wear in the rain though. You would have a soggy mess on your hands...or head. I'm giving this a 5 out of 5 stars. The pattern was simple and I used a fiber that was new to me. Next week I'll have another hat using the same type of fiber from a different leaflet.
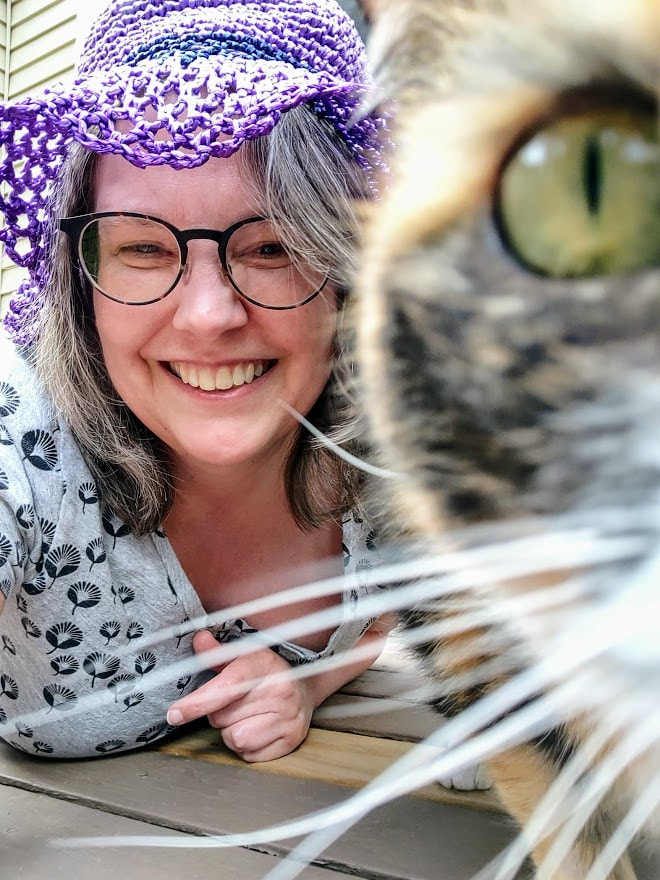
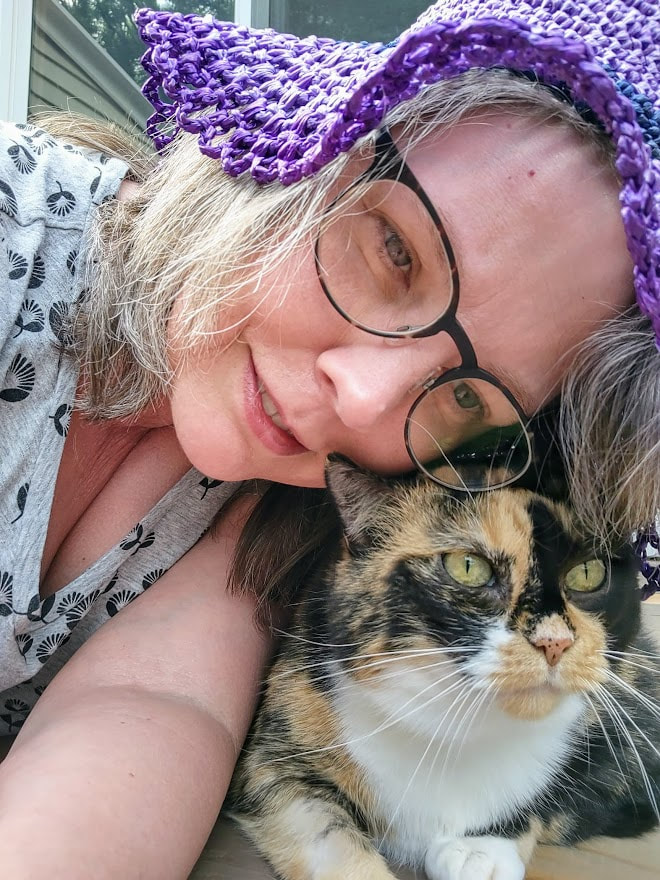
I tried to take a photo with Tayla for the hat. This is how that went:
While I enjoy making vintage patterns I definitely don't want our country to go back to the 60s or 70s. I've been donating to Just the Pill for a few years and I believe in their mission to provide reproductive health care to to people who live in rural areas and to areas that are on the borders of the states it operates in. They use mobile clinics to reach these areas and provide the services. If you would like to learn more about them go to justthepill.com. This week's hat was such a failure that I rewound the yarn after the second attempt and gave up. The hat is a vintage pattern for a Yellow Picture Hat and Bag and can be found here along with many other vintage patterns. This pattern asks for rug yarn and size F hook. Rug yarn can be anything from worsted weight to super bulky. Since this used an F hook I thought it would be on the lighter side but after trying with two different weights and even a different hook I realized it must be something on the heavy side and I didn't have yarn that work. Plus I have a lot of really fun patterns waiting so I didn't want to try a third time. My photo shows the heavier worsted weight yarn using a G hook.
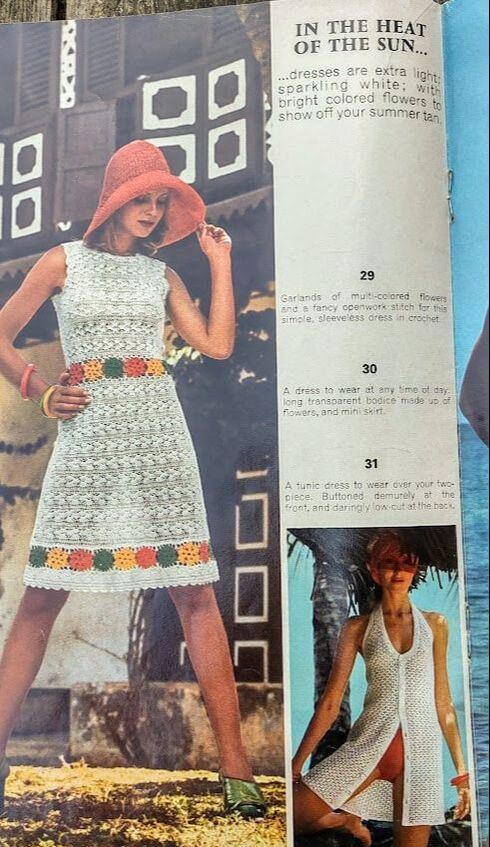
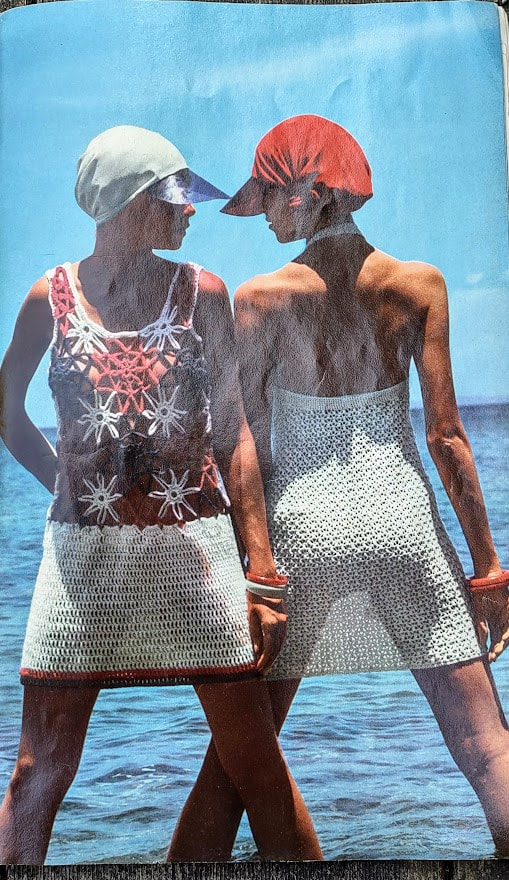
Instead of dwelling on that failed hat lets look at some fun crochet fashion from the summer of 1973. These are from a magazine that I hadn't even heard of but found at Vintage Knits. The magazine has knitting, crochet and one tapestry pattern. 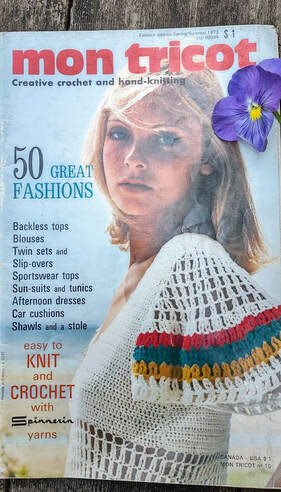 Let's start out with what they say is a wedding dress and hat. They describe this as, "a "trad/mod" dress in a super openwork pattern; just the thing for a summer bride and can be sued as an afternoon dress later on." The shoes are definitely 1970s! 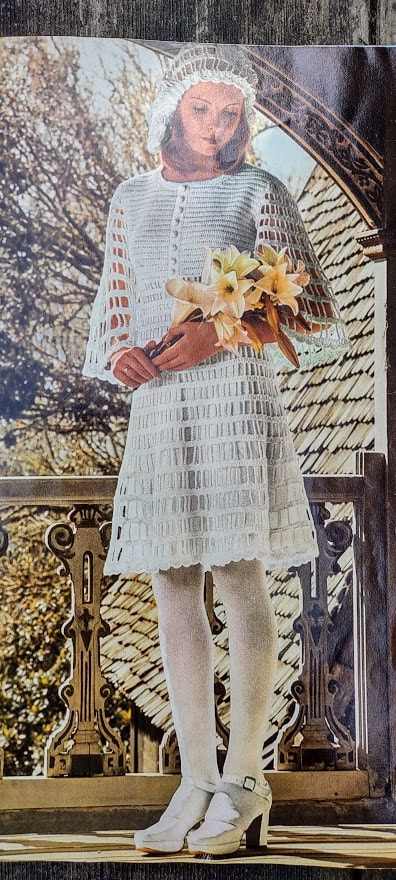 Next we have some sun dresses and swimsuit cover ups. These are all things I wouldn't be surprised to see at the beach now.
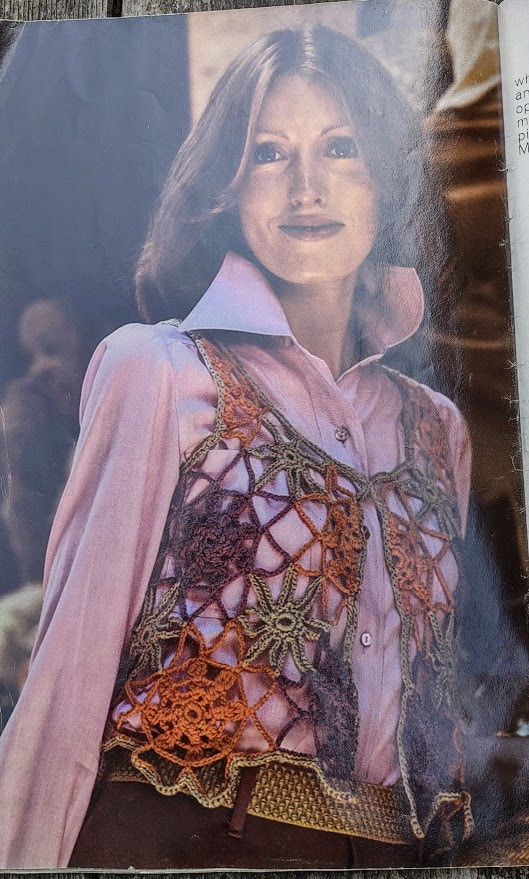
I love the chevron pattern of the first swimsuit here and am amused by the strategic flower placement on the second suit. 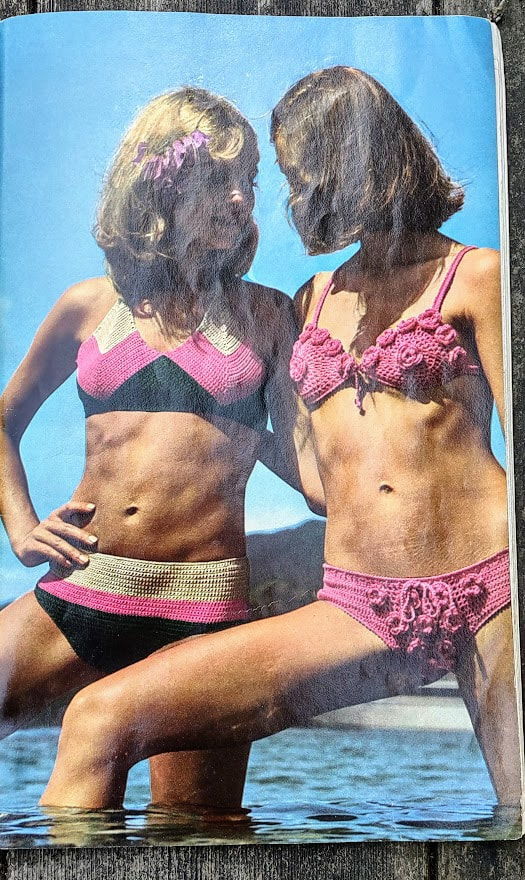 I love this maxi dress and it comes with a pattern for a shell stitch bottom. The description says, "Long dresses are becoming more and more popular; this one with it's open-work pattern and striped borders can be worn as a hostess dress or for an evening out." 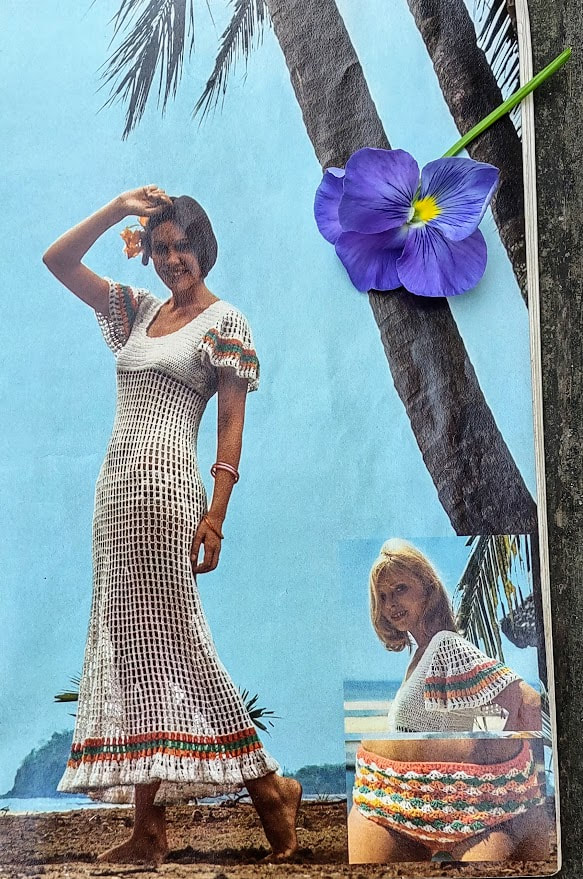 And last, we have two vests that look like they'd fit right in today.
Do you have a favorite from this magazine? Next week I'm working with Strawtex for a hat! 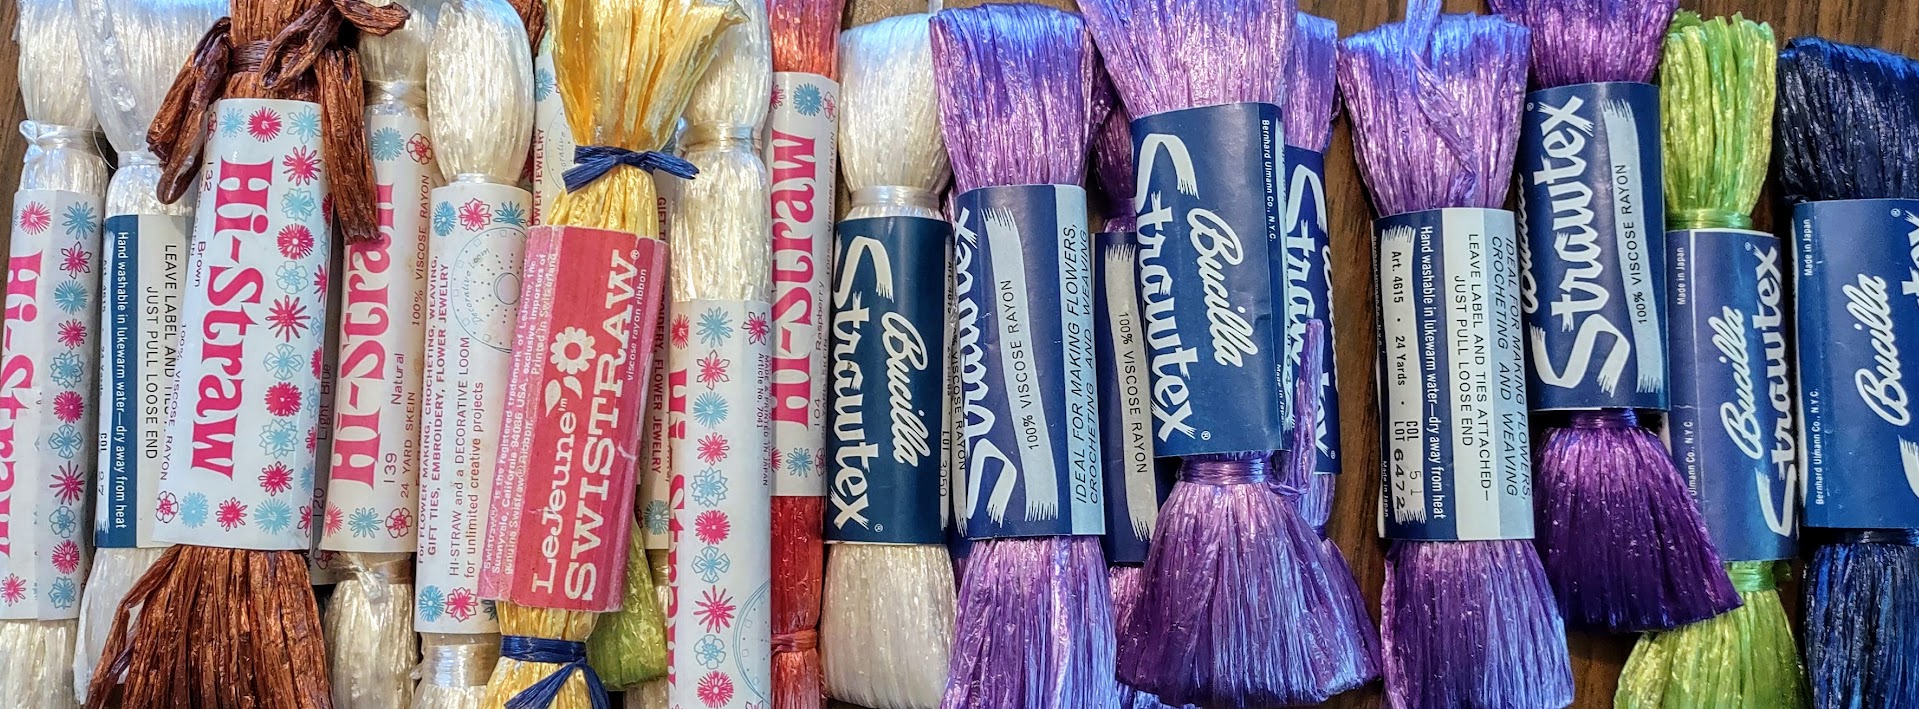 |

Proudly powered by Weebly