|
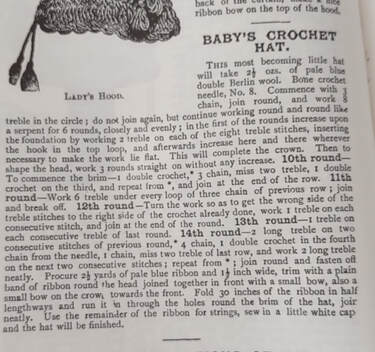
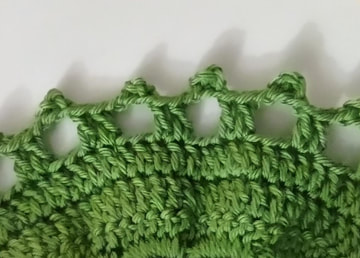
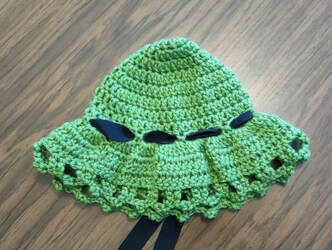
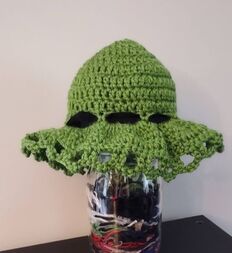
I have a finished baby hat to share. Remember, this hat had no picture to confirm that what I ended up with was what they intended. Their suggested materials for this "becoming little hat" include 2 1/2 ounces of pale blue double Berlin Wool, a No. 8 bone crochet needle, 2 1/2 yards of pale blue ribbon that is 1 1/2 inches wide for the trim. According to their glossary, double Berlin wool is a worsted weight yarn that was originally distributed from a Berlin depository and was made for Berlin needlepoint. The recommended hook for this yarn is an H, I or J. There is no gauge given for the pattern. I’ll be using 100 yds of Red Heart Soft in the color Guacamole and an H hook. I have some ¾ inch black ribbon that’s close to half the width they’re suggesting that I'll try. Let's get started! Their directions are in italics and my notes are bolded. Commence with 3 chain, join round. I just did a magic circle here. Work 8 treble (double crochet) in the circle, do not join again but continue working round and round like a serpent for 6 rounds, closely and evenly; I love the serpent description for working in a spiral! In the first of the rounds increase upon the foundation by working 2 treble (double crochet) on each of the 8 treble (double crochet) inserting the hook in the top loop and afterwards increase here and there where ever necessary to make the work lie flat. This will complete the crown. I did a basic increase pattern on this. The first round was increase in every stitch. The second round was double crochet in first stitch, increase in second and so on. Then shape the head, work three rounds straight on without any increase. So far this seems pretty straightforward. 10th round to commence the brim: 1 double crochet (single crochet), *3 chain, miss two treble (double crochet), 1 double crochet (single crochet) on the third, and repeat from * and join at the end of the row. 11th round – work 6 treble (double crochet) under every loop of the three chain of previous row; join and break off. This is the first part I questioned. Do I really need to cut the yarn? Couldn't I just turn the work without cutting it? I cut it but even after finishing it I didn't think it was necessary. 12th round – turn the work so as to get the wrong side of the treble (double crochet) stitches to the right side of the crochet already done, work 1 treble (double crochet) on each consecutive treble (double crochet) of the last round. 13th round – 1 treble (double crochet) on each consecutive treble (double crochet) of the last round 14th round – 2 long treble (double crochet) on two consecutive stitches of the previous round, * 4 chain, 1 double crochet (single crochet) in the forth chain from the needle, 1 chain, miss two treble (double crochet) of the last row, and work 2 long treble (double crochet) on the next two consecutive stitches; repeat from *; join round and fasten off neatly. I'm not sure what a long treble is and they don't define it. They give me a description of a long double crochet in the first pages of this series (aka half double) but not a long treble. I decided I was just going to do a treble (aka double crochet). That gives me an edging like the one below. I think the intention was to leave enough room for the ribbon. The finishing instructions say to: Trim with a plain band of ribbon round the head joined together in front with a small bow, also a small bow on the crown towards the front. Fold 30 inches of the ribbon in half lengthways and run it in through the holes round the brim of the hat, join neatly. Use the remainder of the ribbon for strings, Sew in a little white cap. I wasn't really sure where to put the ribbon. Running ribbon through the edging shown above is going to make that brim a little droopy. I ended up putting it through the openings made from rounds 10 and 11 at the base of the hat before the brim starts. Here is what my finished version looks like: I'm not planning on rewriting this one. I think the instructions above are good enough and I didn't like it enough to make it again.
Here's the rating: Is the pattern easy to understand? I think the crochet part is pretty easy to understand. The ribbon finishing was a more difficult to understand. Still, I'll give it a point here. 1.0 Does it look like the photo or drawing? No drawing. 0.5 Would someone wear this? A very small baby could wear it. 1.0 Did I enjoy making it? Yes but I don't think I want to make another one. 1.0 Total score = 3.5 out of 4
0 Comments
Leave a Reply. |
AuthorI'm from Minnesota and have been crocheting since 2003. I inherited a box full of Workbasket Magazines from my mother-in-law and became obsessed with the vintage patterns. Archives
June 2024
|


