|
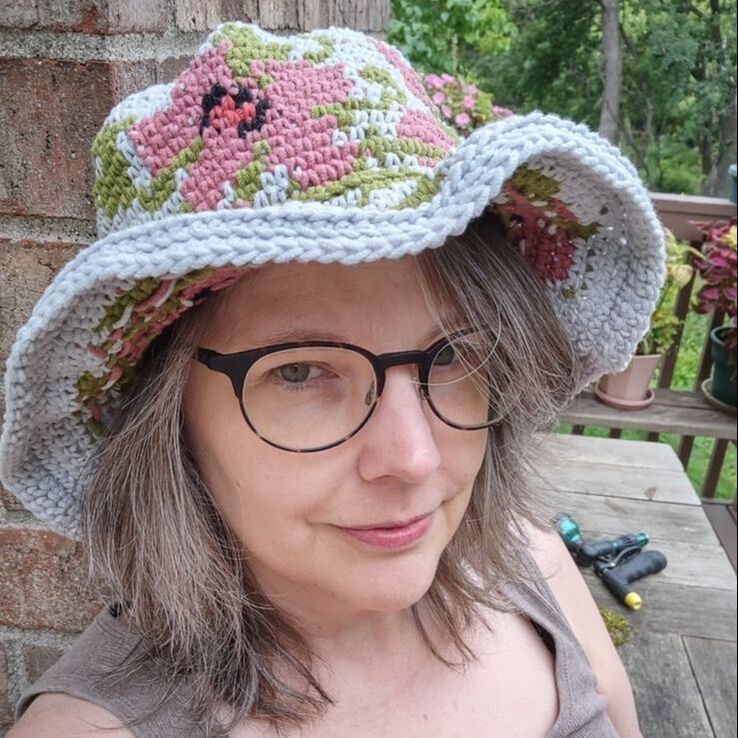
This week I'm sharing my attempt at the Princess Loretta Scarf. The flyer has a colorized photo in addition to the black and white one and that helped make the stitches easier to see. The materials needed for this pattern are:
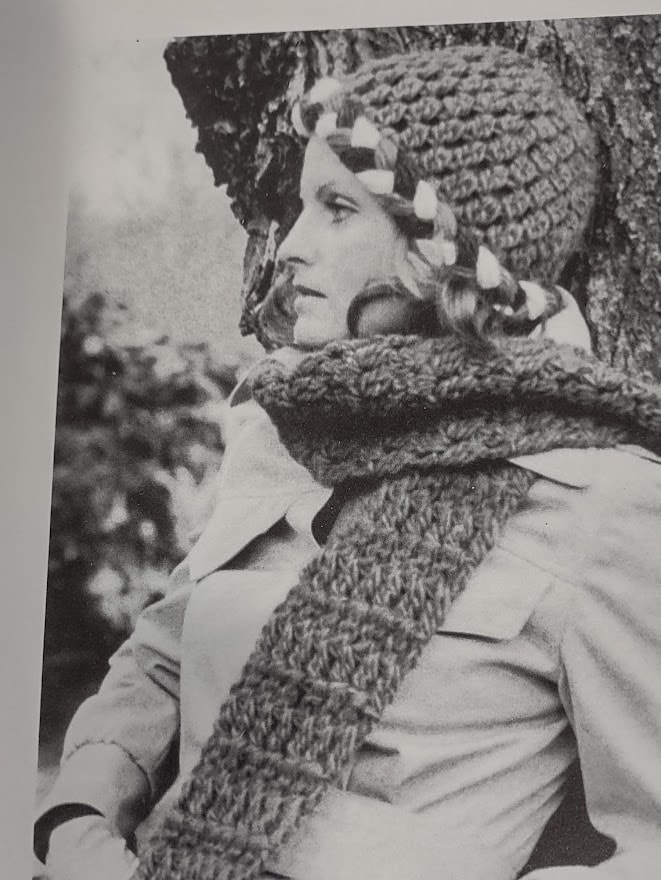
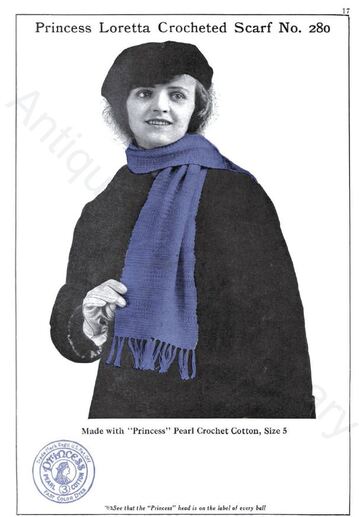 The instructions say that the scarf should turn out to be 52 inches long and gave these instructions; "A chain of 79 stitches will make a scarf about 9 inches wide. This is a good width." That's a gauge of 8.6 stitches per inch. I went up a hook size but I don't think that the fingering weight yarn is much bigger than pearl cotton so I wasn't too worried and just assumed that it would be close. It was not close. I ended up with a chain of 53 to get a width of just over 9 inches. That's more like 6 stitches per inch. Still, this is a scarf so it shouldn't matter that much and I really didn't want to find a lace weight yarn to do a 52 x 9 inch scarf. Rows 1 -19 are just single crochet stitches across. Row 20 is a star stitch and they give very specific instructions on how to make the stitch. Row 21 is single crochet again and you repeat those rows once. Then you do a bunch more single crochet and then repeat the star stitch part again until the scarf measures 28 inches. Here's what that looks like: 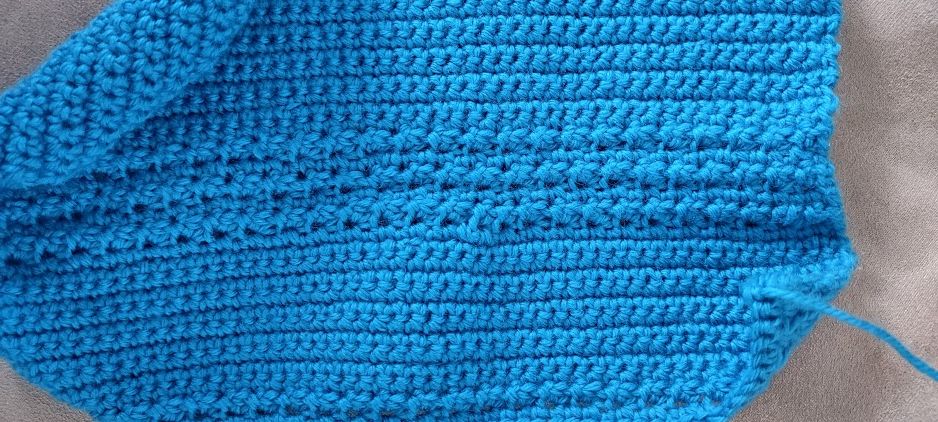 Not long after this I realized the my stitches were much shorter gauge than what the picture looked like and this was going to take longer than I anticipated. I wasn't enjoying doing this stitch pattern with this particular yarn and decided it just wasn't worth the yarn and time to finish it. 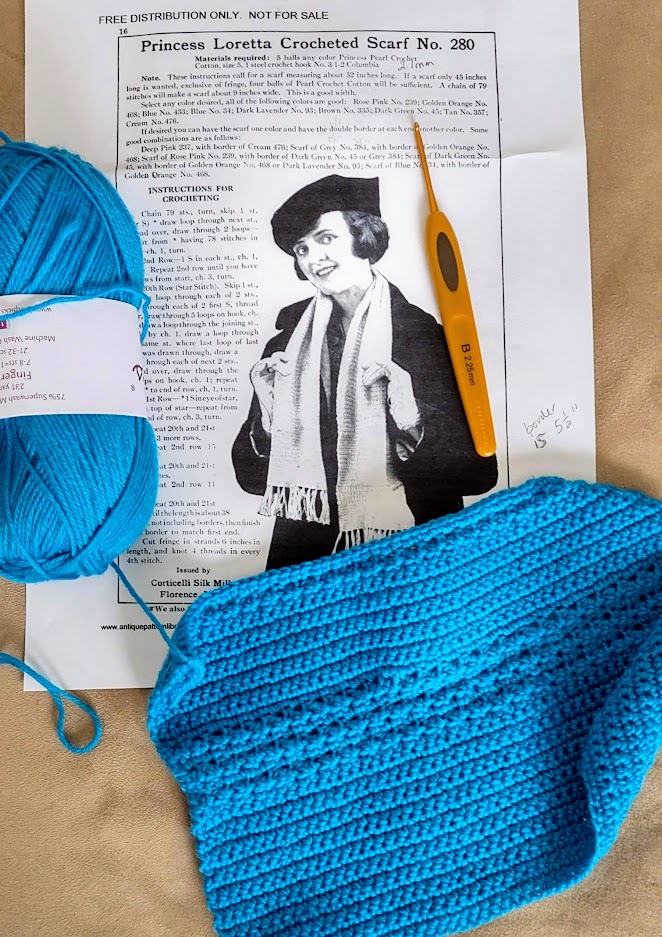 Here's the scoring: Is the pattern easy to understand? Yes 1.0 If there is a gauge, could I match it? No 0 Does it look like photo? For the part I finished, I think it was close 0.5 Would someone wear it? Because this was a DNF I'm giving it a 0 Did I enjoy making it? No 0 Total score is 1.5 Next week I have fun photos from a magazine I picked up at a sale. Based on the ad on the back cover can you guess the year it's from? 
0 Comments
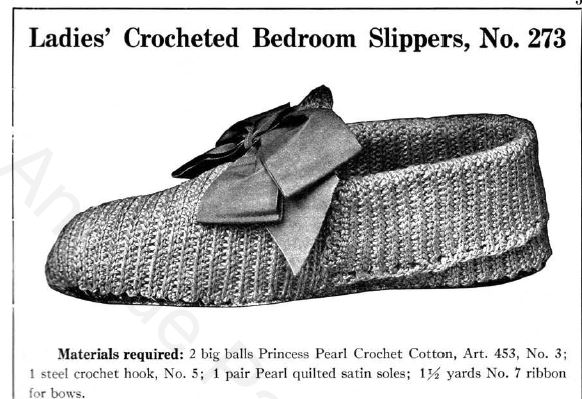
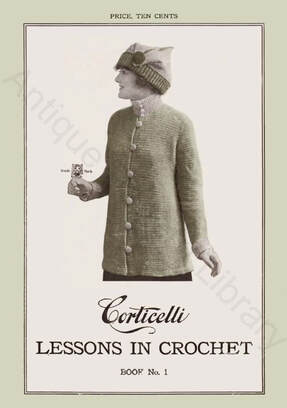 This week I'm sharing photos from Corticelli Lessons in Crochet, Book 1. It was published in 1916 and is available to download at the Antique Pattern Library. This booklet has about 35 patterns for everything from baskets to bags, and slippers to scarves along with stitch instructions and, of course, advertisements for their silk and cotton threads. Four of the patterns were knitted but everything else was crocheted. There are at least 14 edgings and a couple of motifs, four different baskets and curtains. Most of the rest of the patterns are for wearables like these two slipper patterns.
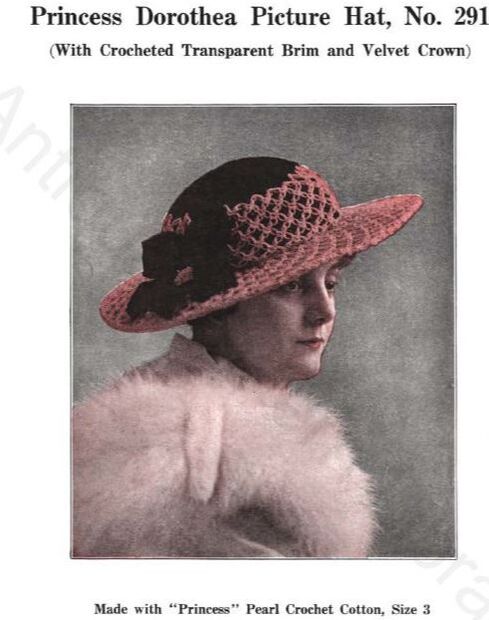
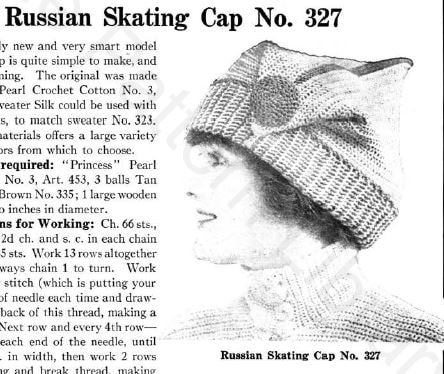
There are five hat patterns. Several are more decorative like the Princess Dorothea Picture Hat but at least two were more practical like the Russian Skating Cap.
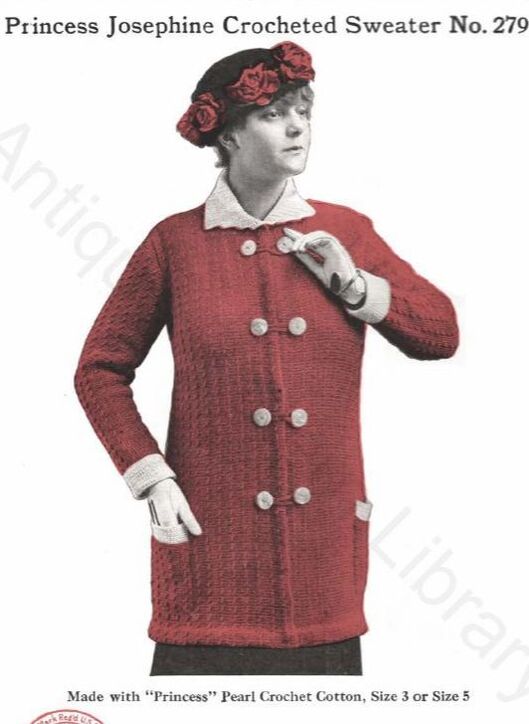
The sweaters and jackets look warm and cozy.
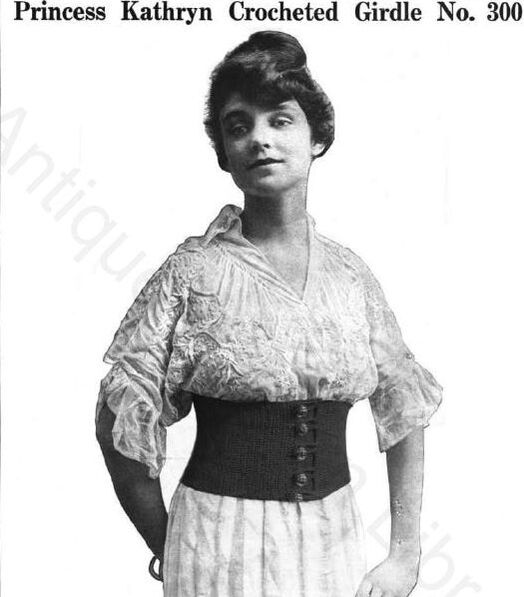
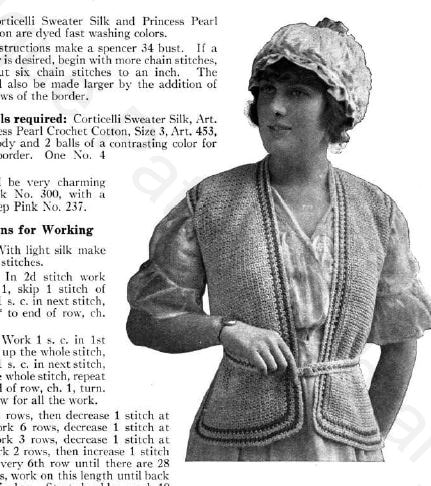
There are a few more unusual patterns for things like a girdle (available in both a knitted and crocheted version) and a spencer.
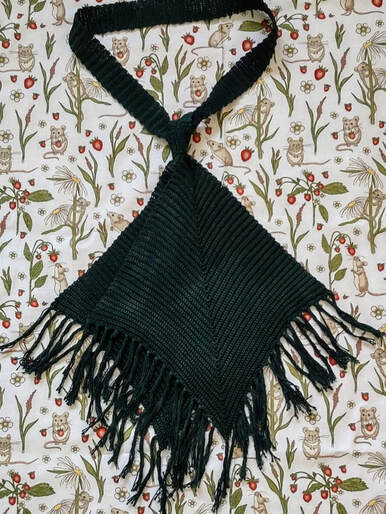
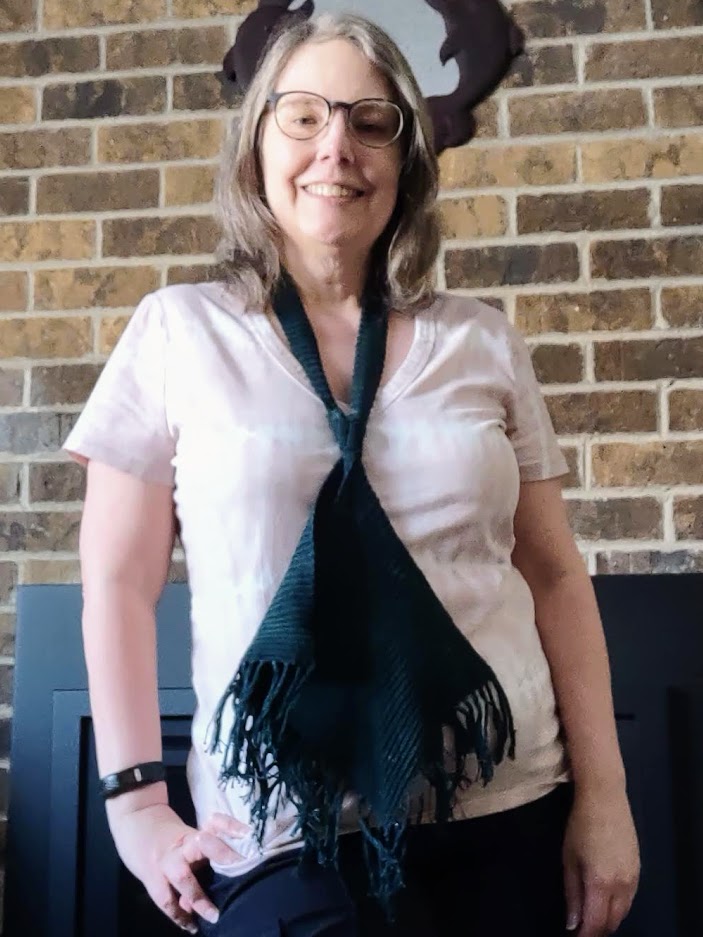
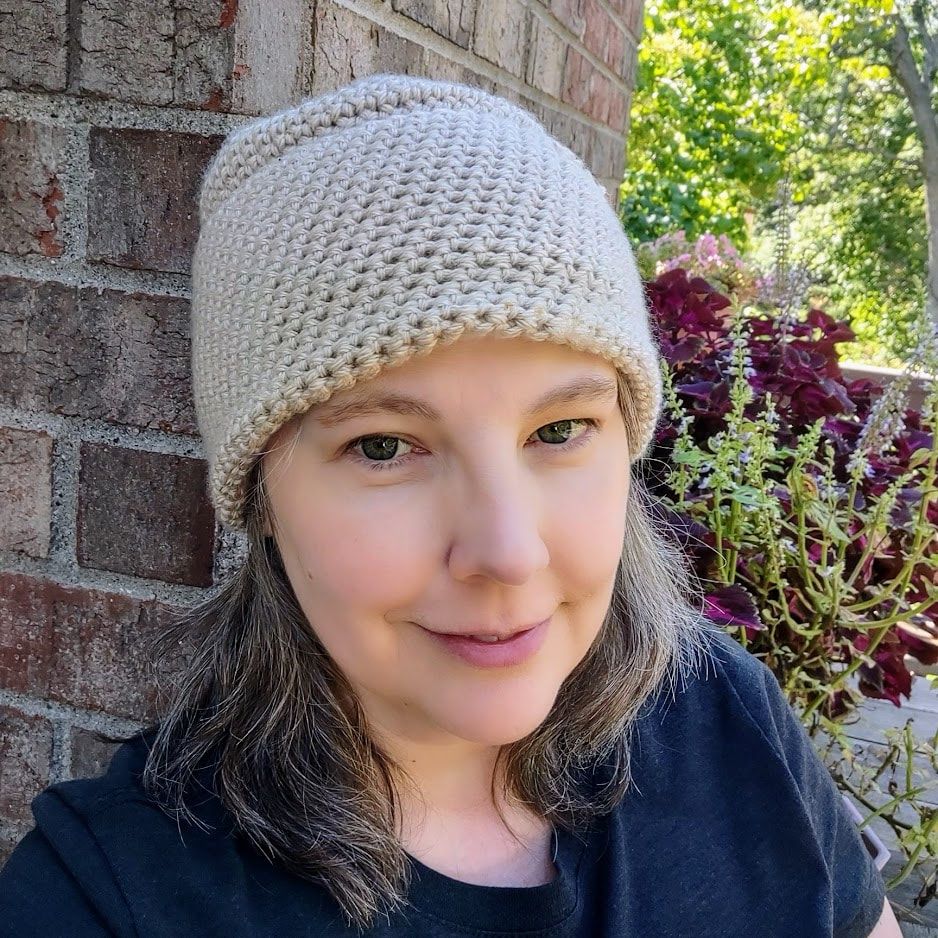
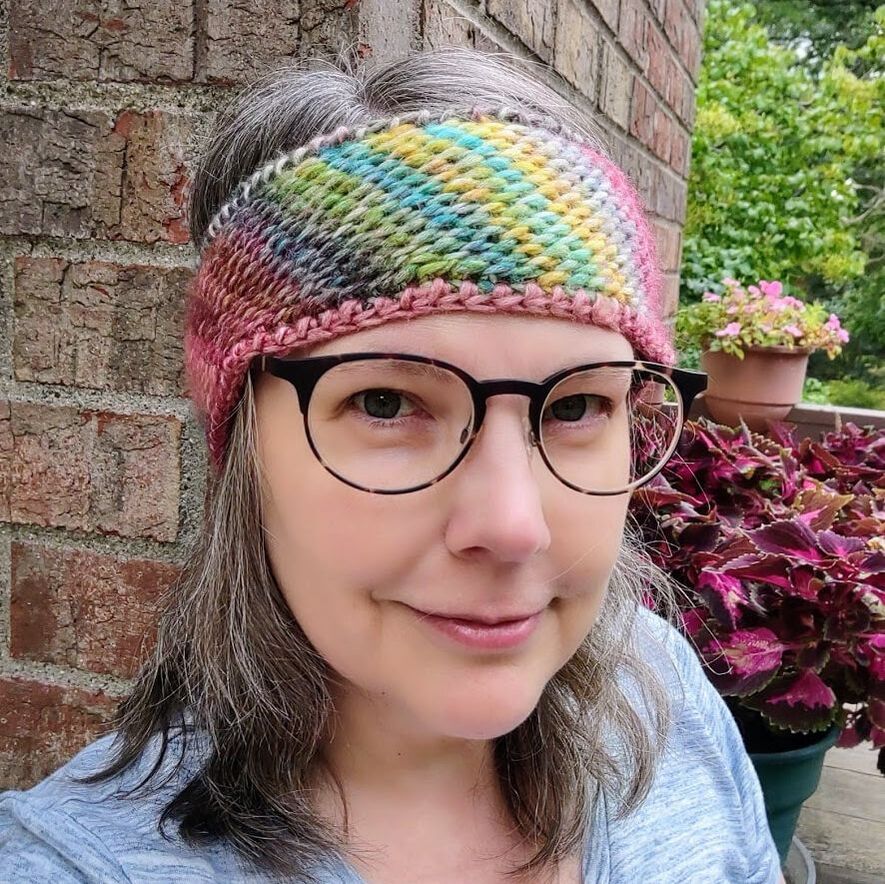
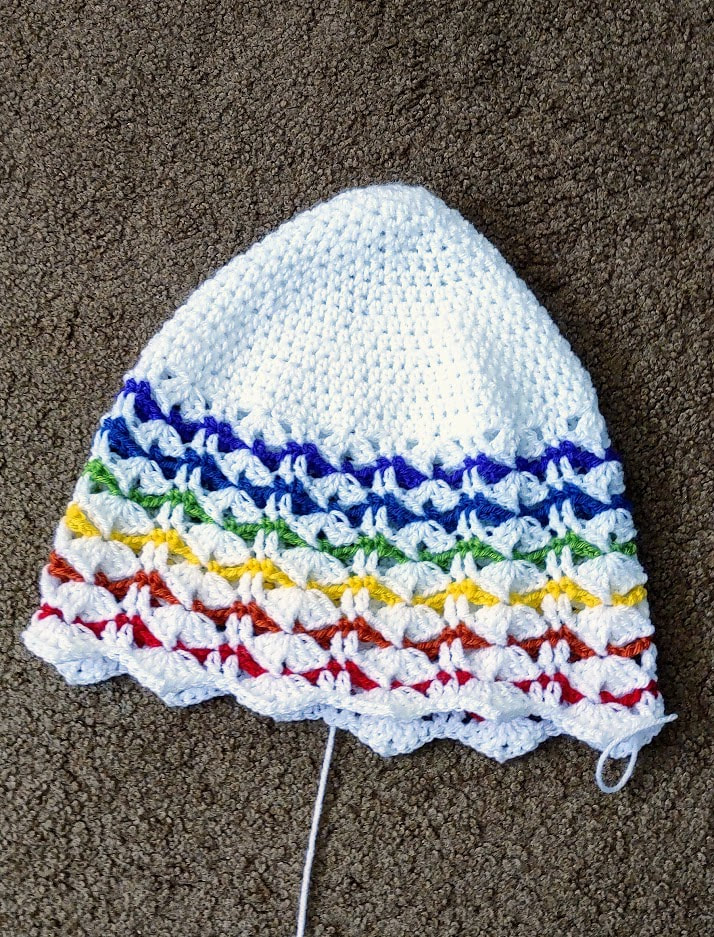
There are only two scarf patterns. One is titled Princess Loretta Crocheted Scarf and the other is called Gentleman's Crocheted Scarf or Muffler. After reading both patterns they use the same two stitches in a pattern that is very similar. The men's version is a little wider and the women's version has a fringe. I'm going to give the women's version a try and give you an update next week. I'll leave you with the last page of the booklet because who can resist a kitten?  This week's pattern is from the Crochet Designs reprinted from Victorian and Edwardian sources that I featured last week. It is reprinted from "Needlecraft Practical Journal, Vol 6, No. 79, published in 1909. 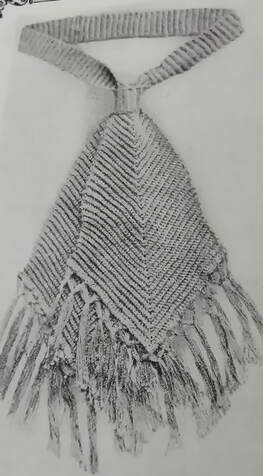 Ladies Ribbed Tie The pattern says it's intended to be worked in Briggs' crochet silk or Silver Shield crochet thread. A quick check of their yarn comparison chart tells me that they consider that a "fine weight" and give us these examples for "modern yarns and threads":
The entire project is worked in back loop only to get that ribbed look and it's done entirely in chains and what they call double crochet (aka single crochet US terminology). This is made in two pieces that are, "neatly joined at centre of neckband". This wasn't a difficult project until I got to the fringe. Here are the instructions for the fringe, "The fringe should be crocheted on over a piece of card about 2 inches deep. Cut the edges and divide the strands at the top by clustering into groups, and knotting with a needle and thread as for drawn thread work." I ended up just making the fringe over a 4 inch card and just attaching them every few stitches and then doing the clustering part. I don't think it's quite what they had in mind but it worked. Since my last dyeing experiment went pretty well I thought I'd give it another try and just make this one a solid green since the off-white was kind of boring. This time it didn't go quite as well. There's some variation in the final dyed fabric that you can see below.
Overall this went pretty well. Let's add up the score:
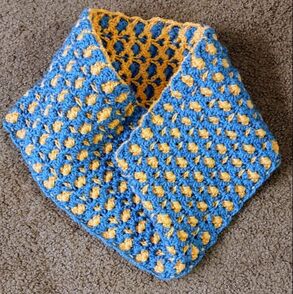
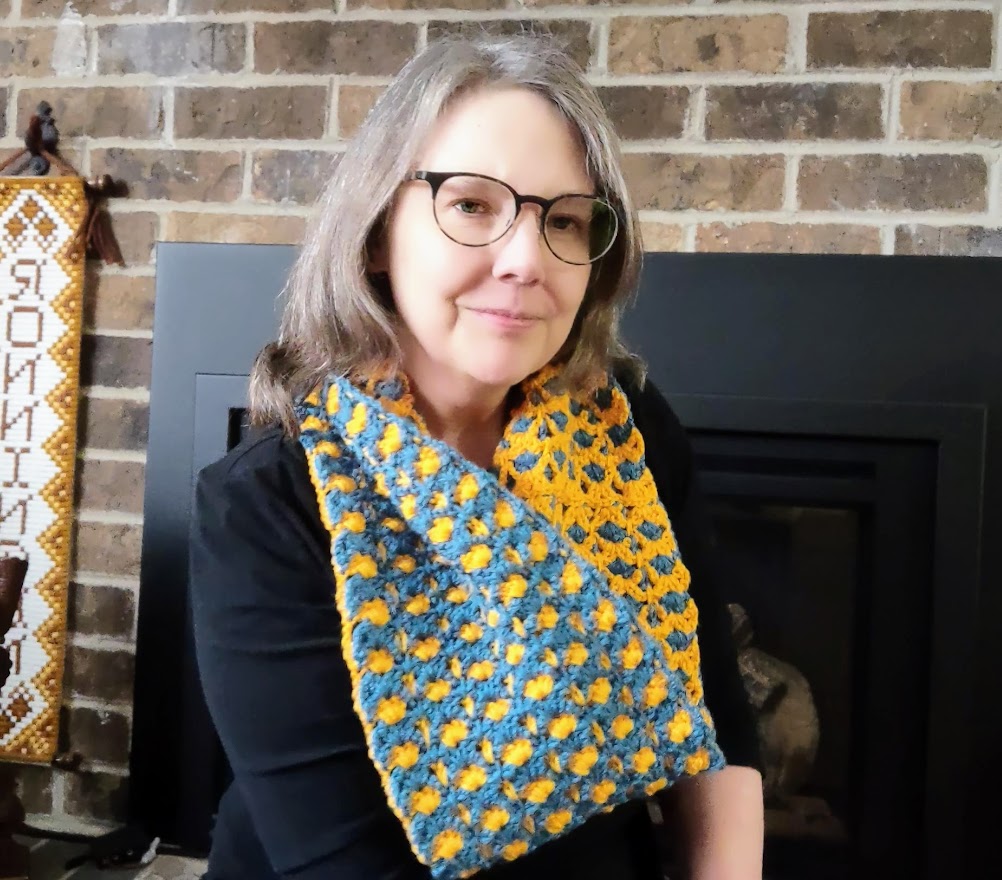
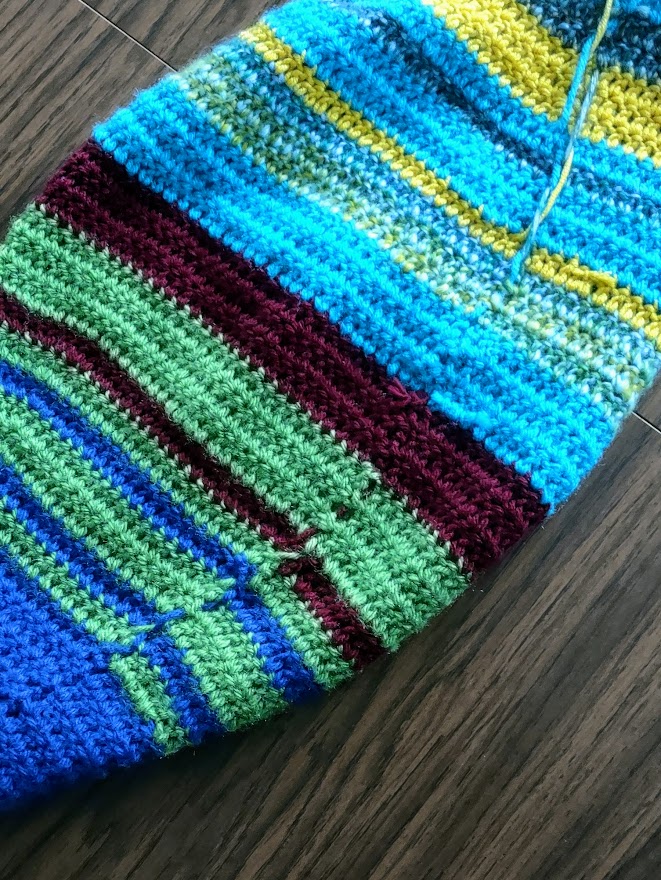
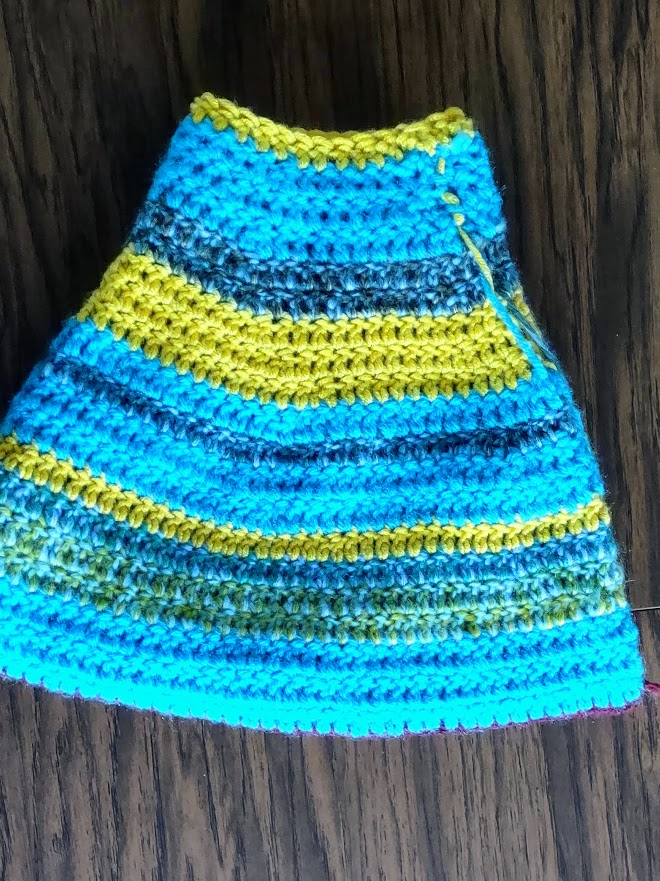
That gives it a score of 3.75 Next week I'll be showing you some patterns from a 1916 Corticelli Silk Mills booklet and the week after that I'll have the results of one of the patterns from the booklet. 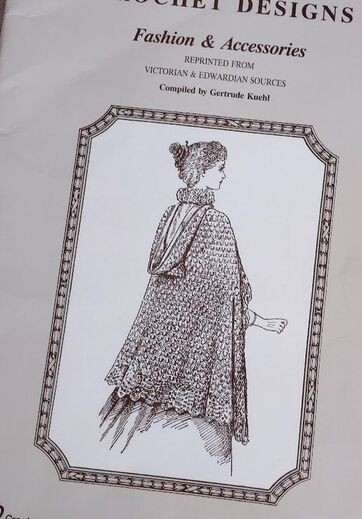 I've had this booklet for years and while I haven't made anything from it yet, it has been a good resource for how to think through the older patterns. The booklet was printed in 1990 by the Knitting and Crochet Guild of London and compiled by Gertrude Kuehl. Not only does it have patterns from 1855 to 1917 it also has a two page introduction written by Gertrude on past terminology and pattern writing styles. More specific terminology started to be used in the mid-19th century when patterns were beginning to be published and that led the way for more standardized terminology in crochet. It's still far from being completely standardized and one of the things I had to figure out when reading patterns in this booklet was whether the instructions were in UK or US terminology. Gertrude says that patterns from that era were either very detailed or just gave you a stitch pattern and let you figure out how to do the rest. She goes on to remind us that the patterns that we would consider lacking in details were more "open-ended" to the Victorian crocheters since they were probably used to making their own sewing patterns. The use of what they called "tension square" (what we would call a swatch) were used to help provide calculations for figuring out measurements, how much yarn they would need as well as whether the yarn was suitable for the project. She says, "For those of us who have been spoon-fed on detailed printed instructions, this may seem like a giant leap into the unknown, but in fact it holds the potential for greater adaptability of design to an individual's needs and opens up each pattern to the use of a wide range of yarns and threads." Let's leap into the unknown! This booklet has a two very helpful charts; one for hook comparisons to guide you through to modern US hook sizes and another for yarn comparisons for the fibers that are used in the booklet's patterns. 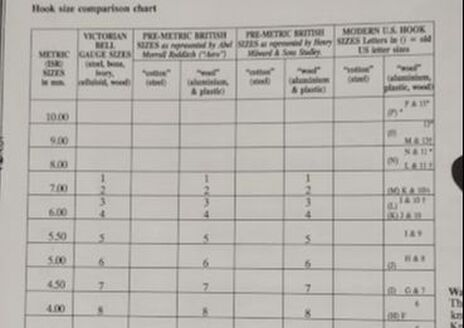 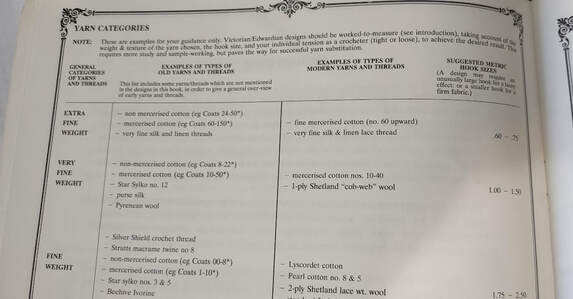 I'm going to share a selection of the patterns instead of all of them just to give you an idea of what's included in this booklet. The first pattern in the booklet is this "Wrap for Lady, With Hood". This has very detailed instructions and they are written without row breaks so it's a little difficult to read. It also gives you the yardage of fabric you need to line the wrap. 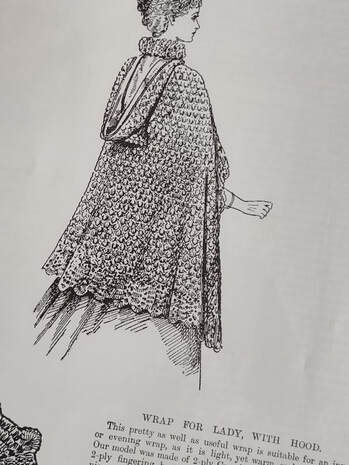 There were several patterns for tops including this Wool Jacket. The directions seemed pretty detailed but there is no information on how big this would turn out. Going with the idea of using this as a guide would work pretty well though. You could easily add or subtract rows with their construction method. 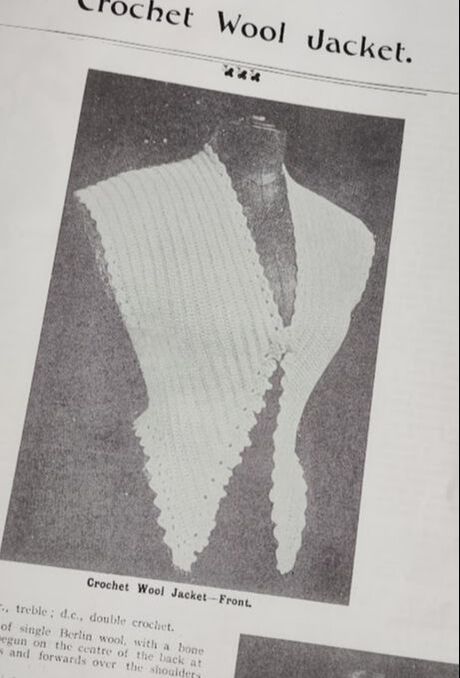 There were three collar patterns in the booklet. This is the first. The others include a Rose one that looks like Irish crochet and one done with metallic thread. This pattern, like many others, give a close up of the stitch pattern. That's almost as good as a chart. 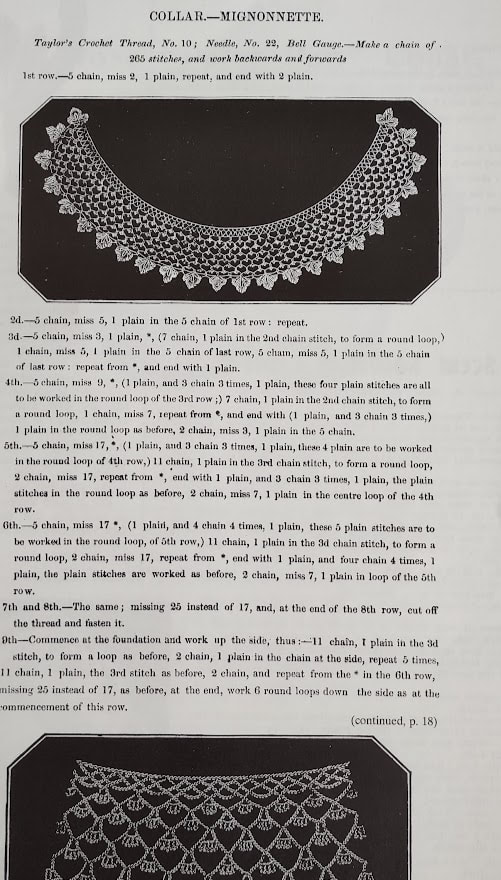 There were several flowers intended to be decorative but this was the only one that was a sachet. The sachet packet goes in the base of the flower.  This bag is one of two in the booklet. They recommend using macramé twine and lining it with silk. 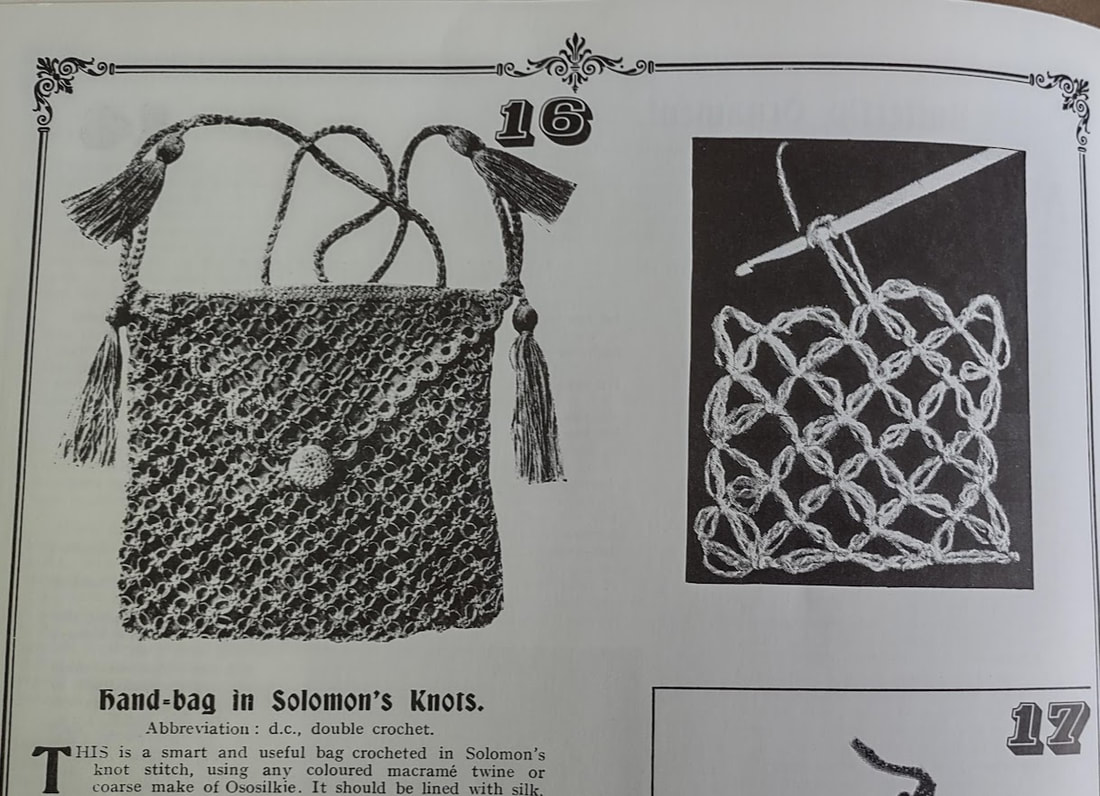 There were also hats, gloves, belts, slippers and a few smaller projects like these buttons and a narcissus flower. 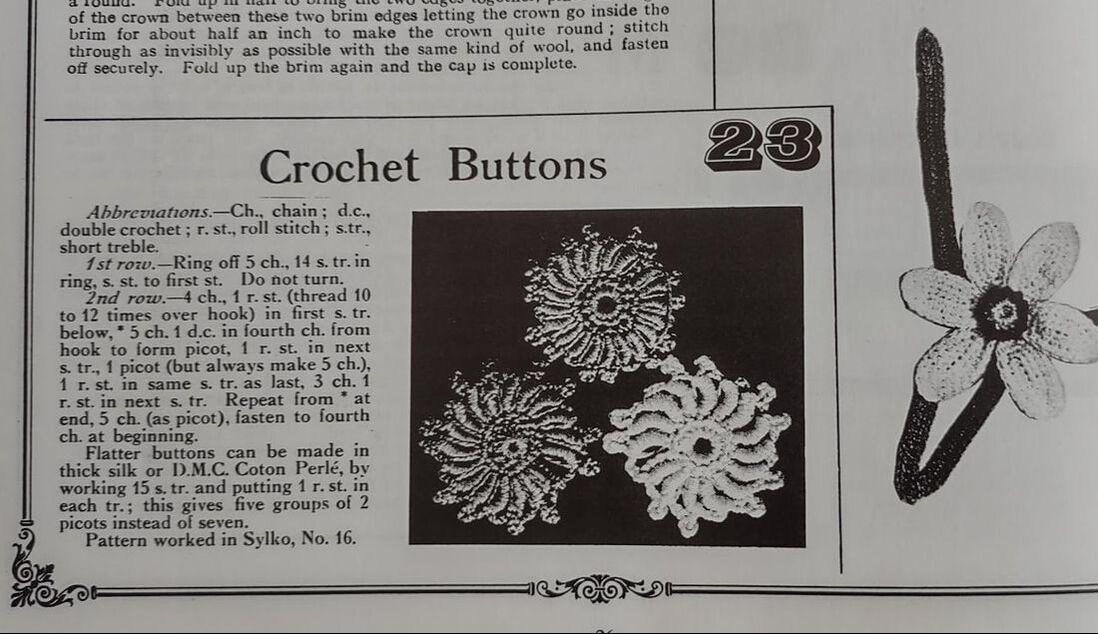 The last two I'm sharing this week are a single Dahlia and the Crochet Yoke for a Lady's Nightdress. The yoke seems to have pretty detailed directions but it's also one that would allow you to make that leap. You could easily continue the pattern down for a longer top. It's worked in strips so it can be worked to fit and the thread changed up. 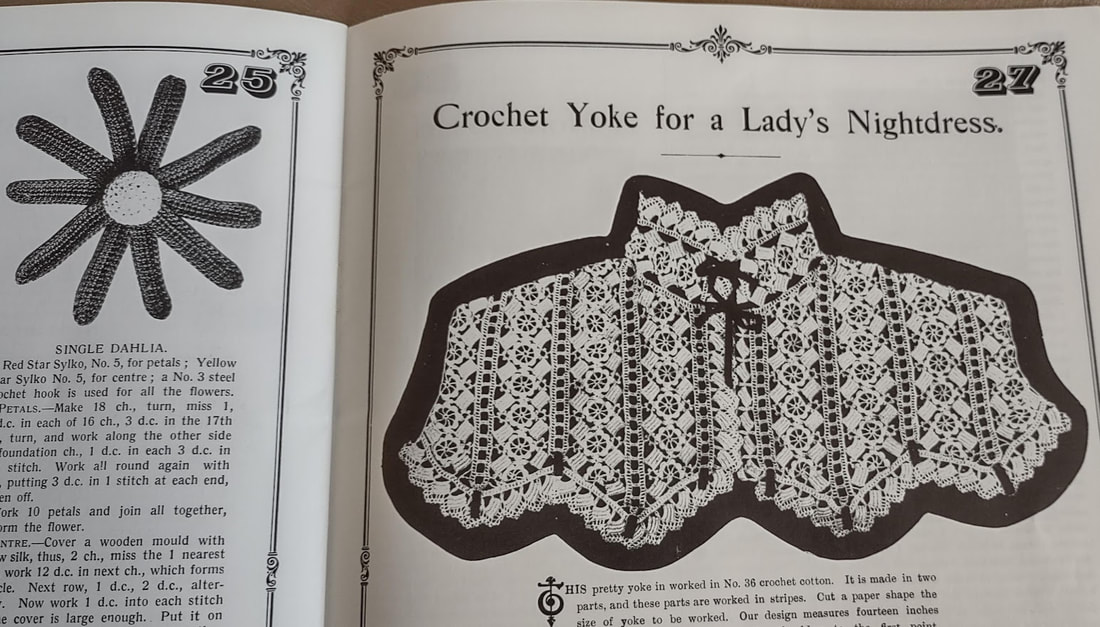 Next week I'll have a finished project from this booklet to share with you. Another leap into the unknown! We're back to the 80s this week with a Workbasket Magazine pattern. I was intrigued by the reversible part of this pattern. The photo the magazine chose for the pattern did not show enough contrast though so I didn't really have a good idea of what this was going to look like when it was done. 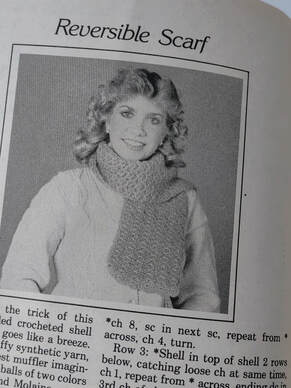 This pattern gives you a specific yarn for this without telling you the weight. They suggest Lion Brand Molaine which comes in 1.4 ounce balls. It says you need two balls of two colors. I looked up the yarn and it appears to be worsted weight so I pulled two skeins of yarn that had 3 ounces each left in them. One was Lion Brand Basic Stitch and the other was Knit Picks Brava Worsted. The pattern had a gauge which I matched pretty closely. It took me a few tries to get "the trick" of the back and forth. You end up dropping an open loop one one side and using the other color for two rows and then dropping that loop and going back to the first color. Once I got it, I didn't really need the pattern any more since it was a simple repeat. The pattern had you repeat the row pattern until you got to 59 inches or your desired length. I did not make it to 59 inches. The photo below shows the point where I realized this wasn't going to make it to 59 inches. It's a little over 36 inches at this point and I have enough for maybe one more row. 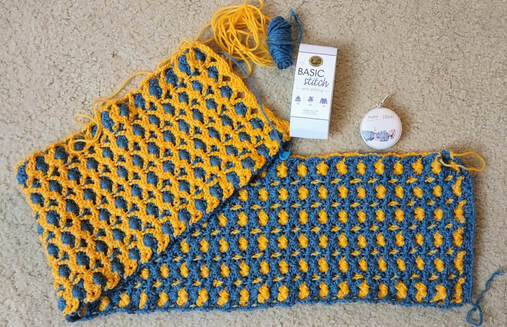 So now what? I don't want to rip it all out and I can't get more of the yarn in time to get it posted. It's long enough for a cowl! Instead of finishing it their way I seamed the ends together and turned it into a cowl. It is reversible with one side being more blue and the other side more yellow. It was really hard to tell from the photo that this is what I was going to end up with. I thought it might be just one color on one side and the other color on the other side. I like it though and it makes a nice, thick and cozy cowl.
Based on the criteria this gets a 3.75 out of 5:
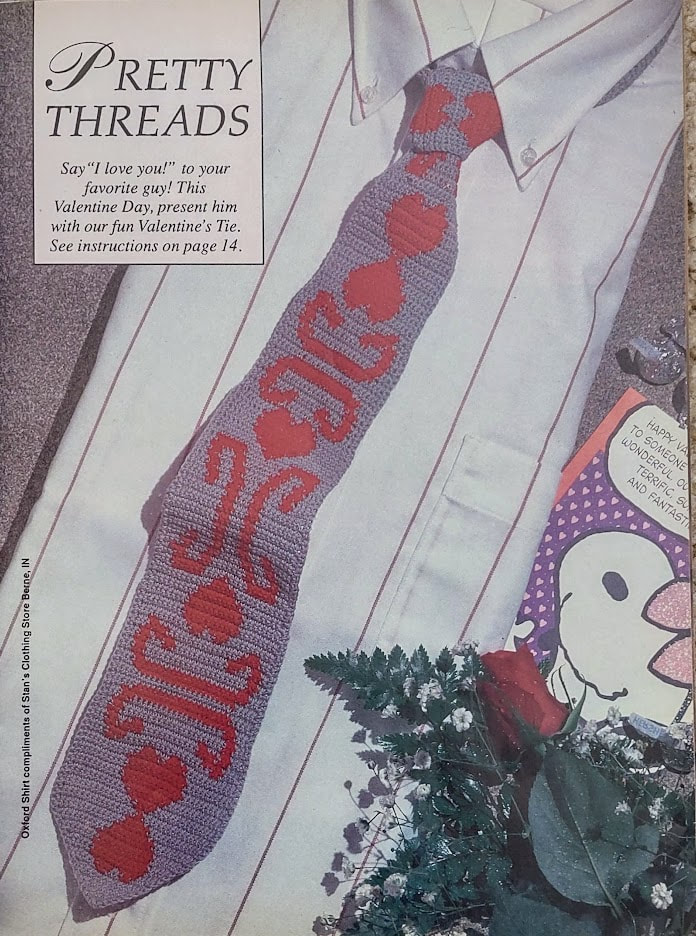
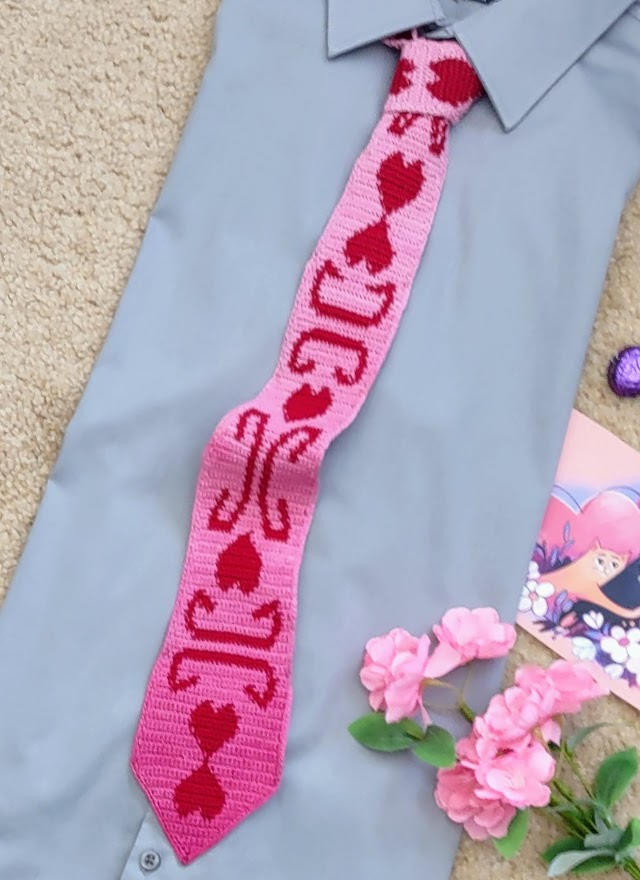
Next week I have a booklet to share that has patterns form the early 1900s. I know this isn't technically vintage but it fits the neck theme. I started this project in September 2022 as my 2023 county fair entry for "Holiday-Not Christmas". It seemed appropriate for a pre-Valentine's day post. I present to you the Valentine Tie! 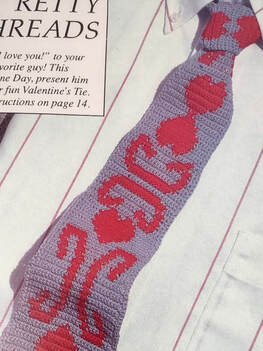 The pattern uses #10 cotton thread in silver and red and a steel crochet hook size 3 (equivalent to a 2.1mm hook). I used cream and dark red because that's what I had and I didn't love the way the silver looked in the photo. I happened to have a size 3 steel hook in my collection of randomly gathered steel hooks. This a pretty easy pattern to follow since it's all single crochet. You get a graph for the colors and a gauge. They even tell you how to change color and tell you to carry the color not being used and work over it. Even though this was easy, it was a little tedious because there are 437 rows! At least the graph was a mirror image so I didn't have to worry about the direction of the row I was on as I went. Once the crocheting was done I thought it looked pretty good. The cream allowed the red thread that was being carried along to show a little bit but that wasn't a deal breaker for me. Since this is cotton thread, it really needed to be wet blocked. I've had problems with thread colors bleeding even when soaking in cold water so this time I put some vinegar in and that worked. Yay! I pinned it on the blocking mat and pulled the pins the next day and discovered I'd made a mistake. The pins must have had some rust on them and now I had rust spots in the cream thread. I tried using some OxyClean spot remover on the spots and then let it soak in the spot remover...and that was the next mistake. When I pulled it out of it's stain bath there were red spots all over it where the red thread bled (say that three times fast). And, the rust spots were still there too. Ugh! After a brief mental reset, I decided I would dye the finished project with the hope that the dye would cover up the spots. As long as I was going to dye it why not try something fancier? Could I make it a gradient? I bought a box of Rit Dye in Fuschia and some Rit ColorStay and made my attempt. Once I had the dye all mixed up I dipped the bottom of the tie in the dye and held in there for a few minutes and then dipped a little lower and held it. I kept doing this through most of the length of the tie and then just dropped the part of the tie that was just cream in and out quickly. I did a quick rinse, applied the color stay and let that soak and then rinsed again. It's not perfect but the dye did a pretty good job of covering up the rust and red dye spots without losing the pattern. I thought it was interesting that this 1991 magazine had very obvious brands in their photo; Kisses and Snoopy. I used Dove chocolate because it's better than Hershey Kisses and I found a cute cat Valentine picture to use instead of the dog Valentine.
And now for it's rating:
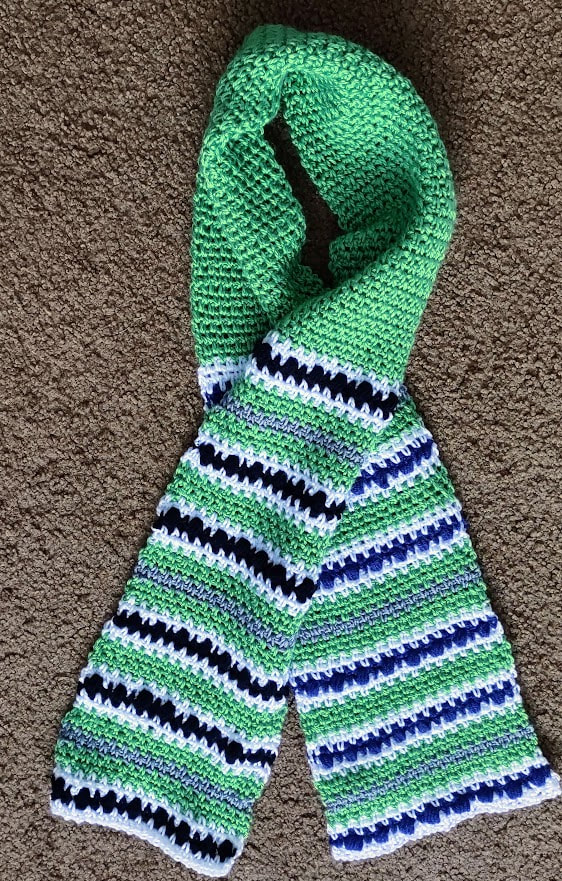
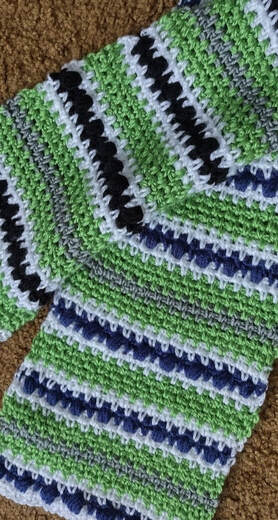
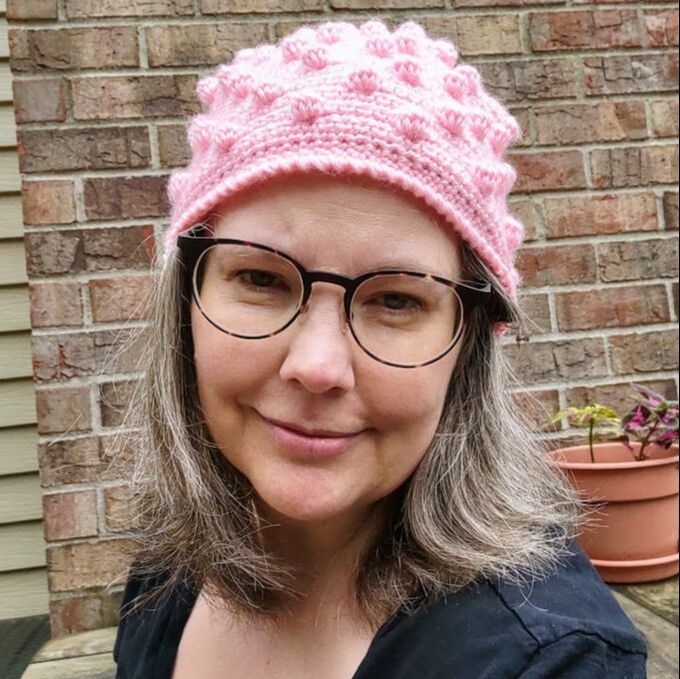
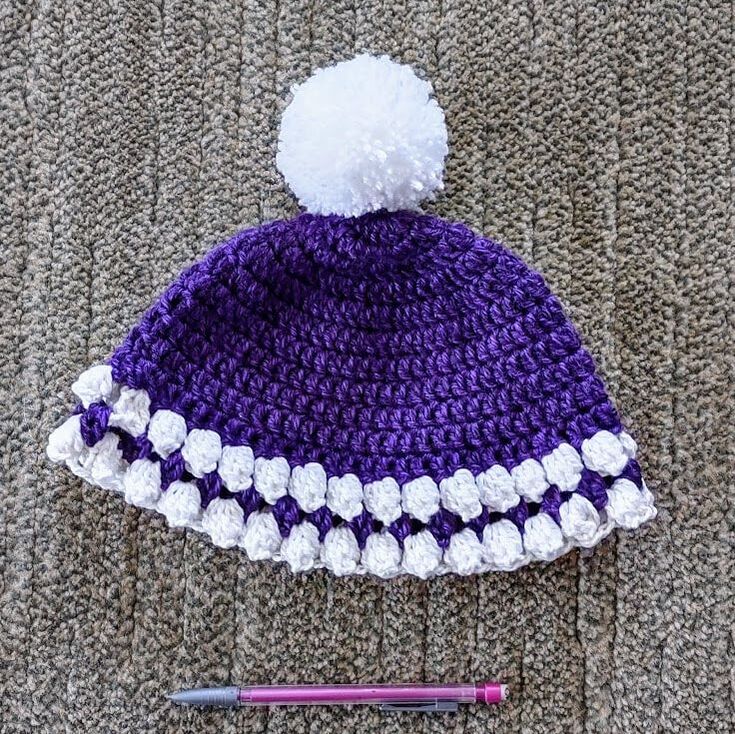
Total is 4 out of 5! This week's pattern is from a February Workbasket pattern. They have directions for a scarf, cap, gloves and legwarmers in some variation of the stitch pattern they give you. Of course, the amounts of yarn given are for the entire set so if you want to make just one of these you'll be guessing at the amounts. Materials include: Columbia Minerva John Kloss Heather yarn; 12 ounces of Gray (MC), 4 ounces of each of the other colors they give as Rice (R), Brown (B), Silver Gray (G), Red Onion (O). An I hook for the scarf (other items use different sizes). A tapestry needle and 12 inches of 1/2 inch elastic (they don't say in this part what the elastic is for but I was reasonably sure it wasn't the scarf). The yarn they specify seems to be a sport weight yarn. I ended up going up to a DK weight and used leftover Bernat Softee Baby for the main part of the scarf. The other colors were mostly scraps of DK weight yarn I had. There is a gauge and I was fairly close to it with the DK weight yarn. 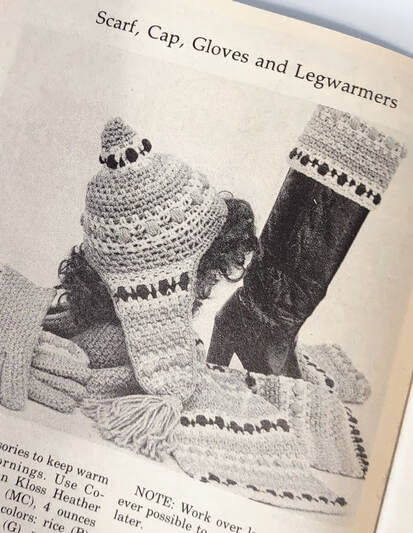 I wasn't impressed by the use of yarn that has unusual color names and that they used a black and white photo for this project. In particular, they used Rice as a color name and gave it the abbreviation R but also had Red Onion which was an O. I ended up using my own colors and had to write out my own color plan for the different rows. Their choice of "O" for Red was even worse when I realized that they were also using "O" as an abbreviation for yarn over. Row 3 reads, "Sc in first ch 1 sp, ch 1, O, draw up a lp in next ch 1 sp, (O, draw up a lp in the same sp 4 times, O and through 11 lps on hook, O draw through lp on hook (popcorn made)..." I used white for Rice, green for the Main Color/gray, blue and black for Brown, gray for Red Onion. Once you get through the confusing color and yarn over abbreviations this turns out to be linen stitch with a row of popcorn stitches. It wasn't complicated just not written out very well.  My handwritten color order. I also guessed wrong on how much blue yarn I would need so I ended up making one end of the scarf blue and the other black. Here are the final photos:
I think the edges are a little messy and it could really use a border but it's fine the way it is too.
Criteria: Is the pattern easy to understand? No. If there is a gauge, could I match it? Yes. Does it look like the photo? Sort of. I think they used two colors for the bobbles and I didn't see how they did that with the color order in the pattern. Would someone wear this? Yes. Did I enjoy making it? Eh. Once I got over the annoyance at their confusing abbreviations it went ok. I didn't hate making it but I wouldn't make this again. That looks like two yeses and two half yeses so that makes this a 3 out of 5. Next week it's not a scarf and it's a special Valentine patern! I know it's early in the year but so far this is my favorite. It took me a while to figure it out and I still got one part wrong but I still love it. I found this scarf on Ravelry by searching for scarves that were originally published before 1970. The entry sent me to an Australian newspaper archive. You can see the pattern in that archive here. The article had the text written out so I didn't have to try to decipher the tiny print even if I did have to decipher the terms they use. 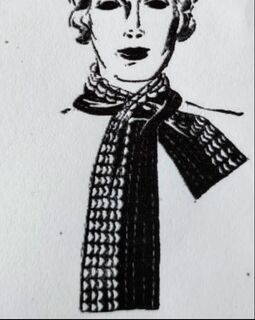 This pattern asks for:
Row two was hard to read and difficult for me to understand. "2nd row: Work first pattern in loop following the part of pattern, then work a pattern into each loop after each pattern, finishing first st of pattern into loop of last pattern." They use loop a lot to mean different things and I knew after the first section was done that it wouldn't give me that scalloped look when I got to the alternating color section. Fortunately for me, someone else on Ravelry made this scarf and I took a very close look at their version and figured out where I went I wrong. I was just doing the stitch pattern across all of the stitches and not doing the pattern in just one stitch or loop. Once I figured that out this went pretty quickly. Here's the my version. I ran out of the light blue yarn so I finished it off with a last row in gray. 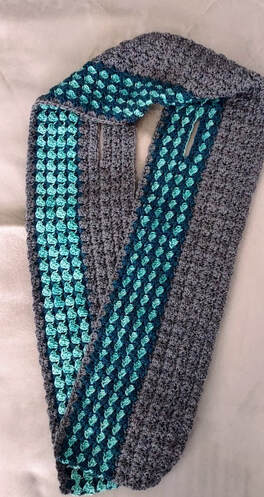 Can you tell what my other mistake was? The two openings were supposed to be next to each other but again, the text was confusing. If I'd looked at the photo again I think I would have done it right but it still works the way it was intended to. Even though this was wool I decided not to block it. It's pretty evenly stitched already and I didn't want to stretch it out. The dense fabric makes it a little warmer.  Criteria:
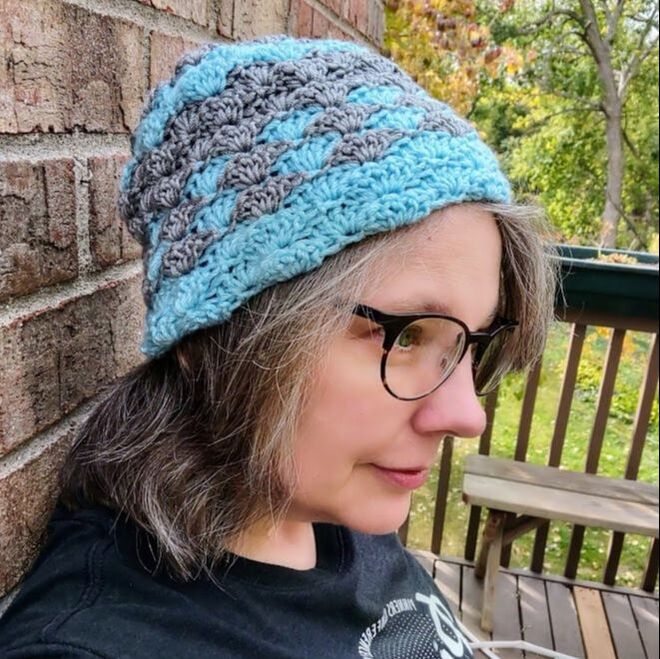
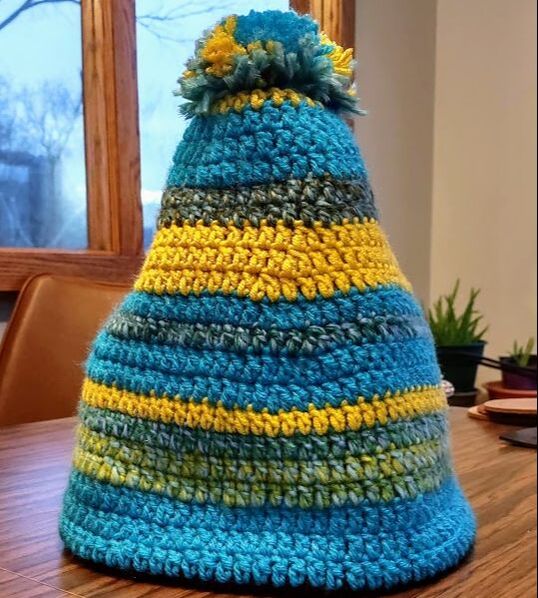
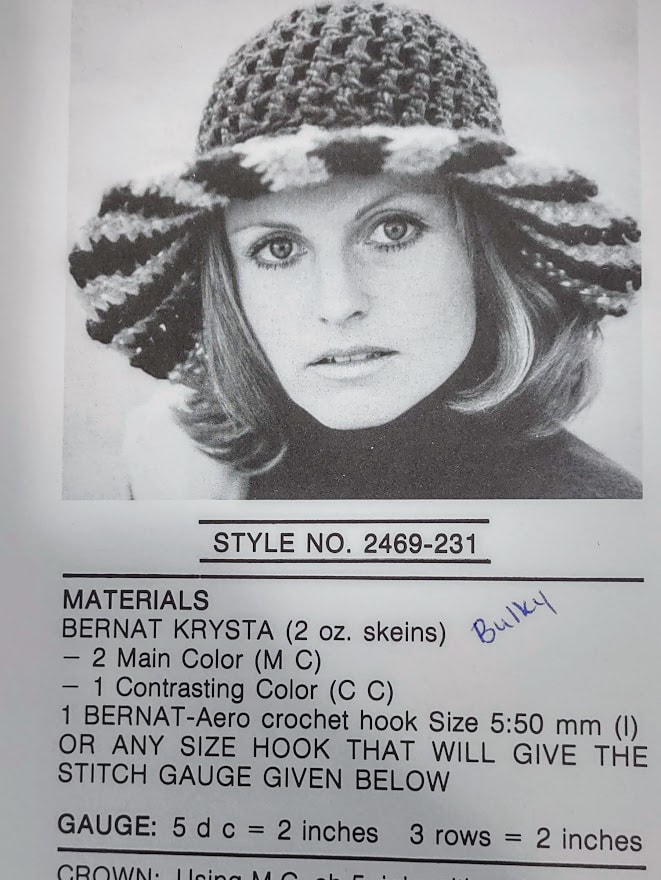
Is the pattern easy to understand? Not really. If there is a gauge, could I match it? Yes. Does it look like the photo (or illustration in this case)? Yes. Would someone wear this? Yes. Did I enjoy making it? Yes. That gives this one a 4 out of 5. Next week we'll head to 1980! Remember this booklet? It had a lot of hat patterns I tried and promptly ripped out. I thought I would give it another chance and try one of the scarf patterns I tried the one in the bottom left corner of the photo. 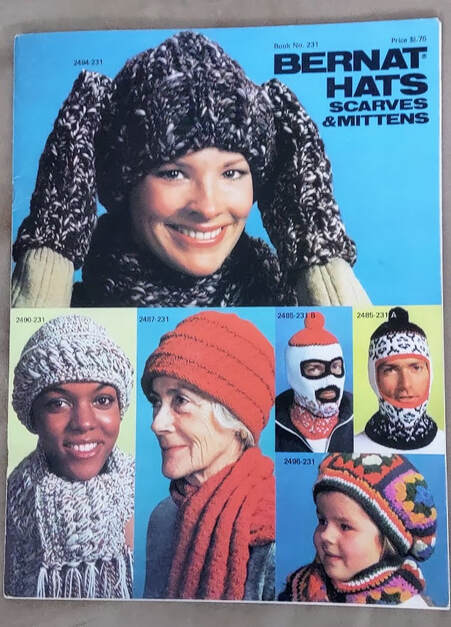 Style No 2490-231 has a marled look that they got by holding two strands of sport weight yarn together. It uses an I hook and gives a gauge of three sc = one inch. I didn't have enough sport weight yarn to make this but I did have bulky yarn so I tried that and matched the gauge with it. This has an interesting stitch pattern that it took me a few tries to understand. Once I got it though, I liked how it was turning out. I hated the yarn in everything else I tried with it but it looked pretty good in this pattern. Here's a close up of the stitch partway through and also where I had to stop. 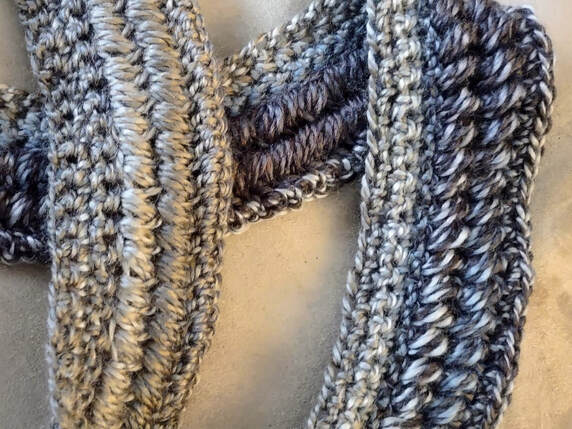 I didn't even come close to having enough of the yarn and it was a clearance yarn so I knew there was no way I was going to find more. I ended up ripping it out so for now I'm not rating this one. It might show up again later though if I get enough sport weight yarn to try it their way.
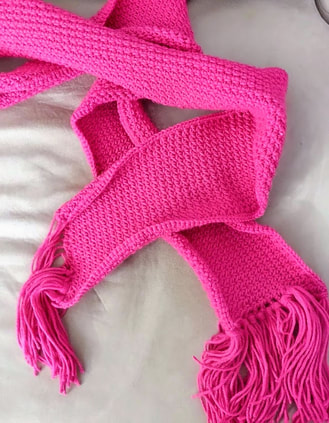
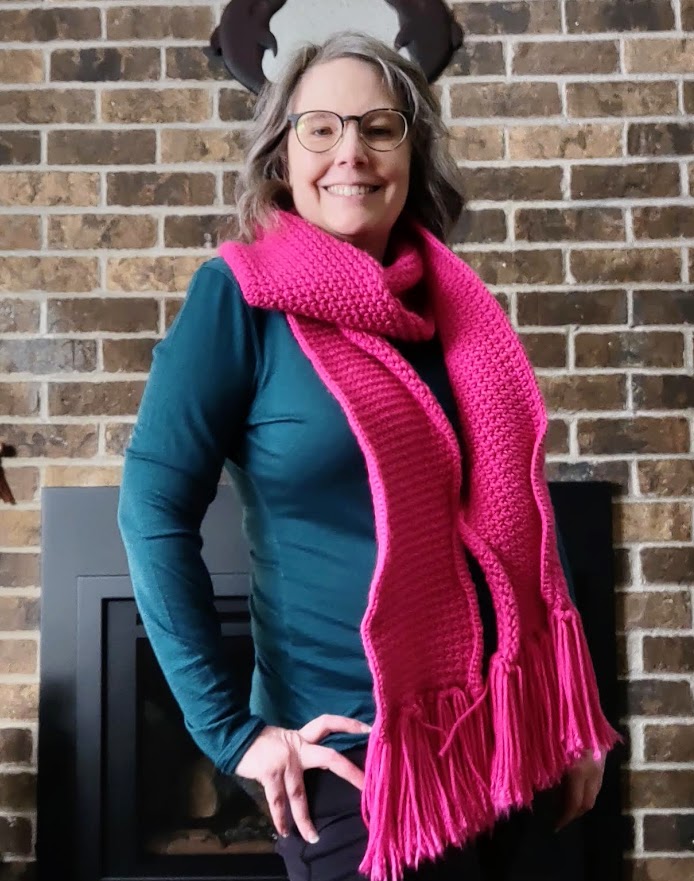
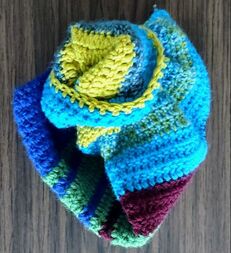
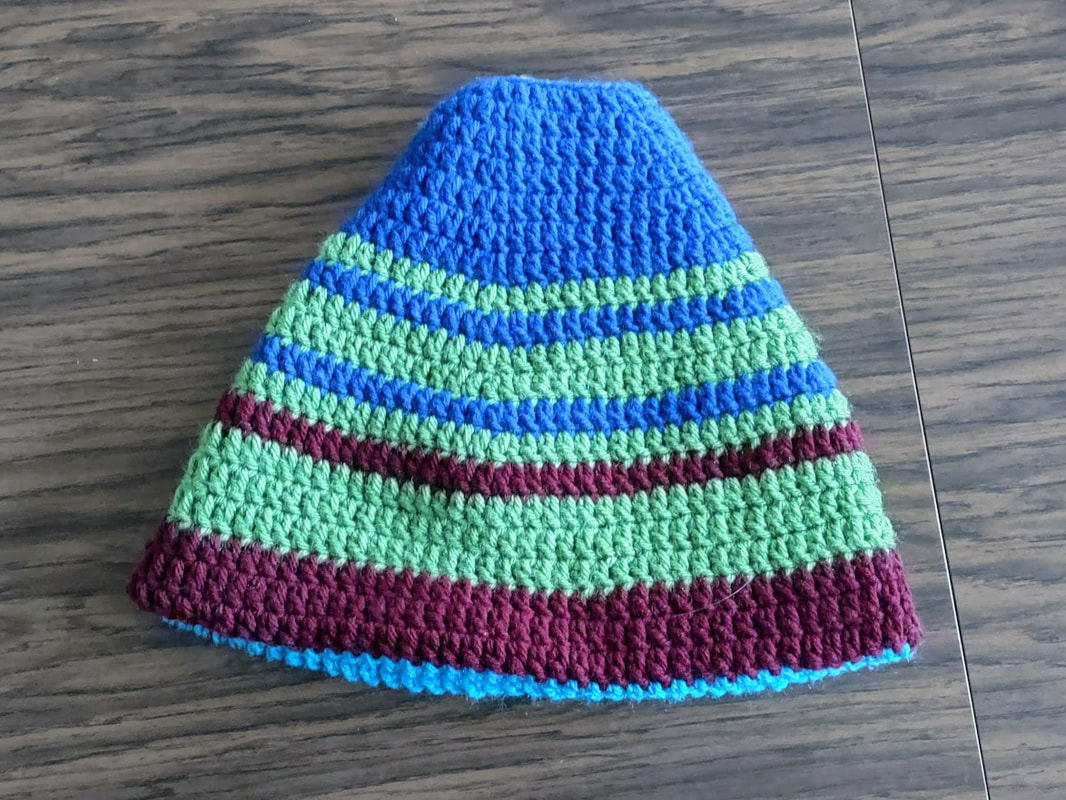
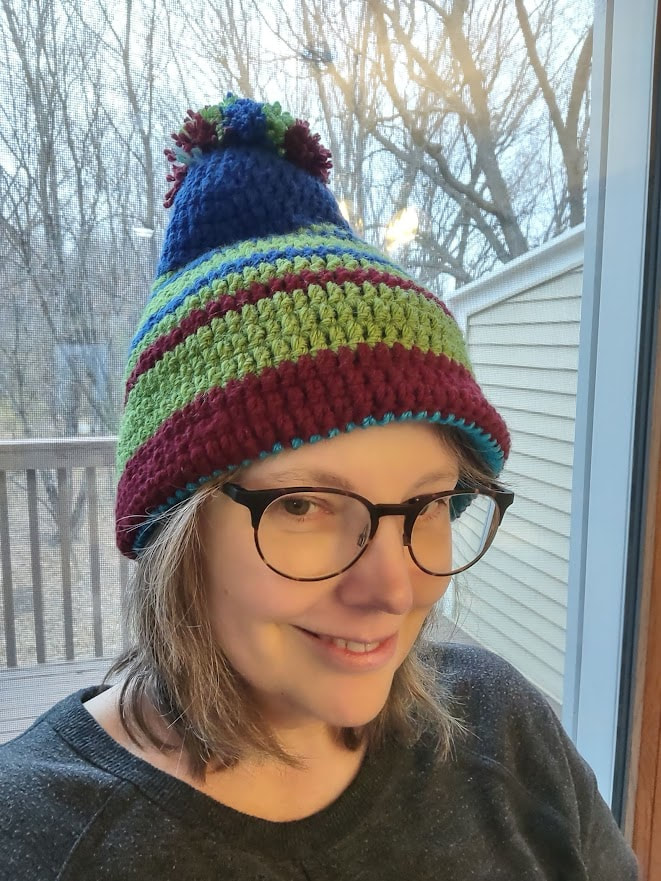
Next week I have a completed scarf from 1937! The Heads to Toes booklet had two of my favorite hats; the Checkered Hat and the Striped Beret so thought I'd try to do one of the scarves from this booklet. I chose the scarf from the set that was a Peaked Hat and scarf. This is the scarf the solidified my "no big scarves" rule. 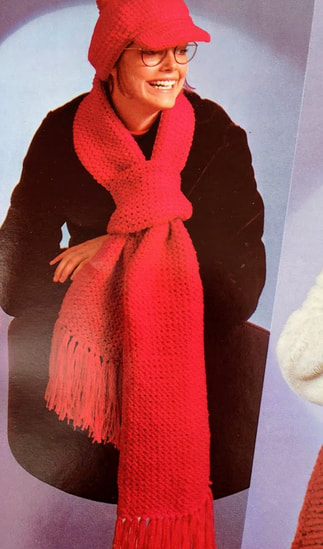 The pattern uses 12 ounces of worsted weight yarn for both the hat and the scarf and a size F hook. It has a gauge of 7 clusters = 3 inches and 7 rows = 3 inches. I did not get the gauge right. I had a skein of Caron Pound of Love that I thought would be good for this but it's very stiff yarn and I knew that using an F hook for a large scarf was going to make my hands very unhappy. I went up a hook size to a G hook and while it was easier on my hands the gauge was now totally off. I got 6 clusters = 3 inches and 9 rows to 3 inches. The stitch pattern has you pulling up a loop and I couldn't consistently pull it up high enough to make that gauge work. It's a scarf though and gauge shouldn't matter that much right? The pattern starts with chain 384 (oof) and then you do their clusters in every row, cutting the yarn at the end and going back to the first cluster of the row to start the next row. The ends don't get sewn in. You tie them off and mix them in with the fringe at the end. Their cluster was defined as; yarn over, draw up a 1/2 inch loop in last chain 1 space used, draw up 1/2 inch loop in next ch-1 space, yarn over and through 4 loops, chain 1. It ends with a row of single crochet on each long side and the fringe on the ends. I used 12 ounces of yarn on the scarf alone. My fringe is a little longer than theirs and I used a bigger hook so that may account for the difference but if you make both of these you may need more than 12 ounces. When it was done the sides were curling. This might be because my gauge is completely off. I thought washing it would help and while it made the scarf a lot softer it didn't really help the curling. It is really long and if you wind it around your neck the curling doesn't show that much.
I don't like this one but I'm not sure if it's user error or a pattern issue. I'm not sure I would have been able to get the gauge consistent even if I had used their hook size.
Criteria Is the pattern easy to understand? Yes. If there is a gauge could I match it? No. Does it look like the photo? No. Would someone wear this? Yes. Did I enjoy making it? Not my favorite but it wasn't too bad since I went up a hook size. That's 3 out of 5. If I'd used the correct hook to get the gauge right, the last criteria would have been no and we would have still ended up with 3 out of 5 but I would have had sore hands. My 2023 blog theme is crochet for necks. This obviously means scarves but also I might do ties, necklaces or collars. If this category becomes a pain in the neck I may switch to something else partway through the year. I've been looking at vintage scarf/neck patterns and while I have a lot of them in my library many of them are patterns I don't want to make. Here are the types of things I'm ruling out (at least for now):
Rating the neck adornments will be a little harder than the hats. A scarf is more of a one size fits all sort of items so "does it fit?" won't be a criteria. Here are the things I'll try to use for ratings:
I have about 35-40 patterns I've marked as possibilities and that might be enough to get me through the year. The three I have queued up for January are from 1937, 1970 and 1977. Next week I'll have the 1970 pattern from a booklet I made some hats out of already. 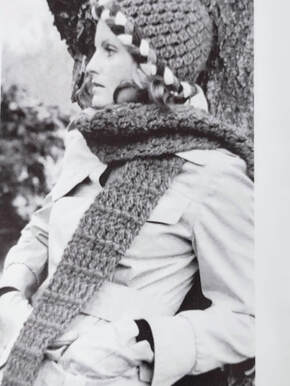 A scarf made in all double crochet. I'm not going to make this one. There are 22 hats that I gave a rating of 4 or higher. Here they are starting with the ones that had a rating of four. Most of these were given to Neighborhood House in St. Paul or Ramsey County Social Services. If it went somewhere else, I put that in the list. Clicking on the photo should take you to the original blog post for that hat. Five hats got ratings of four:
Seven hats had ratings of 4.5:
And finally, here are the ten hats that all got a rating of five out of five:
One of the reasons I started making hats in general was that I don't really like them. They often crush my glasses against my ears or just look weird. Overall it was a pretty good year of making hats. I learned a lot about reading vintage patterns and ended up with two hats that I like! I made 38 hats in 2022. The patterns ranged from 1965-1986 and more than half of them had a rating of 4 or higher. This week I'll share the ones that were the worst and those that were sort of meh. Next week I'll share the best and tell you which ones I kept. I think I rated a little harsher as I went through the year so some of the ones that I did in the beginning might have better scores than I would give them now. Clicking on the photo will take you to the blog post for each of these. The Worst (ratings of 2.5 or below):
The "Not so bad" (rating of 3-3.5): There were seven hats that had a rating of 3 and two that had a rating of 3.5.
Next week will be the 22 hats that had a score of 4 or higher. The Clouds and Rainbows hat comes from the 1986 Winter Omnibook issue of Crochet World. This issue has a lot of very interesting patterns that I need to share before I show you the hat I made from the magazine. First we have a mouse that dispenses toilet paper while holding cheese. Kind of cute but is this sanitary? Is the mouse washable? 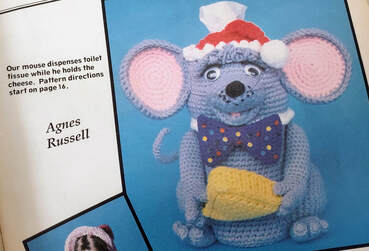 Next we have a nativity set. At first I thought Mary had blonde hair in the photo but after checking the pattern they skip giving her hair and give her a veil instead. Joseph has a dark beard but the way the photo is taken it looks a little like a skull and is giving the whole scene zombie vibes. 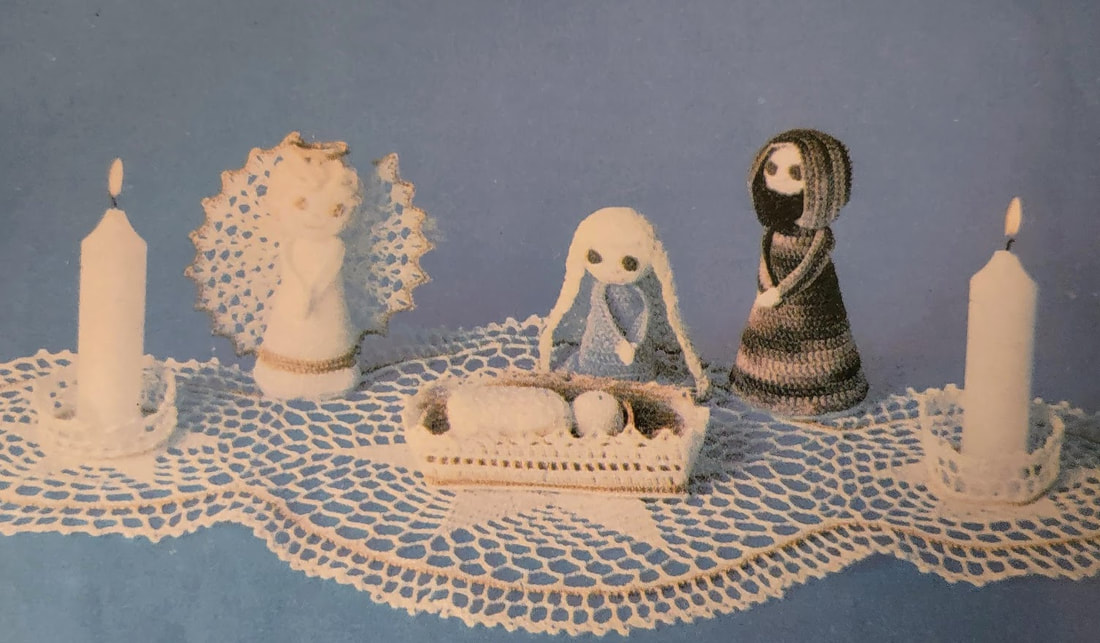 The Crochet World magazines had a lot of Barbie and Ken clothing in the 1980s and this is an excellent example of one. Ken obviously skis and must have his very own, fashionable ski suit. 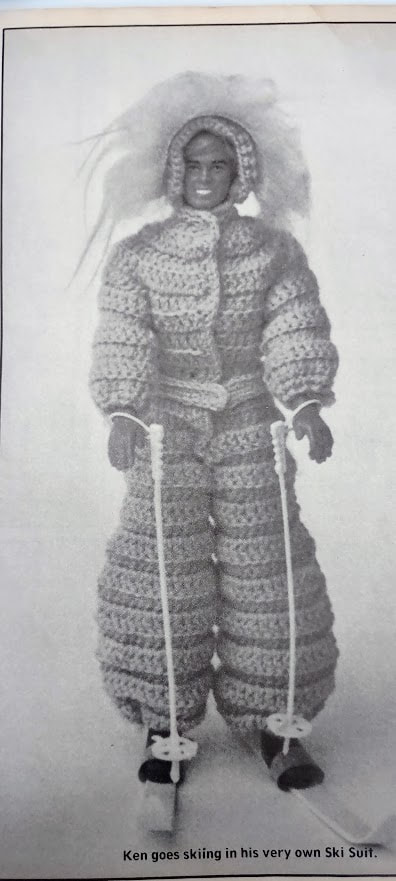 Other patterns not pictured include;
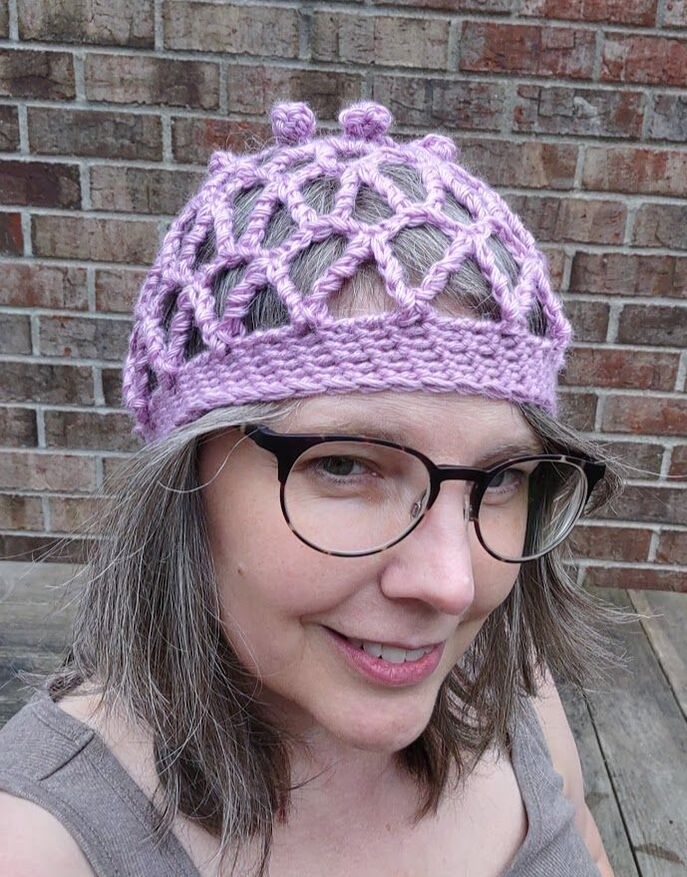
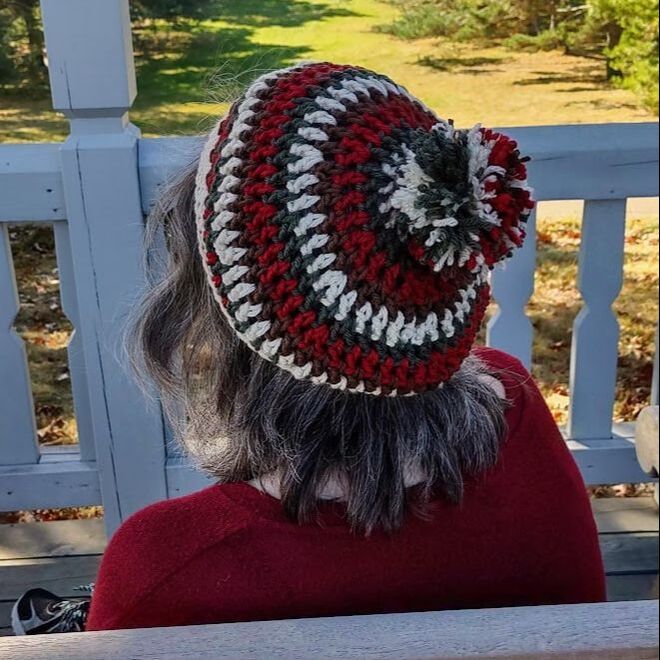
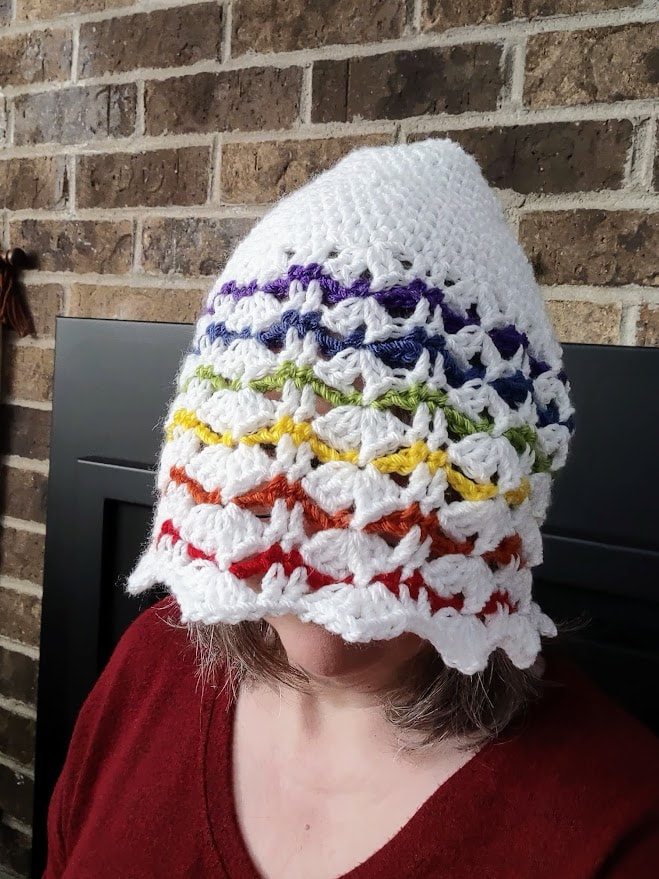
And now the Clouds and Rainbows hat. I knew I wanted to make this the moment I saw it. I was so confused about how that would stay on and if it would really turn out like the photo.  This uses worsted weight yarn and an I hook. I used Lion Brand Basic Stitch which I think of as a lighter weight worsted. They give a gauge that I matched perfectly in the white part of the hat with the recommended hook. The size is given as Misses and there's a note; "This pattern is recommend for experienced crocheters. With a little help beginners can also work this pattern." The note is accurate but maybe not for the reasons you would normally think. The pattern and stitches aren't that hard but the directions assume you have experience crocheting and can read into the directions to get the parts they chose to leave out. The hat is done in the round and the white part is all half double crochets that you join at the end of each round. Here's where I think the beginner would have difficulty. 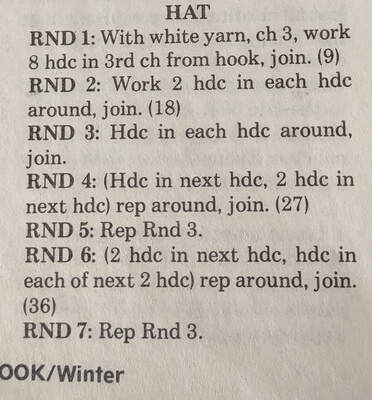 Round two (and throughout the pattern) misses the chain two to start each round or maybe they think you don't need that part and it will be fine. I did the chain two at the beginning of each round. It's nice that they give you a stitch count to make sure you're increasing the right amount. In fact, they're pretty clear about how to increase the rounds right up until round 16 where they tell you to increase by 12 stitches evenly instead of the nine you had been increasing. Round 17 is a round of shells, Round 18 is a color round that is mostly single crochet stitches. Round 19-22 it says to continue in pattern and while it's obvious to me that the "pattern" is round 17-18 that may not be obvious to a beginner. It's not that hard to write something like; repeat round 17 and 18 twice. Rounds 23-29 repeat the "pattern" while increasing the size of the shells. It ends with a pompon (I skipped the pom). This was fast to make but it doesn't fit.
I know you're saying, "What if you just folded the brim up?" Aside from the fact that it hides the rainbow part, it's still too big. Notice that I didn't sew that last end in. I'm going to rip it out. I did sew in the color ends so hopefully it's not too much work. 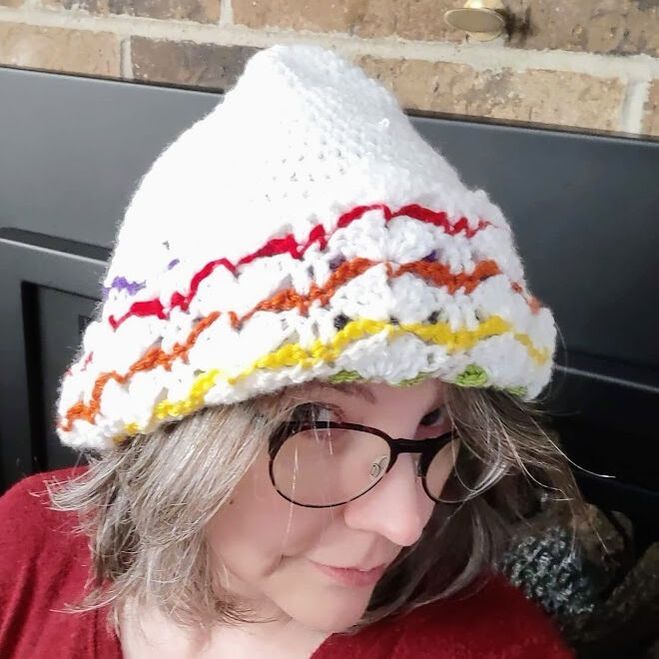 I expected this hat to be weird but didn't expect it to be so big. This gets zero stars since I'm ripping it out.
This is the last hat of the year! Next week I'll wrap up with a post on the best and worst hats of the year. This is a post about hats that didn't work. I was definitely in a mood when I pulled this booklet out and started figuring out what I wanted to make. I tried several patterns in this booklet and either they didn't work out well or I was bored with the pattern. 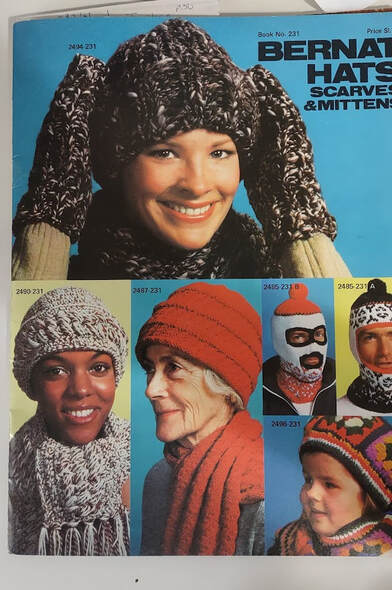 The booklet has 27 patterns or sets. Two are Tunisian crochet, and another 10 are regular crochet. I tried three of the regular crochet patterns. I had bulky yarn so I thought I'd try this one: 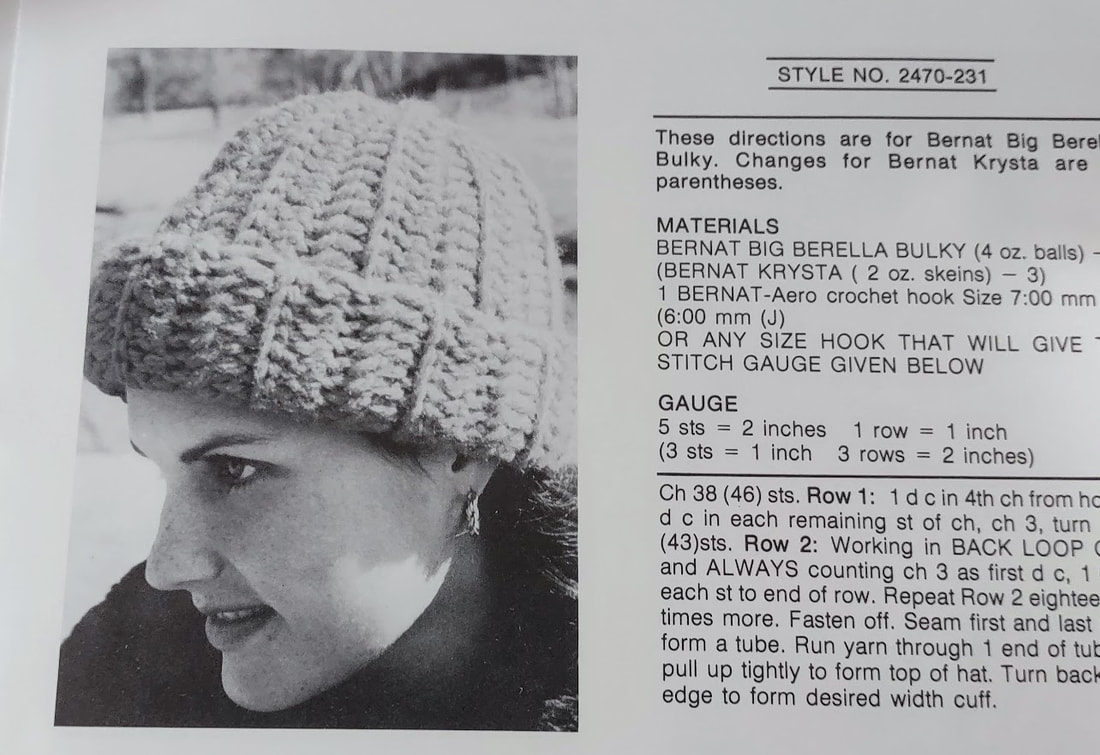 So boring. I think this would have been fine, but I'd already made hats similar to this and it seemed like it was going to be pretty boring. It's a rectangle that you seam up and then gather at the top. Yawn. On to the next pattern. This one seemed different than the other hats I've done and used bulky yarn and a K hook. 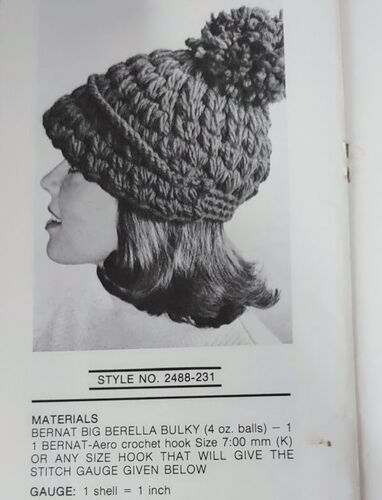 Maybe some day with the right yarn, but probably not. I started it and somewhere around round four things didn't quite line up. I probably could have figured it out but my patience was low that day and I realized that not only was the pattern frustrating but I also didn't like the yarn I was using for this project. I ripped it out. For my last try from the booklet, I thought I'd try this cute popcorn hat. I really thought this one would be ok but about a quarter of the through using an E hook with Red Heart Super Saver my hands said nope! 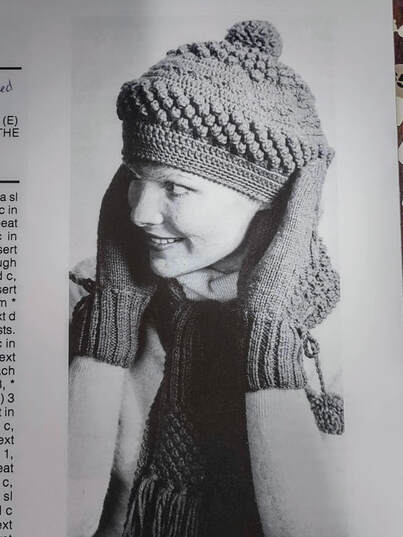 popcorn hell I didn't try any of the other seven crochet hats for various reasons. This first set are the hats that seemed like they would be really boring to make:
This second set had several different issues. I didn't have the yarn for the first one. I didn't love the braid on the second one. The third holds together two strands of sport weight yarn and I don't like doing that and I'm not sure I had enough yarn for this hat in that weight.
Last is the granny square hat. This didn't look like it fit quite right so I wasn't willing to risk the time, yarn and sewing ends in for it.  Next week I will have one last hat and then I'll start wrapping the year of the hat up and planning for next year.
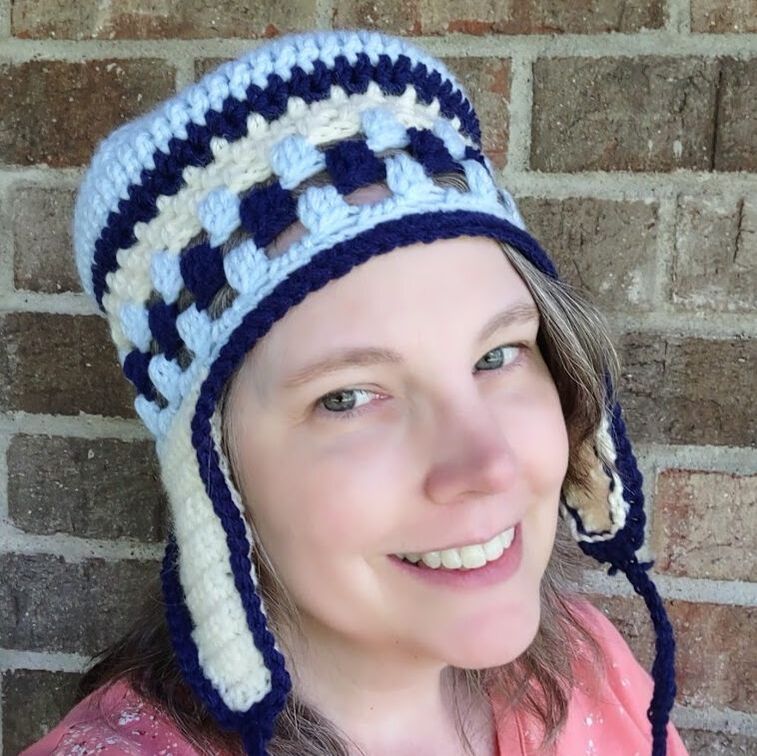
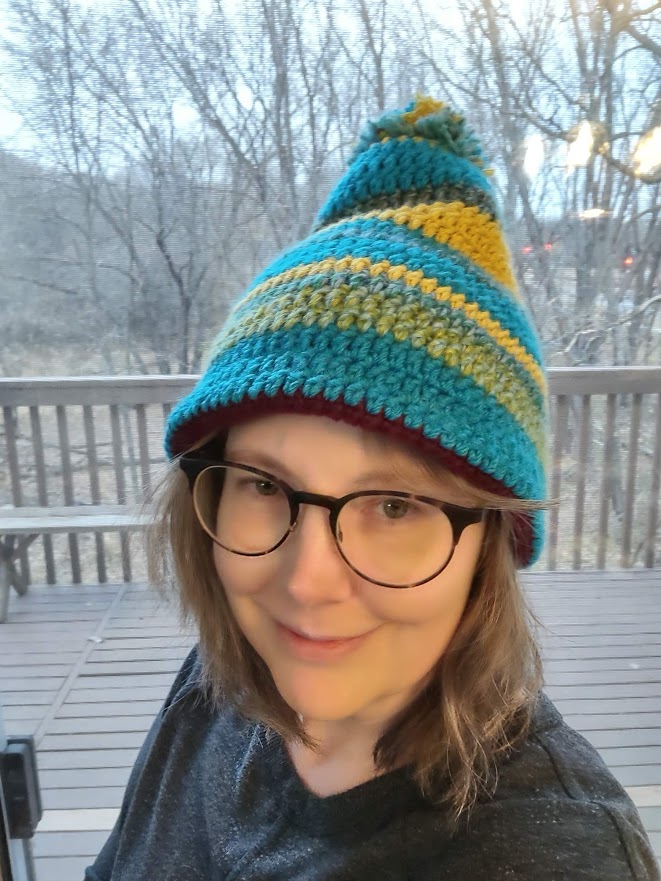
This week's hat is dedicated to Corinna who suggested this pattern book. It has a section with "A Covey of Caps" that were excellent vintage options for this blog. I chose to do the Reversible Ski Hat because it seemed like it would be a great way to use up some scraps and I was intrigued by the reversible part.  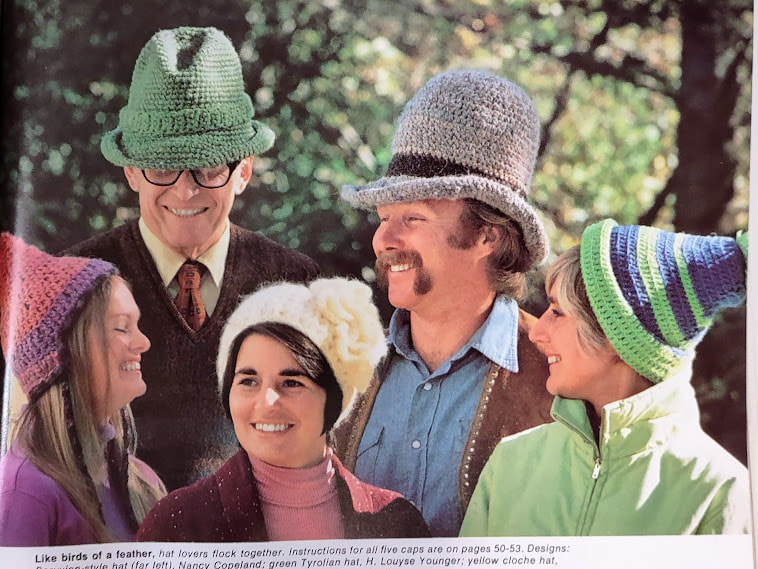 From left to right; Peruvian-style Hat, Green Tyrolian Hat, Yellow Cloches Cap, Cowboy Hat, Reversible Ski Hat. This hat uses worsted weight and an E hook. An E hook with worsted weight yarn is typically what I would use for amigurumi so I expected this to turn out pretty dense and structured. This hat is done entirely in double crochet in the round with the rounds joined with a slip stitch. It has a chart to get the colors the way they look in the photo but I ignored that and just tried to use up my scraps. 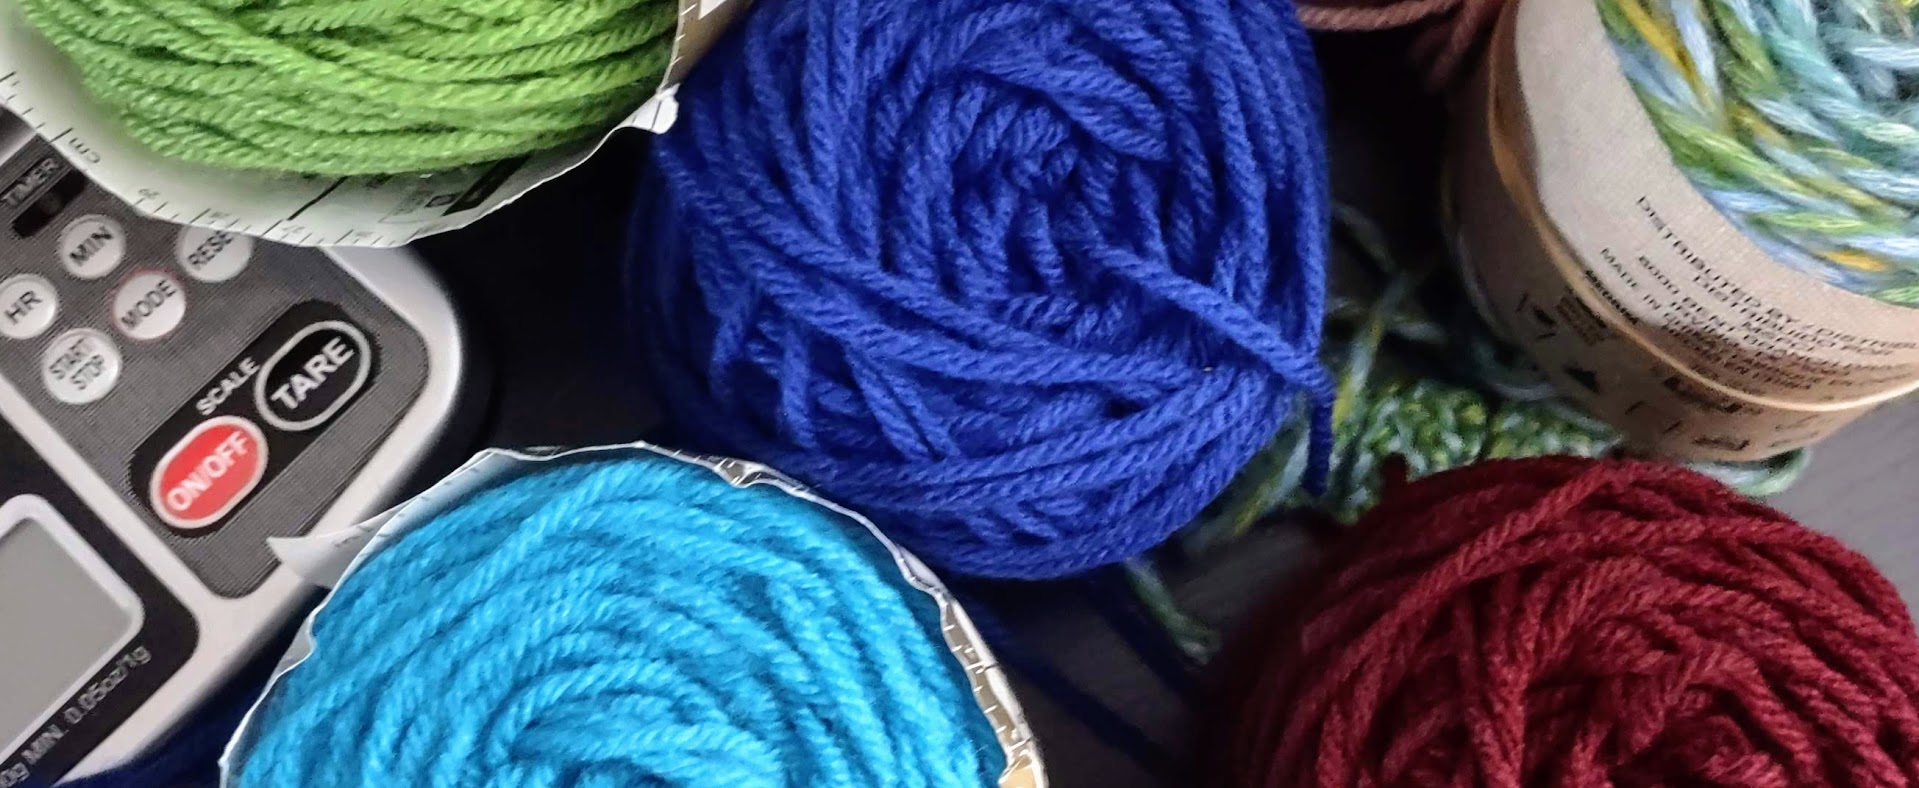 Green, Blue, Brick Red, and multi colored yarn scraps used for this hat. Not pictured is the gold I added in partway through. The directions were pretty good right up to the assembly part. The photo below shows what you end up with when you finish the crocheting part of the hat. 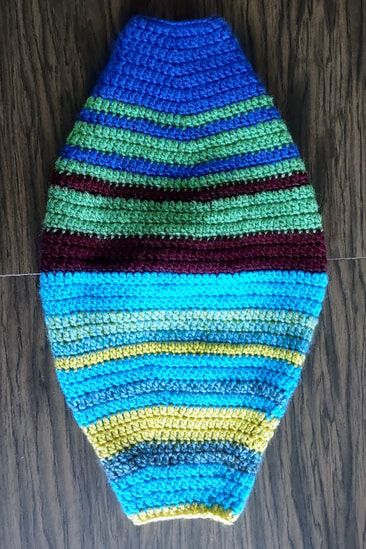 I considered just folding one side up into the other one and then seam together around the short end. That's the easy way to do this. Their way is a little more complex and the only benefit to their version is that the hat would hold together a little bit better. Here are their instructions: 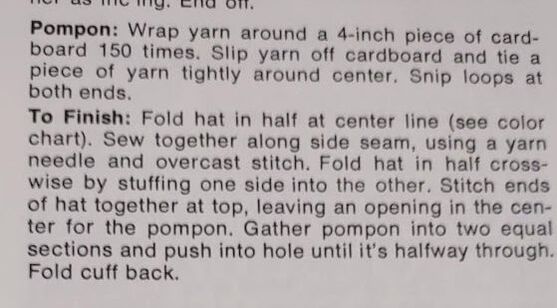 I was skeptical that this would work and I was partly right. I tested it by loosely doing the overcast seam and then "stuffing one side into the other" and it came out inside out. Maybe I just didn't do it right but it seemed like the only way to do it. Here's what I ended up doing: Turn the hat inside out and fold in half at the center line and do an overcast stitch along the side where your rows were joined.
Once it was seamed, I turned it inside out starting with the small end and ended up with the photo on the right:
I used a pom-pom maker and did each side in matching colors so it would match the hat. The pom-pom sticks out half way on each side. I sewed the small end together a little bit and then stuck the pom-pom in the opening and used the tie from the pom-pom to sew it together the rest of the way.  This hat stands up all on it's own! It's very structured. Getting that pom-pom in right was a little bit fiddly but I got it to work. This is two layers of worsted weight yarn crocheted with a fairly small hook for that weight. It's thick and can stand up all on it's own. It's so thick that I couldn't fold up the brim like the woman in the photo is wearing it without it getting weird.
I got it to work and it technically fits but I'm giving it a 3.5. This isn't a hat I would wear and the instructions could have been better for the assembly. The half pom inside the hat feels a little odd too. I'm sure this is warm but it gives off Who-ville vibes. Maybe that's appropriate for the season?
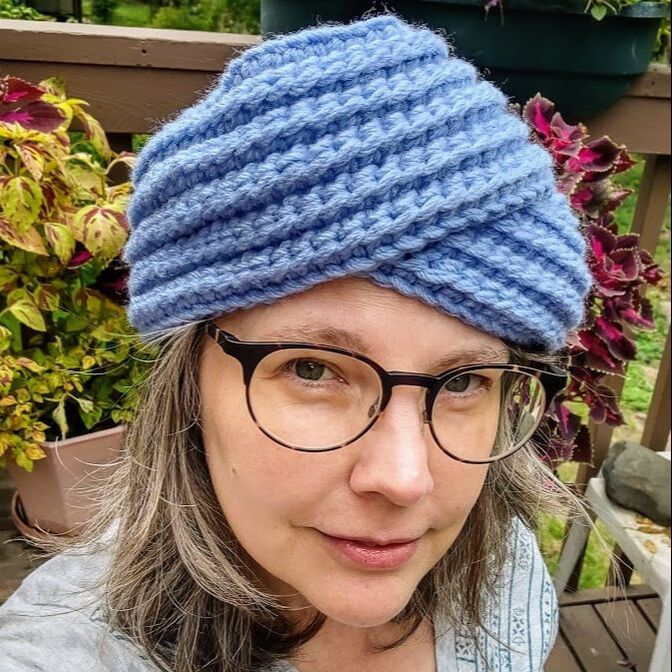
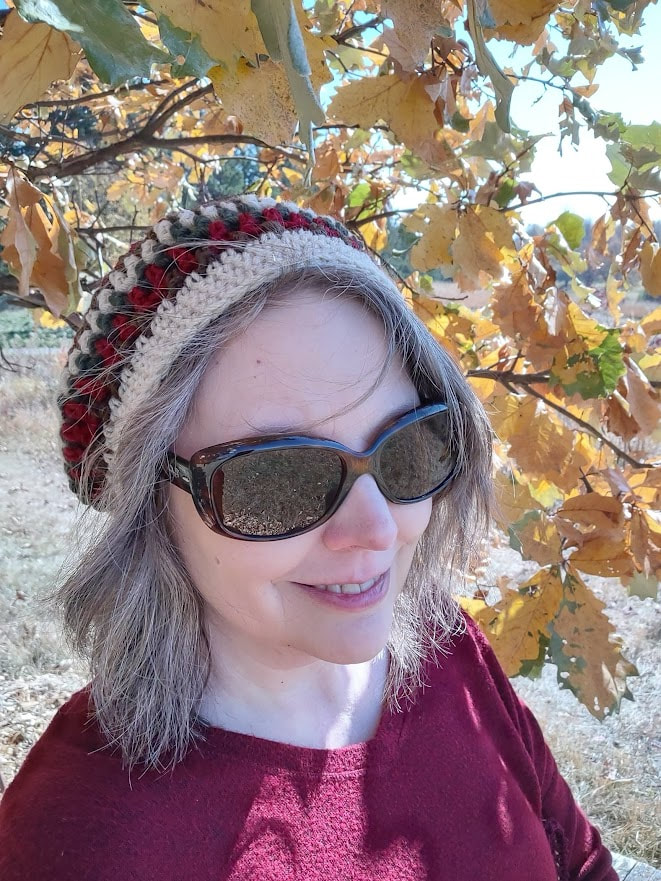
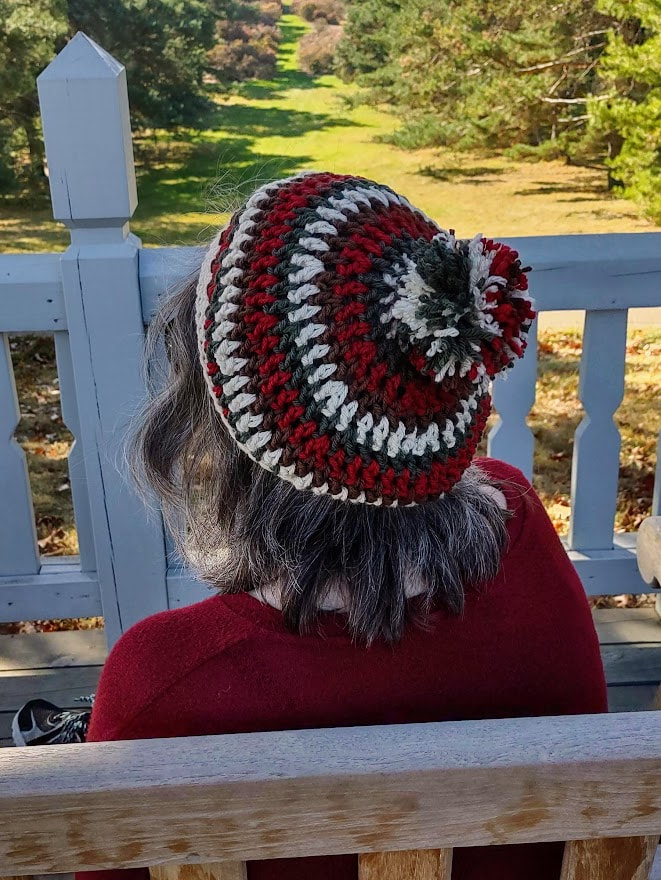
This is a great idea for a hat and with a few adjustments it might be more flexible. I think you could drop the yarn size down to sport, keep the E hook and get rid of the pom-pom. You'd have to do more stitches and rows to get the size right but you'd have a cozy reversible hat that should have a little more give in it. This week I have a striped beret from the Heads to Toes booklet. I don't really like pom-poms and I wasn't sure about the stripes but I had yarn that came close to the photo so thought I'd give it a try. 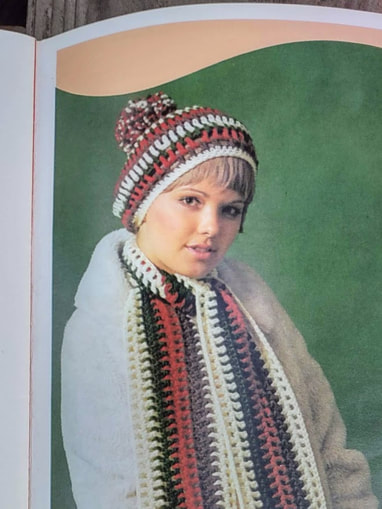 This hat uses worsted weight yarn and the pattern gives the amount for the hat and scarf together (4 ounces each of four colors) so I had to guess on the amounts for the hat. I figured that I'd need about an ounce of each color, maybe a little more on the cream stripes. It uses an H hook so I thought this would go fairly quickly and I was right. The directions are pretty well written, especially on the rows that have increases and decreases. It's worked top down, changing colors almost every row. There are a few sections where it tells you to increase the same way you were for the next two rows but it's basic circle increases so it wasn't hard to understand. This took me about two hours to make and it turned out much better than I expected. We were headed out to the Minnesota Landscape Arboretum the next day so I sewed the ends in on the way there and then wore it that day. It was a beautiful fall day with temps in the 60s and the hat did a great job of keeping the wind from blowing my hair all over the place without being so warm I was sweating. I even got a compliment from the cashier in the café. I'm considering making a second one in a colors that match my fall jacket a little bit better and giving this one away. Maybe to someone who likes the Minnesota Wild since the colors sort of match those team colors.  Here it is on me at the Arb. The first photo is in the nut tree area and the second is by the grasses. This one definitely gets a 5 out of 5.
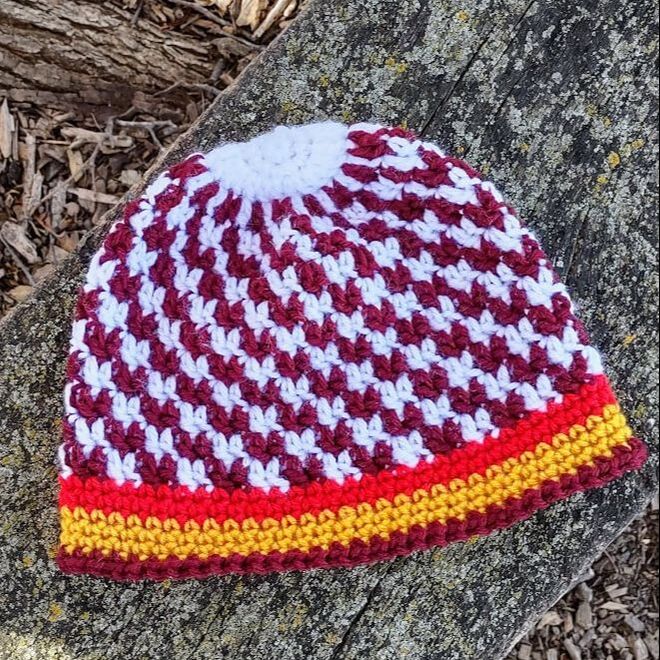
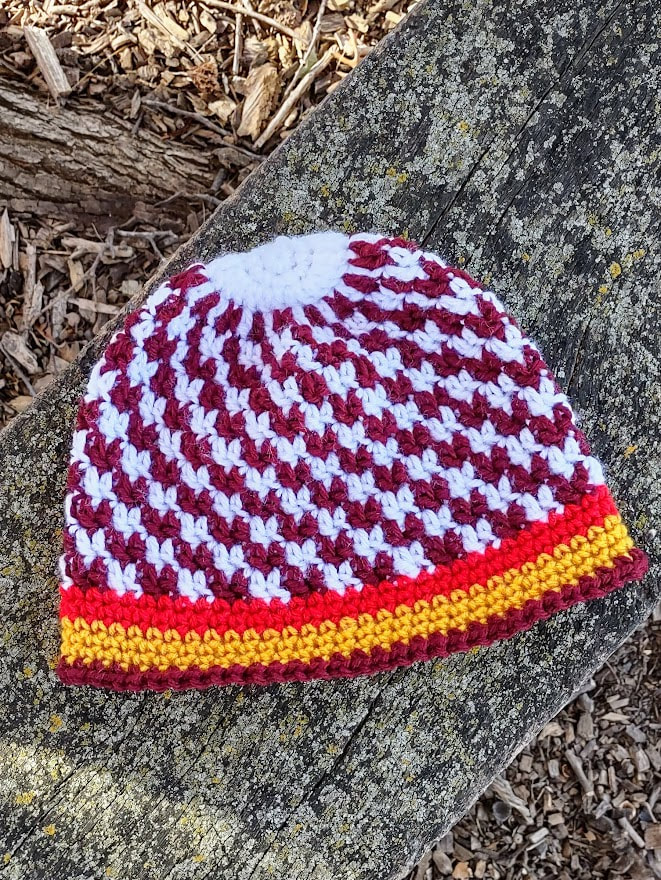
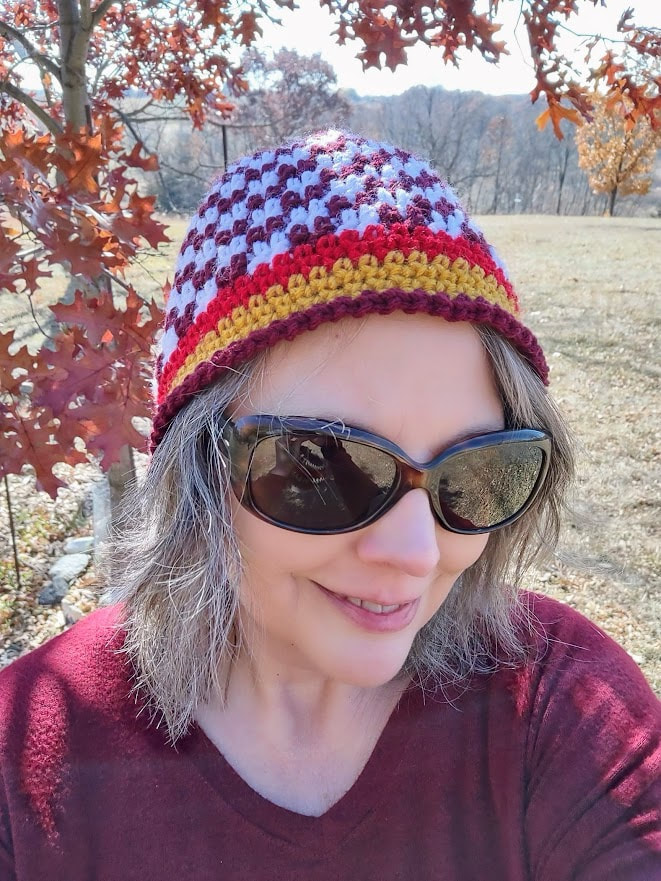
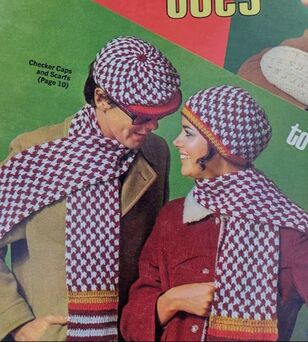
This week it's the Checkered Cap for Girls. I considered making the Boy version but it wanted buckram to make the visor more solid and that seemed like more work than I wanted to do.  Because this booklet was issued by a yarn brand company, they give very specific yarns for each pattern. None of those are available today. They all seem to be worsted or aran weight though and I found colors to match their colors in my stash. This pattern uses a size H hook and gives a gauge. I sort of checked the gauge and it seemed close enough. With the H hook, this went pretty quickly even with the constant color changes. The pattern has excellent instructions on how to change colors in the pattern and gave instructions for every row instead of saying something like, "continue in pattern." Overall, this was a well written pattern that worked up quickly and looks pretty good. As I was making it, I felt like I was making a hat in my high school colors (maroon and white) until I got to the brim with the added red and gold. This would be an easy hat to do in team colors.
I took this with when we went to the Arboretum so I could get some photos with a background other than my deck. I'm giving this a 5 out of 5. It was easy to make, the instructions were good, it's cute and it fits!
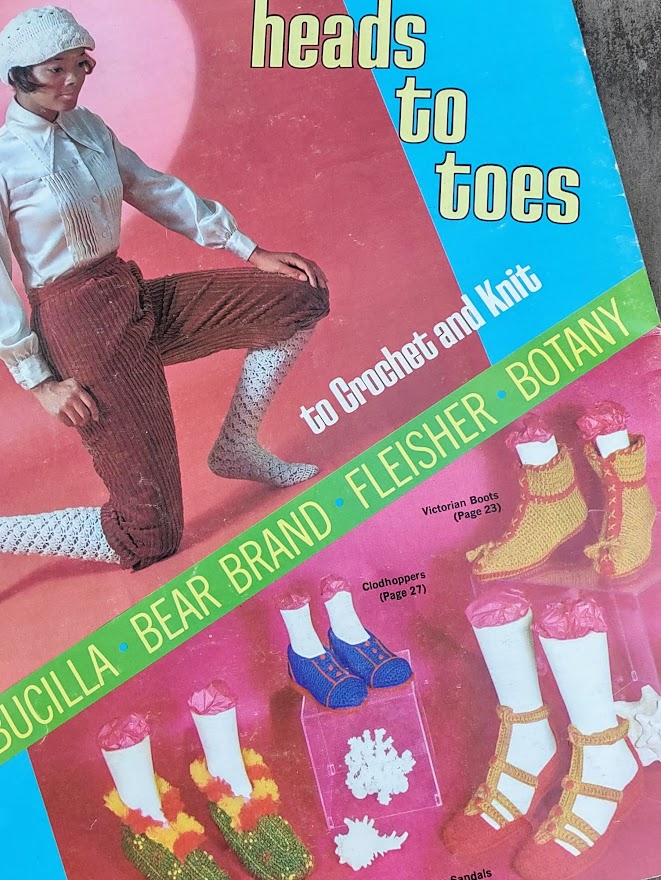
Next week's hat is done already and is one of my favorites! November will have two hats from this booklet called Heads to Toes. This booklet has both knitted and crocheted hats and um...things for your feet.
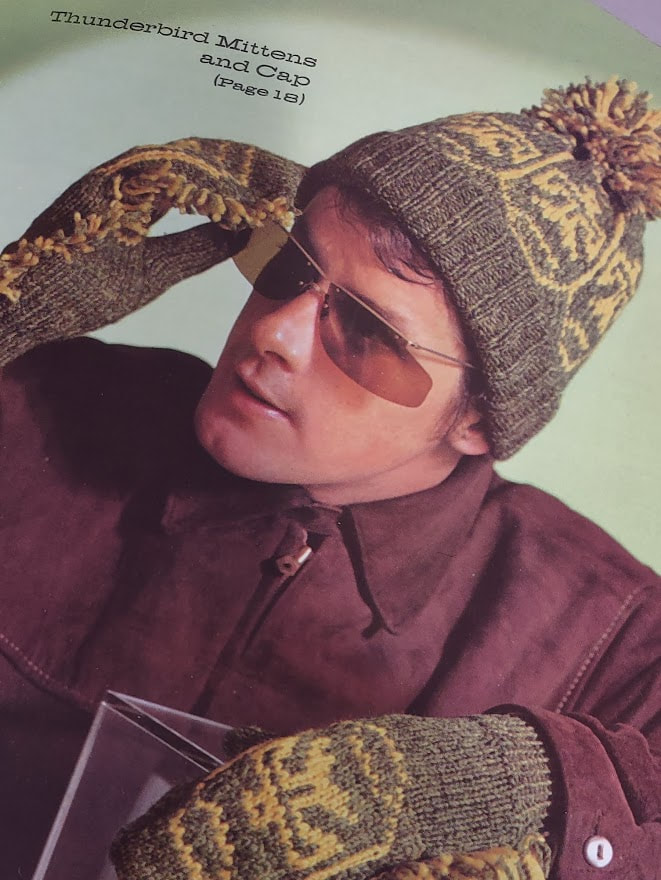
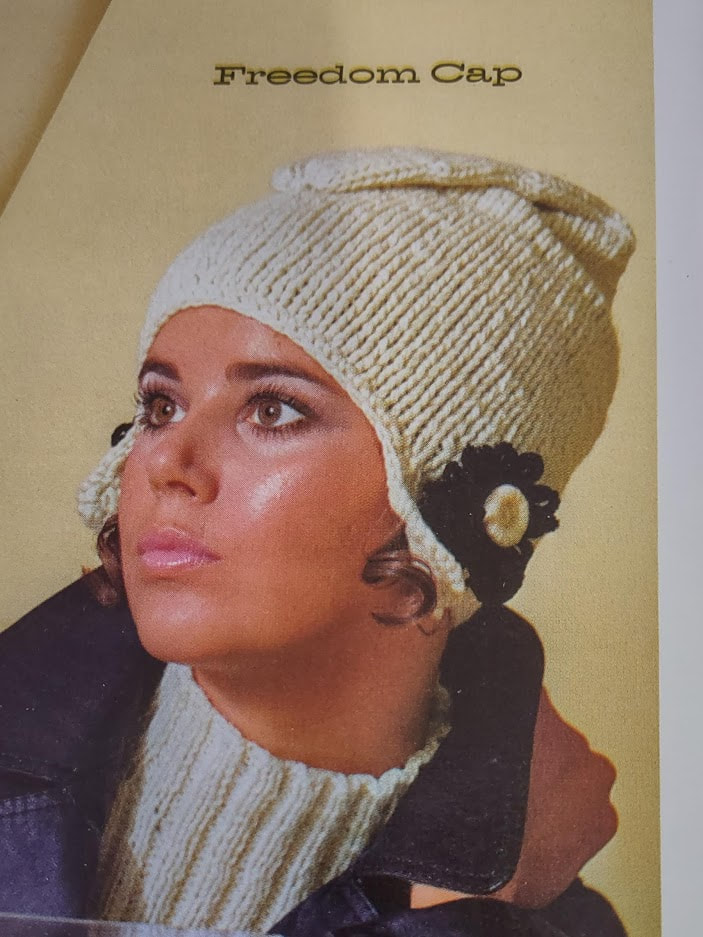
The "Toes" patterns include; Indian Moccasins, Clodhoppers, Victorian Boots and Roman Sandals. I'm intrigued by the Victorian boots but the colors they used are pretty terrible. They're the item under the word "Botany" in the photo above. One of the ways you can tell this is from the 70s is that some of the patterns and the names they chose for them are not appropriate today and of course they are all crocheted. We have a Babushka scarf and an entire outfit that is dressed up to look Native American made of a Serapi, Head Band and Pouch (aka poncho, headband and purse). That leaves me with four patterns from this booklet that I can make. Three of the remaining four have brims and want you to crochet some buckram between the layers and I'm just not willing to put that much work into a hat. The checkered hat on the cover will be the first one I make. Some of the knitted hats are fun too. I really like the Swirl Hats. They're unusual but kind of cool. The cowl on the one the woman is wearing looks practical and cozy. The Thunderbird Mittens have that odd fringe that seems like it would get snagged on everything but the hat is pretty nice. The Pom-pon Hat has a lot of pom-pons on it so I guess that name makes sense. I'm not sure I would wear that but it might fit someone else's personality perfectly. I don't know what's going on with the Freedom Hat. Is it called that because there's so much free space in that flap that's folded over her head? (After I posted this a reader gave me a link to this information about Phrygian hats which was very interesting and completely explains why that hat is called a Freedom hat. )
Next week I'll have the finished Checkered Hat to show you!
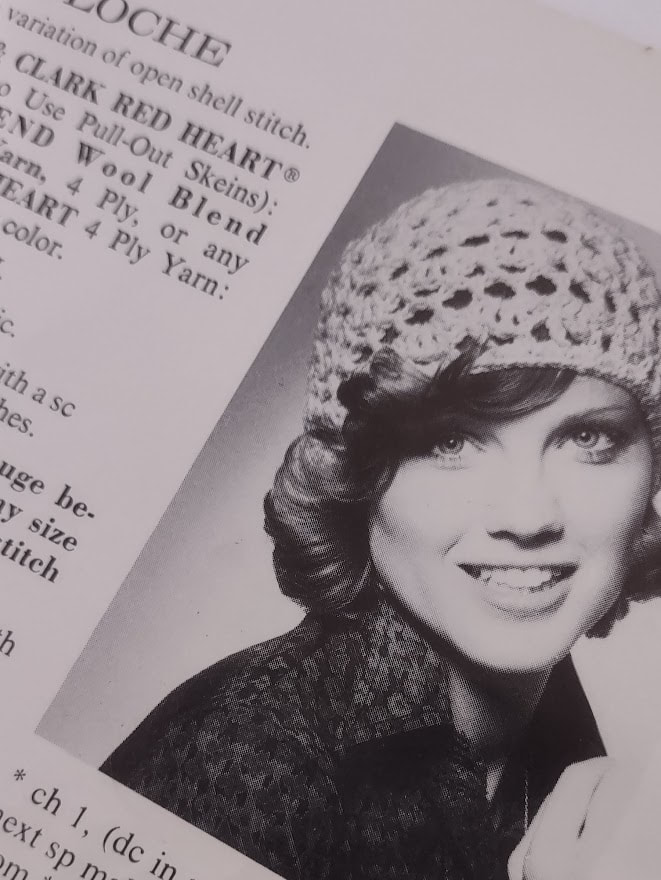
For this week's pattern, I pulled out one of the Learn to Crochet books. This one is from 1974 and has a dozen or so patterns in it with the Cloche being the very last one in the book.
This pattern uses 3 ounces of worsted weight yarn, a size I hook, 3/4 yard of round elastic. I had some leftover worsted weight Lion Brand Heartland in the color Hot Springs (aka purple) but I didn't have 3 ounces. I had about 2 ounces. I've found that a lot of patterns will give the amount needed as a full skein even if you don't use the full skein. The hat seemed pretty open so I was skeptical that I'd really need 3 ounces. The pattern gives a gauge that I matched so I started. It's worked in the round starting at the top. About half way through the hat I realized two things; I was not going to have enough yarn to do that hat as written and, I didn't want to do the hat as written. It was already close to the right size and since I wasn't going to have enough yarn I decided to cut it from 20 rounds to 15. The last step tells you to hold the elastic along the top of the last round and work over it. What it doesn't tell you is to measure it around your head and tie the ends together at some point. Maybe that's obvious but this is a beginners book and I think they should be a little more specific in their instructions.   I'm giving this a 3.5 out of 5. If I'd done all of the rows it would have been pretty slouchy. Even though I made the elastic shorter it's still kind of loose around my head. The directions could have been a little clearer for the finishing. It mostly fits.
For November, I'm going to pull from a couple of different booklets. The first one is from 1970 and has some interesting patterns.... |


Proudly powered by Weebly